Modern LED strips are magical things. The WS2812 has allowed the quick and easy creation of addressable RGB installations, revolutionizing the science of cool glowy things. However, this accessibility means that it’s easy to get in over your head and make some simple mistakes that could end catastrophically. [Thomas] is here to help, outlining a common mistake made when building with LED strips that is really rather dangerous.
The problem is the combination of hardware typically used to run these LED strings. They’re quite bright and draw significant amounts of power, each pixel drawing up to 60 mA at full-white. In a string of just 10 pixels, the strip is already drawing 600 mA. For this reason, it’s common for people to choose quite hefty power supplies that can readily deliver several amps to run these installations.
It’s here that the problem starts. Typically, wires used to hook up the LED strips are quite thin and the flex strips themselves have a significant resistance, too. This means it’s possible to short circuit an LED strip without actually tripping the overcurrent protection on something like an ATX power supply, which may be fused at well over 10 amps. With the resistance of the wires and strip acting as a current limiter, the strip can overheat to the point of catching fire while the power supply happily continues to pump in the juice. In a home workshop under careful supervision, this may be a manageable risk. In an unattended installation, things could be far worse.
Thankfully, the solution is simple. By installing an appropriately rated fuse for the number of LEDs in the circuit, the installation becomes safer, as the fuse will burn out under a short circuit condition even if the power supply is happy to supply the current. With the example of 10 LEDs drawing 600 mA, a 1 amp fuse would do just fine to protect the circuit in the event of an accidental short.
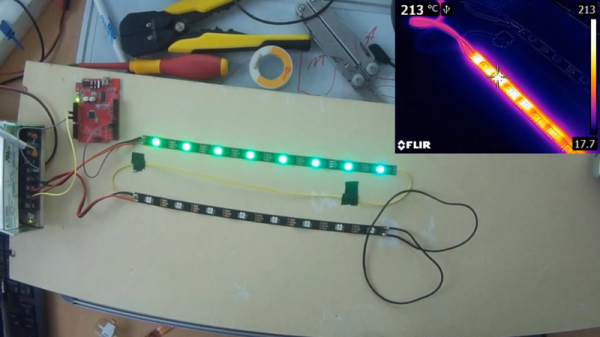
It’s a great explanation of a common yet dangerous problem, and [Thomas] backs it up by using a thermal camera to illustrate just how hot things can get in mere seconds. Armed with this knowledge, you can now safely play with LEDs instead of fire. But now that you’re feeling confident, why not check out these eyeball-searing 3 watt addressable LEDs?
Continue reading “The Engineering Case For Fusing Your LED Strips” →

 A delightful version of a clever one-dimensional game has been made by [Critters] which he calls


