Vintage Organ Donates Parts For Two New Instruments

It’s often hard to know what to do with a classic bit of electronics that’s taking up far too much of the living room for its own good. But when the thing in question is an electronic organ from the 1970s, the answer couldn’t be clearer: dissect it for its good parts and create two new instruments with them.

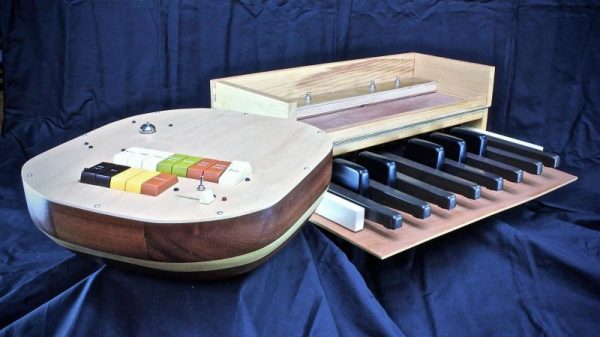
Judging by [Charlie Williams]’ blog posts on his Viscount Project, he’s been at this since at least 2014. The offending organ, from which the project gets its name, is a Viscount Bahia from the 1970s that had seen better days, apparently none of which included a good dusting. With careful disassembly and documentation, [Charlie] took the organ to bits. The first instrument to come from this was based on the foot pedals. A Teensy and a custom wood case turned it into a custom MIDI controller; hear it in action below. The beats controller from the organ’s keyboard was used for the second instrument. This one appears far more complex, not only for the beautiful, hand-held wooden case he built for it, but because he reused most of the original circuitry. A modern tube amp was added to produce a little distortion and stereo output from the original mono source, with the tip of the tube just peeking above the surface of the instrument. We wish there were a demo video of this one, but we’ll settle for gazing at the craftsmanship.

In a strange bit of timing, [Elliot Williams] (no relation, we assume) just posted an Ask Hackaday piece looking for help with a replacement top-octave generator for another 1970s organ. It’s got a good description of how these organs worked, if you’re in the mood to learn a little more.

Continue reading “Vintage Organ Donates Parts For Two New Instruments”

Ask Hackaday: How Do You DIY A Top-Octave Generator?

One of the great joys of Hackaday are the truly oddball requests that we sometimes get over the tip line. Case in point: [DC Darsen] wrote in with a busted 1970s organ in need of a new top-octave generator, and wondered if we could help. He had found a complicated but promising circuit online, and was wondering if there was anything simpler. I replied “I should be able to get that done with a single Arduino” and proceeded to prove myself entirely wrong in short order.

So we’re passing the buck on to you, dear Hackaday reader. Can you help [DC Darsen] repair his organ with a minimum amount of expenditure and hassle? All we need to do is produce twelve, or maybe thirteen, differently pitched square waves simultaneously.

Continue reading “Ask Hackaday: How Do You DIY A Top-Octave Generator?”

A Parallel Port Synthesiser For Your DOS PC

It is a great shame that back in the days when a typical home computer had easy low-level hardware access that is absent from today’s machines, the cost of taking advantage of it was so high. Professional PCBs were way out of reach of a home constructor, and many of the integrated circuits that might have been used were expensive and difficult to source in small quantities.

Here in the 21st century we have both cheap PCBs and easy access to a wealth of semiconductors, so enthusiasts for older hardware can set to work on projects that would have been impossible back in the day. Such an offering is [Serdef]’s Tiny Parallel Port General MIDI Synthesizer for DOS PCs, a very professionally produced synth that you might have paid a lot of money to own three decades ago.

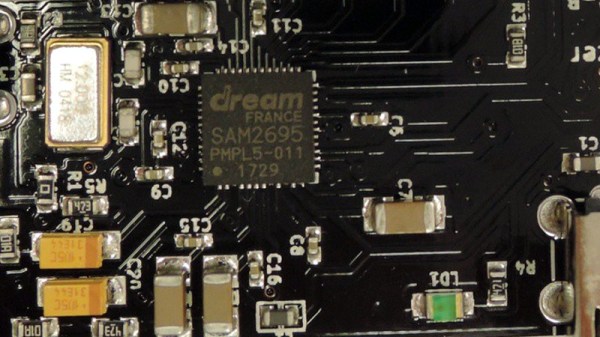
At its heart is a SAM2695 synthesiser chip, and the board uses the parallel port as an 8-bit I/O port. The software side is handled by a TSR (a Terminate and Stay Resident driver loaded at startup, for those of you who are not DOS aficionados), and there are demonstrations of it running with a few classic games.

If the chip used here interests you, you might like to look at a similar project for an Arduino. The Kickstarter we covered is now long over, but you can also find it on GitHub.

Wireless Headphone Hack Dangles Batteries Like Earrings

Koss Porta Pro headphones are something of a rarity in the world of audio gear: they’re widely regarded as sounding great, but don’t cost an exorbitant amount of money. Since the line was introduced in 1984, they’ve been the go-to headphones for those who don’t subscribe to the idea that you should have to take out a loan from the bank just to enjoy your music.

[Jake Bickhard] is a confirmed Porta Pro disciple, owning enough pairs of them that he’s cagey about confirming how many are actually kicking around his home. The only thing he doesn’t like about them is the fact that they’re wired. As it happens, Koss just recently came out with a Bluetooth version of the venerable headphones. But he thought he could do just as well combining a pair of his with a water damaged pair of Bluetooth earbuds he had lying around.
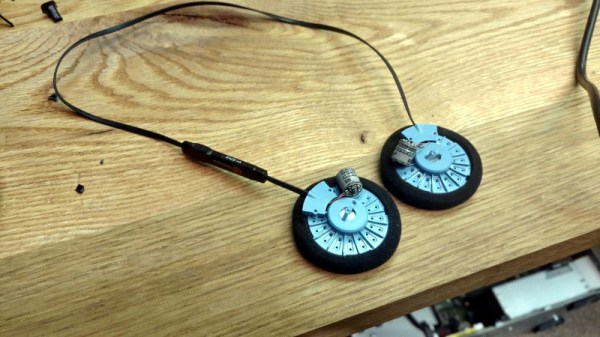
The Porta Pros are easy to take apart, and removing the old wire was no problem. He then cut the “buds” on the Bluetooth earbuds he had, with the intention of just striping the wires and soldering it up to the pads on the Porta speakers. But things didn’t quite go as expected.

What [Jake] hadn’t realized was that the battery for the Bluetooth earbuds wasn’t in the main housing, the power comes from a tiny battery inside each bud. That meant he needed to keep the batteries connected even though the Porta Pro obviously doesn’t have a spot to mount them. In the future he says he’ll address the issue properly, but for now the two batteries hang from the headphones: making it look like he’s wearing the world’s ugliest earrings. But at least he’s happy with the performance of the finished modification, saying they’re even louder now than when they were when wired.

This is a perfect project if you’re cursed with a mobile device that had enough “courage” to take the headphone jack away from you. Though you might first want to study the fine art of soldering headphone wires.

Stylish Business Card With A Stylophone Built In

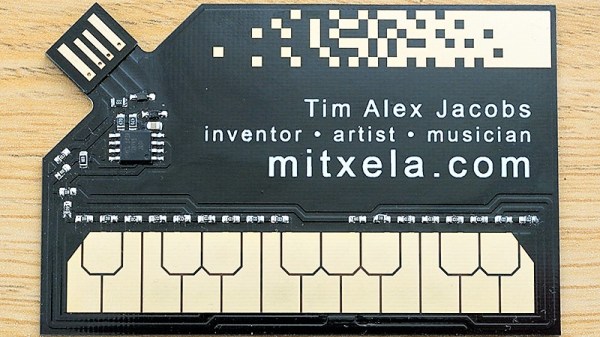
If you’re in the electronics business, PCB business cards seem like a natural fit. They may be impractical and expensive, but they can really set you apart from that boring paper card from Vistaprint crowd. But they need to make sense for what you do, so for a musician and MIDI pro, this MIDI-controller stylophone business card is a real eye- and ear-catcher.

This business card is an idea that [Mitxela] has been kicking around for a while, and he even built a prototype a couple of years ago. The homebrew card, made using the spray paint, laser etching, and ferric chloride method, worked well enough as a proof of concept, but it was a little rough around the edges and needed the professional touch of a PCB fabricator. We’ve got to say that the finished cards are pretty darn sexy, with the black resist contrasting nicely against the gold-immersion pads. He selected a 1-mm thick board and made the USB connector as a separate small board; snapped off of the main board and reflowed back on, it builds up the edge connector to the proper thickness. The parts count is low — just an ATtiny85 and a resistor ladder to encode each key, with a simple jumper used as the stylus. The device itself is just a MIDI controller and makes no music on its own, but we still think this is a pretty creative way to hang out a shingle.

[Mitxela] has quite a few interesting builds, and is no stranger to our pages. Check out his recent servo-plucked MIDI music box, or these amazing miniature LED earrings.

Continue reading “Stylish Business Card With A Stylophone Built In”

Stomping On Microcontrollers: Arduino Mega Guitar Effects Pedal

Effects pedals: for some an object of overwhelming addiction, but for many, an opportunity to hack. Anyone who plays guitar (or buys presents for someone who does) knows of the infinite choice of pedals available. There are so many pedals because nailing the tone you hear in your head is an addictive quest, an itch that must be scratched. Rising to meet this challenge are a generation of programmable pedals that can tweak effects in clever ways.

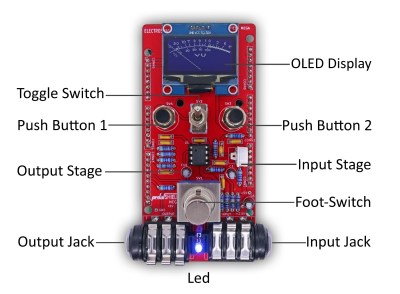
With this in mind, [ElectroSmash] are back at it with another open source offering: the pedalSHIELD MEGA. Aimed at musicians and hackers who want to learn more about audio, DSP and programming, this is an open-hardware/open-software shield for the Arduino MEGA which transforms it into an effects pedal.

The hardware consists of an analog input stage which amplifies and filters the incoming signal before passing it to the Arduino, as well as an output stage which does the DAC-ing from the Arduino’s PWM outputs, and some more filtering/amplifying. Two 8-bit PWM outputs are used simultaneously to make pseudo 16-bit resolution — a technique you can read more about in their handy forum guide.

The list of effects currently implemented covers all the basics you’d expect, and provides a good starting point for writing custom effects. Perhaps a library for some of the commonly used config/operations would be useful? Naturally, there are some computational constraints when using an Arduino for DSP, though it’s up to you whether this is a frustrating fact, or an opportunity to write some nicely optimised code.

[ElectroSmash] don’t just do pedals either: here’s their open source guitar amp.

Continue reading “Stomping On Microcontrollers: Arduino Mega Guitar Effects Pedal”

Synthbike Rolls To The Beat

Modular synthesizers are some of the ultimate creative tools for the electronic musician. By experimenting with patch leads, knobs and switches, all manner of rhythmic madness can be conjured out of the æther. While they may overflow with creative potential, modular synths tend to fall down in portability. Typically built into studio racks and composed of many disparate modules, it’s not the sort of thing you can just take down the skate park for a jam session. If only there was a solution – enter the madness that is Synth Bike.

Synth Bike, here seen in the 2.0 revision, impresses from the get go, being built upon a sturdy Raleigh Chopper chassis. The way we see it, if you’re going to build a synth into a bicycle, why not do it with some style? From there, the build ratchets up in intensity. There’s a series of sequencer modules, most of which run individual Arduino Nanos. These get their clock from either a master source, an external jack, or from a magnetic sensor which picks up the rotation of the front wheel. Your pace dictates the tempo, so you’ll want to work those calves for extended raves at the park.

The features don’t stop there – there are drums courtesy of a SparkFun WAV Trigger, an arcade button keyboard, and a filter board running the venerable PT2399 digital delay chip. It’s all assembled on a series of panels with wires going everywhere, just like a true modular should be.

The best thing is, despite the perplexing controls and arcane interface, it actually puts out some hot tunes. It’s  not the first modular we’ve seen around these parts, either.