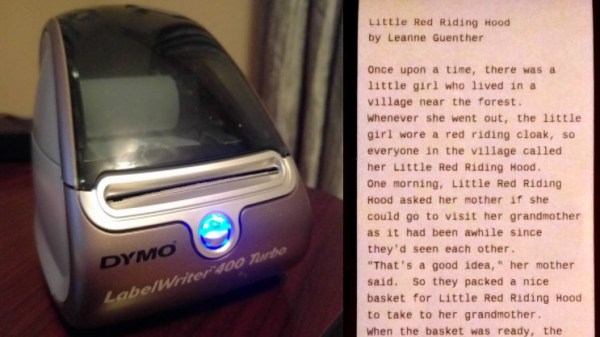
KVM Foot Switch In A Few Steps

[Radishmouse], despite the handle, is not a mouse guy. Give him a keyboard and he will get around just fine in any OS or program. As it is, he’s got a handful of ThinkPads, each running a different OS. He wanted to be able to switch his nice mechanical keyboard between two laptops without the hassle of unplugging and replugging the thing. His solution: a DIY KVM foot switch.

He’s been learning about electronics and 3D design, and this problem was the perfect opportunity to dig in and get his hands dirty. After learning enough about the USB protocol and switches to figure out what had to happen, he made a prototype from a pâte tub. Though undeniably classy, this vessel would never survive the rigors of foot-stomping in feline territory. Fortunately, [radishmouse] has also been learning about 3D design. After some trial and error, he came up with a sturdy, curvy 3D-printed two-piece enclosure. We particularly like the blocks built into the bottom piece that shore up the USB ports.

There are lots of reasons to build input controls for those under-utilized appendages at the ends of your legs. You could control your ‘scope with a probe in each hand, or use a foot switch to relocate an inconvenient power button.

Via [r/functionalprint]

A Macro Keyboard In A Micro Package

Remember back in the early-to-mid 2000s when pretty much every cheap USB keyboard you could find started including an abundance of media keys in its layout? Nowadays, especially if you have a customized or reduced-sized mechanical keyboard, those are nowhere to be seen. Whenever our modern selves need those extra keys, we have to turn to external peripherals, and [Gary’s] Knobo is one that looks like it could’ve come straight out of a fancy retail package.

The Knobo is a small macro keypad with 8 mechanical Cherry-style keys and a clickable rotary encoder knob as its main feature. Each key and knob gesture can be customized to any macro, and with five gestures possible with the knob, that gives you a total of thirteen inputs. On top of that, the build and presentation look so sleek and clean we’d swear this was a product straight off of Teenage Engineering’s money-printing machine.

The actions you can do with those inputs range from simple media controls with a volume knob all the way to shortcuts to make a Photoshop artist’s life easier. Right now you can only reprogram the Knobo’s Arduino-based firmware with an In-Circuit Serial Programmer to change what the inputs do, but [Gary] is currently working on configuration software so that users without any programming knowledge will be able to customize it too.

Knobs are just one of those things that everyone wants to use to control their computers, much like giant red buttons. Alternative input devices can range from accessibility-designed to just downright playful. Whatever the inspiration is for them, it’s always nice to see the creativity of these projects.

Continue reading “A Macro Keyboard In A Micro Package”

Laser Trip Wire Hides What You’re (Not) Working On

We assume your office policy allows for reading Hackaday during work hours. But what about cruising reddit, or playing Universal Paperclips? There’s a special kind of stress experienced when attempting to keep one eye on your display and the other on the doorway; all the while convinced the boss is about to waltz into the room and be utterly disappointed in you.

But fear not, for [dekuNukem] has found the solution with Daytripper. This wireless laser tripwire communicates back to your computer using NRF24 (2.4 Ghz on the ISM band) and can be used to invisibly cordon off a door or hallway and fire a scripted action on your computer if its beam has been broken. Nominally this is used to send the keyboard command that hides all open windows, but we’re sure the imaginative readers of Hackaday could come up with all sorts of alternate uses for this capability.

The Daytripper transmitter uses a laser time-of-flight sensor, in this case the very small VL53L0X by STMicroelectronics. It’s best situated so the laser will be bounced straight back at it. It has a range of about four feet, which is perfect for covering a door, though a wide hallway could give it some trouble. [dekuNukem] admits that the 5 Hz scan rate means a sufficiently fast moving adversary might slip past the sensor, but if they’re trying that hard to see what’s on your monitor, they probably deserve a peek.

On the receiver side, there’s a small board that plugs into your computer and mimics a USB keyboard. It has a selector switch on the side that allows the user to set what key sequence will be “typed” once the system has been tripped. It has built-in support for minimizing all windows or locking the computer, or you can set it to send ALT + Pause, which you can listen for and act on however you see fit.

If you want to build your own Daytripper, the firmware and hardware are both available on GitHub under an MIT license. For those who prefer instant gratification, [dekuNukem] is doing a small production run and offering them up on Tindie.

Cash Register Hotkey Board Is On The Money

When presented with a pile of free electronics, sometimes you grab things for their ‘someday’ potential. Other times, you know exactly what you’re after. [Bryce] got a big old cash register for free from school because they’ve moved on to using Square or something. He scored two VFDs and a solenoid as a side effect, but he was really after that sturdy keypad and its paper-label keycaps, ripe for customization.

Two hours of reverse engineering later, he knew where the button presses were going well enough to reach for a knockoff Arduino Pro Micro and a couple of shift registers. [Bryce] wanted his hotkey-board to handle keyboard presses as well as media key input, so he went with the HID-Project library over the standard-issue Arduino version. Of course, the whole point of making your own hotkey-board is customization. For [Bryce], that means Word shortcuts and quick access to Greek letters for all those engineering reports he must write. Dig that Half-Life lambda!

What? You don’t have access to free electronics? You could make a hotkey-board out of arcade buttons. Those things can really take a beating.

The Not Quite USB-C Of Nintendo Switch Accessories

Historically gaming consoles are sold at little-to-no profit in order to entice customers with a low up-front price. The real profits roll in afterwards from sales of games and accessories. Seeking a slice of the latter, aftermarket accessory makers jump in with reverse-engineered compatible products at varying levels of “compatible”.

When the Nintendo Switch was released with a standard USB-C port for accessories, we had hoped those days of hit-or-miss reverse engineering were over, but reality fell short. Redditor [VECTORDRIVER] summarized a few parts of this story where Nintendo deviated from spec, and accessory makers still got things wrong.

Officially, Nintendo declared the Switch USB-C compliant. But as we’ve recently covered, USB-C is a big and complicated beast. Determined to find the root of their issues, confused consumers banded together on the internet to gather anecdotal evidence and speculate. One theory is that Nintendo’s official dock deviated from official USB-C dimensions in pursuit of a specific tactile feel; namely reducing tolerance on proper USB-C pin alignment and compensating with an internal mechanism. With Nintendo playing fast and loose with the specs, it makes developing properly functioning aftermarket accessories all the more difficult.

But that’s not the only way a company can slip up with their aftermarket dock. A teardown revealed Nyko didn’t use a dedicated chip to manage USB power delivery, choosing instead to implement it in software running on ATmega8. We can speculate on why (parts cost? time to market?) but more importantly we can read the actual voltage on its output pins which are too high. Every use becomes a risky game of “will this Switch tolerate above-spec voltage today?” We expect that as USB-C becomes more common, it would soon be cheapest and easiest to use a dedicated chip, eliminating the work of an independent implementation and risk of doing it wrong.

These are fairly typical early teething problems for a new complex technology on their road to ubiquity. Early USB keyboard and mice didn’t always work, and certain combination of early PCI-Express cards and motherboards caused damage. Hopefully USB-C problems — and memories of them — will fade in time as well.

[via Ars Technica]

[Main image source: iFixit Nintendo Switch Teardown]

Jazzberry Bakes The Pi Into A Mechanical Keyboard

If you hang around Hackaday long enough, pretty soon you’ll start to see some patterns emerging. As the nexus of all things awesome in the hacking world, our front page offers a unique vantage point by which you can see what’s getting folks excited this particular month, year, or decade. Right now we can tell you hackers love the Raspberry Pi, 3D printing, and perhaps above all, they can’t get enough mechanical keyboards.

So that makes the Jazzberry by [Mattis Folkestad] something of a perfect storm in the hacker world. The project uses a 3D printed enclosure to combine a Raspberry Pi 3B+ and an Ajazz AK33 mechanical keyboard into a single unit like the home computers of old. Honestly, we’re just glad he didn’t sneak an ESP8266 in there; as the resulting combination might have been enough to crash the site.

That being said, we can’t help but notice there’s a lot of open space inside the 3D printed enclosure. Right now there’s nothing inside but the Raspberry Pi, which only takes up a fraction of the internal volume. Adding a battery and hard drive would be the logical next steps, but it could also be outfitted with a suite of radios and various other hacking and security research accoutrements. We’ve seen an influx of such builds over the last few months, and the Jazzberry seems like it could make a very slick entry into this burgeoning category of mobile pentesting devices.

The STL files are designed specifically for the combination of hardware that [Mattis] used, but it shouldn’t be too difficult to modify them for your own purposes. Even if you stick with the same AK33 keyboard, an upgrade to the impressively powerful Raspberry Pi 4 would be more than worth the time fiddling with the STLs in your CAD tool of choice. If you really want to go all in, add a display and you’re well on the way to that cyberdeck you’ve always wanted.

A Power Bank For Soldering On The Go

If you have a portable gadget, the chances are you’ve probably used power banks before. What few could have predicted when these portable battery packs first started cropping up is that they would one day be used to power soldering irons. Dissatisfied with the options currently available on the market, [Franci] writes in with his own power bank specifically designed for use with his TS80 portable soldering iron.

The electronics side of this build is simple and easy to replicate, with 4 18650 Li-ion cells standard to most high-capacity power banks and an off-the-shelf Fast Charge module serving as the brains of the operation. The beauty of this project however lies in the design of the actual case, completely custom-made from scratch to be 3d printed.

Unlike most power banks, where the outputs stick out to the side and leave the connectors prone to being bumped and damaged, [Franci] engineered his case so the ports are stacked on top and facing inwards. That way, USB plugs are contained within the footprint of the power bank’s body, and therefore protected from bending or snapping off in the socket. He also gracefully provides all instructions needed to make your own, including a wiring guide and a reminder about safety when dealing with battery packs.

If you’re unfamiliar with the TS80 soldering iron, we’ve featured the younger sibling of the TS100 in a previous post. And if you think this power bank is too simple for you, don’t worry, we’ve got you covered.