Pixy2 Is Super Vision For Arduino Or Raspberry Pi

A Raspberry Pi with a camera is nothing new. But the Pixy2 camera can interface with a variety of microcontrollers and has enough smarts to detect objects, follow lines, or even read barcodes without help from the host computer. [DroneBot Workshop] has a review of the device and he’s very enthused about the camera. You can see the video below.

When you watch the video, you might wonder how much this camera will cost. Turns out it is about $60 which isn’t cheap but for the capabilities it offers it isn’t that much, either. The camera can detect lines, intersections, and barcodes plus any objects you want to train it to recognize. The camera also sports its own light source and dual servo motor drive meant for a pan and tilt mounting arrangement.

Continue reading “Pixy2 Is Super Vision For Arduino Or Raspberry Pi”

Low-cost Autonomous Rover Will Drive Your Projects

[Miguel] wanted to get more hands-on experience with Python, so he created a small robotic platform as a testbed. But as such things sometimes go, it turns out the robot he created is a worthy enough project in its own right. With a low total cost and highly flexible design, it might be exactly what you’re looking for. Who knows, it might even bootstrap that rover project that’s been wandering around the back of your mind.

The robot makes use of an exceptionally simple 3D printed frame. No complicated suspension to worry about, no fasteners to hold together multiple printed parts. It’s just a single printed “L” shaped piece that has mounts for the motors and front sensor board. As designed it simply drags its tail around, which should work fine on smooth surfaces, but might need a bit of tweaking if you plan on taking your new robotic friend on an outdoor adventure.

There’s a big open area on the “tail” to mount a Raspberry Pi, but you could really put whatever board or microcontroller you wish here. In the nose is an HC-SR04 ultrasonic sensor, which [Miguel] is using to perform obstacle avoidance in his Python code. A dual H-Bridge motor driver controls the pair of gear motors in the front to provide propulsion and steering, and a buck converter steps down the 7.4V from the 2S LiPo battery to power the electronics. He’s even included a mini breadboard so you can add circuits or sensors as experimental payloads.

If you’re looking for a slightly more advanced 3D printed robotics platform, we’ve seen our fair share. From the nearly fully printed Watney to a tank that looks like it’s ready for front-line combat.

Creating A 3G Raspberry Pi Smartphone

It’s hard to believe, but the Raspberry Pi has now been around long enough that some of the earliest Pi projects could nearly be considered bonafide vintage hacks at this point. A perfect example are some of the DIY Raspberry Pi smartphone projects that sprung up a few years back. Few of them were terribly practical to begin with, but even if you ignore the performance issues and bulkiness, the bigger problem is they relied on software and cellular hardware that simply isn’t going to cut it today.

Which was exactly the problem [Dylan Radcliffe] ran into when he wanted to create his own Pi smartphone. There was prior art to use as a guide, but the ones he found were limited to 2G cellular networks which no longer exist in his corner of the globe. He’s now taken on the quest to develop his own 3G-capable Pi smartphone, and his early results are looking very promising.

Inside the phone, which he calls the rCrumbl, [Dylan] has crammed a considerable amount of hardware. A Raspberry Pi 3B+ with attached Adafruit touchscreen LCD is the star of the show, but there’s also a Pi camera module, battery charging circuit, and Adafruit FONA 3G modem (which also provides GPS). Powering the device is a 2500 mAh 3.7V battery, which reportedly delivers a respectable 8 to 12 hour runtime.

The case is 3D printed, and [Dylan] says it took a long time to nail down a design that would fit all of his hardware, keep things from shifting around, and still be reasonably slim. Obviously DIY phones like this are never going to be as slim as even the chunkiest of modern smartphones, but the rCrumbl looks fairly reasonable for a portable device. We especially like the row of physical buttons he’s included along the bottom of the screen, which should help with the device’s usability.

Speaking of usability, that’s where [Dylan] still has his work cut out for him. The existing software he’s found won’t work on 3G, so he’s going to have to come up with his own software stack to provide a proper phone interface. As it stands he’s made a call on the rCrumbl using command line tools, but while that might score you some extra geek points at the next hacker meetup, it’s not exactly going to fly for daily use. He mentions he would love to talk to any developers out there that would like to team up on the software side of the project.

We’ve covered one of the 2G Pi smartphones in the past, and of course the ZeroPhone is a very interesting project if you don’t mind the “dumb phone” interface. But if you’re looking for something that’s fairly close to commercial devices in terms of usability, you might just want to roll your own Android phone.

Hack My House: ZoneMinder’s Keeping An Eye On The Place

Hacks are often born out of unfortunate circumstances. My unfortunate circumstance was a robbery– the back door of the remodel was kicked in, and a generator was carted off. Once the police report was filed and the door screwed shut, it was time to order cameras. Oh, and record the models and serial numbers of all my tools.

We’re going to use Power over Ethernet (POE) network cameras and a ZoneMinder install. ZoneMinder has a network trigger capability, and we’ll wire some magnetic switches to our network of PXE booting Pis, using those to inform the Zoneminder server of door opening events. Beyond that, many newer cameras support the Open Network Video Interface Forum (ONVIF) protocol and can do onboard motion detection. We’ll use the same script, running on the Pi, to forward those events as well.

Many of you have pointed out that Zoneminder isn’t the only option for open source camera management. MotionEyeOS, Pikrellcam, and Shinobi are all valid options.  I’m most familiar with Zoneminder, even interviewing them on FLOSS Weekly, so that’s what I’m using.  Perhaps at some point we can revisit this decision, and compare the existing video surveillance systems.

Continue reading “Hack My House: ZoneMinder’s Keeping An Eye On The Place”

Real Time Satellite Tracker Shows You What’s Going Over Your Head

Whilst modern technology relies heavily on satellites, it’s easy to forget they’re there; after all, it’s hard to comprehend mostly-invisible lumps of high-density tech whizzing around above you at ludicrous speeds. Of course, it’s not hard to comprehend if you’ve built a real-time satellite tracker which displays exactly what’s in orbit above your head at any given time. [Paul Klinger]’s creation shows the position of satellites passing through a cylinder of 200 km radius above the tracker.

Each layer of LEDs represents a specific band of altitude, whilst the colour of the LEDs and text on the screen represent the type of object. The LEDs themselves are good old WS2812b modules, soldered to a custom PCB and mounted in a 3D-printed stand. The whole thing is a really clean build and looks great – you can see it in action in the video after the break

On the software side, a Raspberry Pi is in charge, running Python which makes use of pyorbital for some of the heavy lifting. The data is taken from space-track.org, who provide a handy API. All the code is on the project GitHub, which also includes the 3D print and PCB files.

[Paul] answers questions in the reddit thread, and gives more detail in this reddit comment. The project was inspired by one of our favorite sites: stuffin.space.

Some of the satellites the device displays are de-commisioned and inactive. Space junk is a significant problem, one which can only be tackled by a space garbage truck.

Continue reading “Real Time Satellite Tracker Shows You What’s Going Over Your Head”

Blazing Fast Raspberry Pi Display Driver Will Melt Your Face Then Teach You How

Reader [poipoi] recently wrote into our tip line to tell us about an “amazingly fast” Raspberry Pi display driver with a README file that “is an actual joy to read”. Of course, we had to see for ourselves. The fbcp-ili9341 repo, by [juj], seems to live up to the hype! The software itself appears impressive, and the README is detailed, well-structured, educational, and dare we say entertaining?

The driver’s main goal is to produce high frame rates — up to around 60 frames per second — over an SPI bus, and it runs on various Raspberry Pi devices including the 2, 3 and Zero W. Any video output that goes to the Pi’s HDMI port will be mirrored to a TFT display over the SPI bus. It works with many of the popular displays currently out there, including those that use the ILI9341, ILI9340, and HX8357D chipsets.

The techniques that let [juj] coax such frame rates out of a not-terribly-fast serial bus are explained in detail in the README’s How it Works section, but much of it boils down to the fact that it’s only sending changed pixels for each frame, instead of the full screen. This cuts out the transmission of about 50% of the pixels in each update when you’re playing a game like Quake, claims the author. There are other interesting performance tweaks as well, so be sure to check out the repo for all the details.

There’s a video comparing the performance of fbcp-ili9341 to mainline SPI drivers after the break.

Continue reading “Blazing Fast Raspberry Pi Display Driver Will Melt Your Face Then Teach You How”

Stock Looking PSP Hides A Raspberry Pi Zero

We don’t see that many PSP hacks around these parts, perhaps because the system never attained the same sort of generational following that Nintendo’s Game Boy line obtained during its heyday. Which is a shame, as it’s really a rather nice system with plenty of hacking potential. Its big size makes it a bit easier to graft new hardware into, the controls are great, and there’s no shortage of them on the second-hand market.

Hopefully, projects like this incredible “PiSP” from [Drygol] will inspire more hackers to take a second look at Sony’s valiant attempt at dethroning Nintendo as the portable king. With his usual attention to detail, he managed to replace the PSP’s original internals with a Pi Zero running RetroPie, while keeping the outside of the system looking almost perfectly stock. It wasn’t exactly a walk in the park, but we’d say the end definitely justifies the means.

The first half of the project was relatively painless. [Drygol] stripped out all the original internals and installed a new LCD which fit so well it looks like the thing was made for the PSP. He then added a USB Li-ion charger board (complete with “light pipe” made out of 3D printer filament), and an audio board to get sound out of the usually mute Pi Zero. He had some problems getting everything to fit inside of the case. The solution was using flat lithium batteries from an old Nokia cell phone to slim things down just enough to close up the PSP’s case with some magnets.

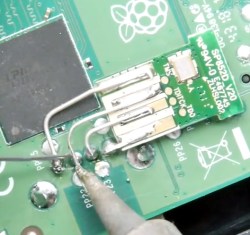
What ended up being the hardest part of the build was getting the original controls working. [Dyrgol] wanted to use the original ZIF connector on the PSP’s motherboard so he wouldn’t have to modify the stock ribbon cable. But it was one of those things that was easier said than done. Cutting out the section of PCB with the connector on it was no problem, but it took a steady hand and a USB microscope to solder all the wires to its traces. But the end result is definitely a nice touch and makes for a cleaner installation.

We’ve covered the exciting world of PSP homebrew, and even DIY batteries built to address the lack of original hardware, but it’s been fairly quiet for the last few years. Here’s hoping this isn’t the last we’ve seen of Sony’s slick handheld on these pages.

Continue reading “Stock Looking PSP Hides A Raspberry Pi Zero”