The Return Of SCSI

There was a time when high-performance disk drives used SCSI — the Small Computer System Interface — and everything else was kid stuff. Now, advanced forms of SCSI are still around but there are other high-performing disk interfaces, too. But some old gear really loves their classic SCSI ports, and [Adrian] decided to try hooking some of them up to some modern computers. You can see how he did in the video below.

The key to the attempt is a USB to SCSI adapter which was unusual but not unheard of, and [Adrian] came across one from 1999. Of course, you have to wonder if a modern computer will support the device or will be able to load the drivers from the old CD.

Continue reading “The Return Of SCSI”

A circuit board with a memory chip in a socket, and many memory chips in foam

Simple DRAM Tester Built With Spare Parts

Some of the most popular vintage computers are now more than forty years old, and their memory just ain’t how it used to be. Identifying bad memory chips can quickly become a chore, so [Jan Beta] spent some time putting together a cheap DRAM tester out of spare parts.

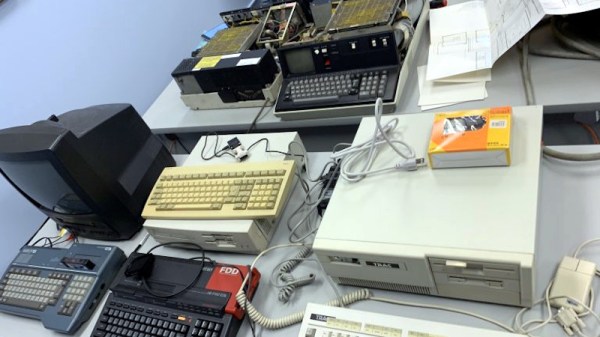
This little tester can be used with 4164 and 41256 DRAM memory chips. 4164 DRAM was used in several popular home computers throughout the 1970s and 1980s, including the Apple ][ series, Commodore 64, ZX Spectrum and many more. Likewise, the 41256 was used in the Commodore Amiga. These computers are incredibly popular in the vintage computing community, and its not uncommon to find bad memory in any of them.

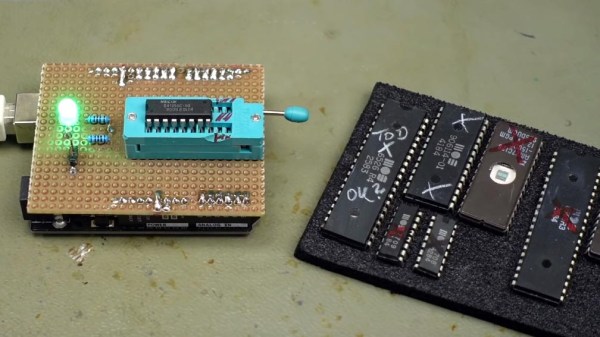
With an Arduino at its core, this DRAM tester uses the most basic of electronic components, and any modest tinkerer should have pretty much everything in stock. The original project can be found here, including the Arduino code. Just pop the suspect chip into the ZIF socket, hit the reset switch, and wait for the LED – green is good, and red means it’s toast.

It’s a great sanity check for when you’re neck deep in suspect DRAM. A failed test is a sure sign that the chip is bad, however the tester does occasionally report a false pass. Not every issue can be identified with such a simple tester, however it’s great at weeding out the chips that are definitely dead.

If you’re not short on cash, then the Chip Tester Pro may be more to your liking, however it’s hard to beat the simplicity and thriftiness of building your own simple tester from spare parts. If you’re a little more adventurous, this in-circuit debugger could come in handy.

Continue reading “Simple DRAM Tester Built With Spare Parts”

90s PC With Modern Parts Throws Many Off Track

When building a desktop computer, usually the budget is the limiting factor. Making sacrifices on one part in order to improve another without breaking the bank is part of the delicate balance of putting together a capable PC. If you’re lucky enough to have the sponsors that [Shank] has though, caution can be thrown to the wind with regards to price for some blisteringly fast parts. Putting them in a ’90s Hot Wheels case to build the ultimate sleeper PC, though, is just icing on the top.

This isn’t quite as simple as replacing a motherboard in a modern PC case, though. The Hot Wheels PC used a mini-ITX standard and is quite a bit smaller than most modern computers outside of something like a Mac Mini. To get the RTX 3060 GPU into the computer the shrouds needed to be removed to save space, plus an unusual 92mm form factor liquid CPU cooler needed to be installed. An equally obscure power supply was included to round out the Ryzen 9 build and after a lot of tinkering eventually all the parts were fitted into this retro case including the original, working floppy disk drive. After that some additional case modding was installed such as RGB lighting, wheels with spinning rims, a spoiler, and an exhaust pipe.

The main issue with this build was temperatures, and both the CPU and GPU were topping out at dangerously high temperatures until [Shank] installed a terrifying 11,000 RPM case fan. With a series of original CRT monitors to go along with this sleeper PC he can have up to 9 displays with surprisingly high video quality thanks to the fundamental properties of CRTs. The video is definitely worth a watch and falls right in line with some of [Shank]’s other console mods that he is famous for such as this handheld Virtual Boy.

Thanks to [Fast Rock Productions] for the tip!

Continue reading “90s PC With Modern Parts Throws Many Off Track”

the Caps Wiki logo, showing a few bulging capacitors, with "Caps Wiki" text under it

Caps Wiki: Place For You To Share Your Repair Notes

A right-to-repair battle is being waged in courts. The results of it, we might not see for a decade. The Caps Wiki is a project tackling our repairability problem from the opposite end – making it easy to share information with anyone who wants to repair something. Started by [Shelby], it’s heavily inspired by his vintage tech repairs experience that he’s been sharing for years on the [Tech Tangents] YouTube channel.

When repairing a device, there are many unknowns. How to disassemble it? What are the safety precautions? Which replacement parts should you get? A sporadic assortment of YouTube videos, iFixit pages and forum posts might help you here, but you have to dig them up and, often, meticulously look for the specific information that you’re missing.

The Caps Wiki talks a lot about capacitor replacement repairs – but not just that. Any device, even modern ones, deserves a place on the Caps Wiki, only named like this because capacitor repairs are such a staple of vintage device repair. You could make a few notes about something you’re fixing, and have them serve as help and guideline for newcomers. With time, this won’t just become a valuable resource for quick repairs and old tech revival, but also a treasure trove of datapoints, letting us do research like “which capacitors brands or models tend to pass away prematurely”. Plus, it also talks about topics like mains-powered device repair safety or capacitor nuances!

Continue reading “Caps Wiki: Place For You To Share Your Repair Notes”

Don’t Miss The VCF Indoor Swap Meet This Weekend

We don’t need to tell you that these last couple of years have been a real drag for in-person events. But at long last, after a bit of a false start last summer, it seems like we can finally start peeking our heads out and getting back to doing the things we love. So why not celebrate by taking part in that most sacred of geek pastimes: poring through boxes of dusty old gear in search of some electronic treasure?

On Saturday the Vintage Computer Federation (VCF) is holding an indoor swap meet at the InfoAge Science and History Museum in New Jersey, and everyone’s invited. Vintage computers will naturally be the main attraction, but if their previous events are any indication, you should expect the tables to be filled with a healthy mix of general electronics, classic games, and amateur radio gear as well. The doors open up at 8 AM sharp and it’s free to get in, so we’d suggest showing up early for the best selection.

A little less than a year ago we visited the previous VCF swap meet, which back then had to be held outdoors due to COVID-19 concerns, and were blown away by the selection of weird and wonderful hardware up for grabs. From arcade cabinets to luggable PCs and 3D printers, there was a little something for everyone, and all at rock-bottom prices. The only real gripe we had was the lack of on-site food and beverage, which according to the VCF website, has been addressed this time around. No word on whether or not there’s an ATM handy though, so you might want to stop and get some cash before heading to the relatively remote Camp Evans site.

After the swap meet wraps up at 2 PM, be sure to check out the Vintage Computer Federation’s permanent collection at InfoAge, as well as all the incredible exhibits and mini-museums the site has to offer. If nothing else, we strongly recommend you take the walk down the road to the TLM-18 Space Telemetry Antenna that Princeton University currently operates as Linux-powered software defined radio telescope.

The fine folks of the VCF are also hard at work putting together their annual East Coast Vintage Computer Festival, which will take place at InfoAge on April 22nd to the 24th, so mark your calendars.

A vintage pocket calculator with extra exposed circuitry added

I2C Breathes New Life Into Casio Pocket Calculator

When is a pocket calculator more than just a calculator? [Andrew Menadue] has been pushing the limits of his 1970s Casio FX-502P by adding all sorts of modern functionality via the calculator’s expansion port.

Several older Casio calculators included an expansion port for connecting cassette tape storage and printing functionality. Data on the FX-502P could be saved on cassette tape using the well-known Kansas City standard, however this signal was produced by Casio’s FA-1 calculator cradle, not the FX-502P itself. To interact with the calculator itself would require an understanding of whatever protocol Casio designed for this particular model.

It turns out that the protocol is a little quirky compared to its contemporaries, with variable length data packets and inverted data logic, (zero volts is ‘1’ and three volts is ‘0’). Once the protocol was untangled, it was ‘simply’ a matter of connecting the calculator to the GPIO interface on the STM32, and using some software wizardry to start shooting data packets back and forth.

This hack can be used to send and receive data from an SD card (via a RAM buffer), however it’s the other expansion capabilities that really make us wonder. [Andrew] has demonstrated how easy it is to add a real-time clock or thermal printer. Using the I2C capabilities of the STM32, it’s likely that all sorts of gadgets and sensors could be coupled with this vintage calculator, and many others like it.

You can find even more details about this hack over here, including some follow up videos to the original hack. No stranger to vintage calculators, we last featured [Andrew] after he retrofitted a modern LCD display to an old Casio. It’s charming to see how these calculators are far from obsolete.

Continue reading “I2C Breathes New Life Into Casio Pocket Calculator”

Dial Into The Internet Like It’s 1999

Restoring classic hardware of any sort is a great hobby to have, whether it’s restoring vintage cars, tools, or even antique Apple or Commodore computers. Understanding older equipment can help improve one’s understanding of the typically more complicated modern equivalents, plus it’s just plain fun to get something old up and running again. Certainly we see more retro computing restorations around here, but one thing that we don’t typically see much of is the networking equipment that would have gotten those older computers onto the early Internet. [Retrocet] has a strong interest in that area, and his latest dial-up server really makes us feel like we’re back in the 90s.

This home networking lab is built around a Cobalt Qube 2 that was restored after it was gifted to him as a wedding present. The Qube had a cutting edge 250 MHz 64-bit processor with up to 256 MB of RAM, and shipped with a customized Linux distribution as an operating system. The latest upgrade to this build sped up the modems to work at their full 56k rates which involved the addition of a DIVA T/A ISDN terminal and some additional hardware which ensures that incoming calls to the modems are digital. Keeping the connections digital instead of analog keeps the modems from lowering their speed to 33k to handle the conversions.

Until recently, [Retrocet] was running some of the software needed for this setup in a custom virtual machine, but thanks to the full restoration of the Qube and some tweaking of the Red Hat Linux install to improve the Point-to-Point Protocol capabilities of the older system, everything is now running on the antique hardware. If you are like [Retrocet] and have a bunch of this older hardware sitting around, there are still some ISPs available that can provide you with some service.