Reviving An 8-Inch Hard Drive From The 1980s

As part of the eternal quest within the realm of retrocomputing, storage devices can be one of the most challenging, especially when it comes to firmly obsolete hard drives, such as the CDC Finch drive. This compact 8″ HDD replaced the previous 14″ models with a form factor that was decidedly more portable. These Finch drives being 1980s technology that got run pretty hard before their retirement, it’s little wonder that they’d end up on the repair bench over at [Usagi Electric]

A CDC Finch hard disk drive, available in 8 to 32 MB for all your data storage needs. (Credit: Usage Electric)

Introduced in the early 1980s, the CDC Model 9410 Finch drive was unlike its 14″ predecessors in that it is a sealed unit, with maintenance-free air filtration. With the 14″ models you’d have both fixed and swappable platters, with far less consideration for dust exposure. This makes these Finch drives more touchy to work on, not unlike HDDs today, and adds to the excitement when repairing one of these old drives.

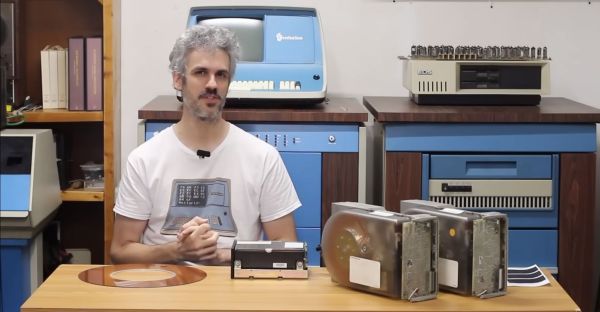
In this video, two differently broken Finch drives are discussed. Both appear to have an issue on the controller board, with one not responding to communications on the interface, while the other featuring a dead short on the interface pins. The first drive was brought back to life by replacing a dead SN75110 line driver IC, as well as a dead 7818 voltage regulator that was only outputting a sad 0.3 V.

Unfortunately, after half an hour of uptime and in the process of dumping data the drive errored out with a Not Ready, indicating that there are further issues on the controller board to fix. The good news here is that the platters appear to be pretty robust, but the controller boards on these old drives tend to develop issues over the years, something which will be further explored in upcoming videos.

Continue reading “Reviving An 8-Inch Hard Drive From The 1980s”

A Cycle-Accurate Sega Genesis With FPGA

The Field-Programmable Gate Array (FPGA) is a powerful tool that is becoming more common across all kinds of different projects. They are effectively programmable hardware devices, capable of creating specific digital circuits and custom logic for a wide range of applications and can be much more versatile and powerful than a generic microcontroller. While they’re often used for rapid prototyping, they can also recreate specific integrated circuits, and are especially useful for retrocomputing. [nukeykt] has been developing a Sega Genesis clone using them, with some impressive results.

The Sega Genesis (or Mega Drive) was based around the fairly common Motorola 68000 processor, but this wasn’t the only processor in the console. There were a number of coprocessors including a Z80 and several chips from Yamaha to process audio. This project reproduces a number of these chips which are cycle-accurate using Verilog. The chips were recreated using images of de-capped original hardware, and although it doesn’t cover every chip from every version of the Genesis yet, it does have a version of the 68000, a Z80, and the combined Yamaha processor working and capable of playing plenty of games.

The project is still ongoing and eventually hopes to recreate the rest of the chipset using FPGAs. There’s also ongoing testing of the currently working chips, as some of them do still have a few bugs to work out. If you prefer to take a more purist approach to recreating 90s consoles, though, we recently featured a project which reproduced a Genesis development kit using original hardware.

Thanks to [Anonymous] for the tip!

Odd Retrocomputer Had A Graphics Coprocessor

[Noel’s Retro Lab] scored an unusual 1980s vintage computer sold in Japan and Spain. The Seconinsa FM-7 appears to be a popular Fujitsu Japanese computer altered to fit the Spanish market. They seem to be pretty rare, at least in our part of the world. The outside appearance was very nice for the time, with a large keyboard and plenty of expansion ports. But the board has an unusual feature considering the era — dual CPUs. One 6809 executed your program, and another 6809 handled graphics output. You can see the machine in the video below.

There are two 32K ROMs, but the machine specifications claim only 48K. After dumping the ROMs, it turns out one of the ROMs has two copies of the same data. You can imagine they might not want to decode the entire address space. It could be that they needed 16K of space for other devices.

It wasn’t just the ROMs. The video RAM is pretty strange, too, as [Noel] explains. There are even some static RAMs the computer doesn’t claim. It appears these act as communication pipes between the two CPUs. In fact, it turns out that even the keyboard has its own 4-bit CPU, so the machine actually has a total of 3 CPUs!

This was a heavy-duty design for the time it was built. [Noel] wanted to fire it up, but he had to figure out the cables since the computer didn’t have any with it. Some clever repurposing of stock cables provided monochrome video output. Color display was a bit more complicated, but not impossible.

[Noel] winds the video up with some history of the companies behind the machine. The Spanish government wanted to use the FM-7 in the classroom, but the program failed to materialize. Want to see what it was like to program the thing? Here’s the Basic reference manual (in Spanish). Most of the documentation for the machine is either in Spanish or Japanese.

While this certainly is a rare computer, at least there’s a record of its existence. If you want to see what a Japanese computer looked like a few decades earlier, check out the FACOM 128B.

Continue reading “Odd Retrocomputer Had A Graphics Coprocessor”

Apple III Slows Down To Smell The Roses

The most collectible items in the realm of vintage computers often weren’t the most popular of their era. Quite the opposite, in fact. Generally the more desireable systems were market failures when they first launched, and are now sought out because of a newly-appreciated quirk or simply because the fact that they weren’t widely accepted means there’s fewer of them. One of the retro computers falling into this category is the Apple III, which had fundamental hardware issues upon launch leading to a large recall and its overall commercial failure. [Ted] is trying to bring one of these devices back to life, though, by slowing its clock speed down to a crawl.

The CPU in these machines was a Synertek 6502 running at 1.8 MHz. With a machine that wouldn’t boot, though, [Ted] replaced it with his own MCL65+, a purpose-built accelerator card based on the 600 MHz Teensy 4.1 microcontroller in order to debug the motherboard. The first problem was found in a ROM chip which prevented the computer loading anything from memory, but his solution wouldn’t work at the system’s higher clock speeds. To solve that problem [Ted] disabled the higher clock speed in hardware, restricting the system to 1 MHz and allowing it to finally boot.

So far there haven’t been any issues running the computer at the slower speed, and it also helps keep the computer cooler and hopefully running longer as well, since the system won’t get as hot or unstable. This isn’t [Ted]’s first retrocomputing rodeo, either. His MCL chips have been featured in plenty of other computers like this Apple II which can run at a much faster rate than the original hardware thanks to the help of the modern microcontroller.

Let’s Listen To A Tape — Paper Tape

These days, data is as likely as not to be “in the cloud.” Otherwise, it’s probably on a USB flash drive or SD card. But in the old days, paper tape was a widespread way to store and retrieve data. A common way to start the day at the office was to toggle in a few dozen bytes of bootloader code, thread a bigger bootloader tape into your TeleType paper tape reader, and then get your coffee while the more capable bootloader clunked its way into memory. Then you could finish your brew while loading the tape with your compiler or whatever you wanted. [Scott Baker] has a Heathkit H8 and decided using a paper tape machine with it and some of his other gear would be fun.

Instead of a TeleType, [Scott] picked up a used paper tape machine from FANUC intended for the CNC industry. They are widely available on the surplus market, although a working machine might run you $500. [Scott] paid $200, so he had some work to do to make the unit operational.

Paper tape had a few varieties. For computer work, you usually had a tape that could hold eight holes across, one for each bit in a byte. However, there are also 6-bit and 5-bit tapes for special purposes or different encodings (old TeleTypes used 5-bit characters in Baudot). The paper choice varied too. You could get plain paper, oiled paper, which maybe didn’t jam as often, and Mylar, which is less likely to shred up when it does jam.

To make things even more difficult, the machines all worked a little differently as well. Sure, punches almost all use solenoids. But the tape transport was sometimes a pinch roller and sometimes a sprocket-style drive. Reading the holes could be done with mechanical contacts or optically. Some punches left little “hanging chads” on the tape, so you didn’t have to empty a confetti box to throw away the chad.

The repair job was interesting. Inside the machine is an 8051 microcontroller. There was no clock, and the circuit used two custom modules. One was simply a crystal, and the other was an oscillator. Removing both allowed a modern can oscillator to replace both modules. The next problem was a fried serial output driver. Replacing that got things working except for random resets due to a faulty brown-out reset circuit. That was easy to fix, too.

Of course, if you are really cheap, it is easy to make a paper tape reader from 8 phototransistors, and pulling tape through by hand isn’t unheard of. It can even talk USB. We’ve even seen a conference badge that can read tapes.

Continue reading “Let’s Listen To A Tape — Paper Tape”

TinyBasicLike: A Target-Independent BASIC Interpreter

In the long and winding history of BASIC, it’s sometimes hard to keep track of all the different variants and dialects. Some may still remember TinyBASIC, which was published in 1976 as Palo Alto Tiny BASIC by [Gordon Brandly]. Later, TinyBASIC was modified by a number of people including [Scott Lawrence] who created TinyBASIC Plus (TBP). Inspired by this, [Karl] figured he could improve on TBP by making the original C-based project even easier to port by removing whatever platform dependencies he could find, creating what he calls TinyBasicLike.

The main change is that TinyBasicLike consists out of two C files, with one containing the core code, and the second the platform-specific details that can be used by the core. Although [Karl] started off with the Palo Alto Tiny BASIC-like code by [Scott Lawrence], he decided to make it into his own by making a few alterations, such as adding left and right shift operators, adding an ADDR() function, expanding the features of INPUT and adding multiple logical operators.

In the example STM32F4 project linked on the project page it is demonstrated how to target a new platform with TinyBasicLike. Performance on the STM32F4 Discovery board with a simple counting loop yielded about 6 lines of TBL program code per millisecond. For a 168 MHz STM32 MCU that’s definitely not astounding, but considering how straightforward Tiny BASIC (and TBL as a consequence) is, it’s definitely no slouch.

This is probably a good time to remind that BASIC was the original champion of cross-platform programming and the source of countless fond (and frustrating) memories.

A ZX Spectrum with a Microdrive emulator plugged into its expansion port

A Modern Replacement For The ZX Spectrum’s Odd Tape Storage System

Unless you were lucky enough to be able to afford a floppy disk drive, you probably used cassette tapes to store programs and data if you used pretty much any home computer in the 1980s. ZX Spectrum users, however, had another option in the form of the Microdrive. This was a rather unusual continuous-loop mini-tape cartridge that could store around 100 kB and load it at lightning speed, all at a much lower price point than a floppy drive. The low price came at the cost of poor durability however, and after four decades it’s becoming harder and harder to find cartridges that work reliably. [Derek Fountain] therefore set out to make a modern Microdrive emulator that stores data on SD cards.

Several projects already exist to replace Microdrives, but they typically also need the ZX Interface 1, a serial/network expansion module that’s becoming equally hard to find. Hence [Derek]’s choice to make his emulator a completely standalone system that directly plugs into the Spectrum’s expansion port.

A 3D-printed box with a PCB inside holding three Raspberry Pi Picos and an SD cardThe system is housed in a 3D-printed enclosure that holds two PCBs. Three Raspberry Pi Picos run the show inside: one to hold the ZX Interface 1’s ROM image and interface with the Spectrum’s bus, another to simulate the Microdrive, and a third to run the user interface and communicate with the SD card. The user can choose between eight tape images stored in .MDR format by using two pushbuttons and a rotary encoder, with a small OLED display showing the machine’s configuration.

While you might think that three dual-core 133 MHz ARM CPUs would run circles around the Spectrum’s Z80, it actually took quite a bit of work to get everyting running properly in real time. The 3.5 MHz bus clock rate gave the second Pico precious little time to fetch the required bytes out of its flash memory. Its RAM was fast enough for that, but too small to hold all eight tape images at the same time. In the end, [Derek] settled on using a separate 8 MB SPI DRAM chip that could easily keep up the data rate, with the Pi just using its GPIO ports to shuttle the data around.

All source code and extensive documentation are available on Derek’s excellent blog post and GitHub page. Be sure to also check out [Jenny]’s detailed review and teardown if you’d like to know more about the weird and wonderful Microdrive system.

Thanks for the tip, [Andrew]! Continue reading “A Modern Replacement For The ZX Spectrum’s Odd Tape Storage System”