As useful as electronics are, the need to have some source of power for them can be a bit of an issue, especially for small, portable devices. One of the most low-tech but universally applicable source is human mechanical power, as demonstrated by the rugged 1980s-era Messenger II tape player in a recent [TechMoan] video. Without beating around the bush, this is indeed a device created by an evangelical organization (GRN) that missionaries would take with them to wherever their mission took them. Naturally this put the availability of power from a wall outlet in question, especially in the 1980s when this tape player was produced. Continue reading “Ready For The Rapture: This Wind-Up Cassette Player Can Play Anywhere”→
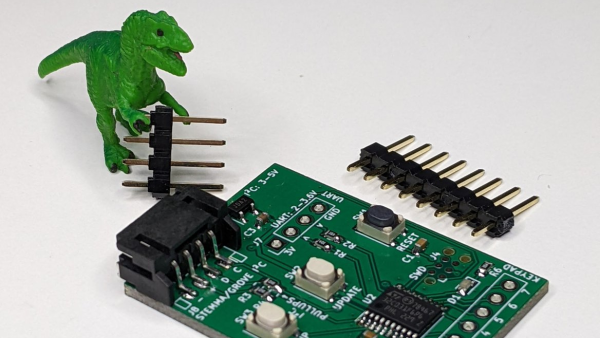
If you’ve scavenged some random keypads and want to reuse them in a project without the hassle of figuring out the pinouts, then [Cliff Biffle] has an interface module for you. The Keypad Go connects to the mystery keypad via an 8-pin 0.1 inch header, and talks to your own project using I2C and/or serial.
You could categorize the mechanism at work as machine learning of a sort, though it’s stretching definitions a bit, as there is no ChatGPT or GitHub Copilot wizardry going on here. But you must teach the module during an initial calibration sequence, assigning a 7-bit ASCII character to each key as you press it. Once trained, it responds to key presses by sending the pre-assigned character over the interface. Likewise, key releases send the same character but with the 8th bit set.
The heart of the board is either an STM32G030 or STM32C011/31, depending on parts availability we presume. I2C connectivity is over a four-pin STEMMA connector, and logic-level serial UART data is over a four-pin 0.1 inch pin header. [Cliff] plans to release the firmware and schematics as open source soon, after cleaning up the code a bit. The device is also for sale on Tindie, though it looks like they won’t be back in stock until later on in the month.
Longtime readers might recognize [Cliff] from his impressive m4vga project which we covered back in 2015, where he manages to generate 800×600 VGA signals at 60 Hz from an STM32F4-family microcontroller.
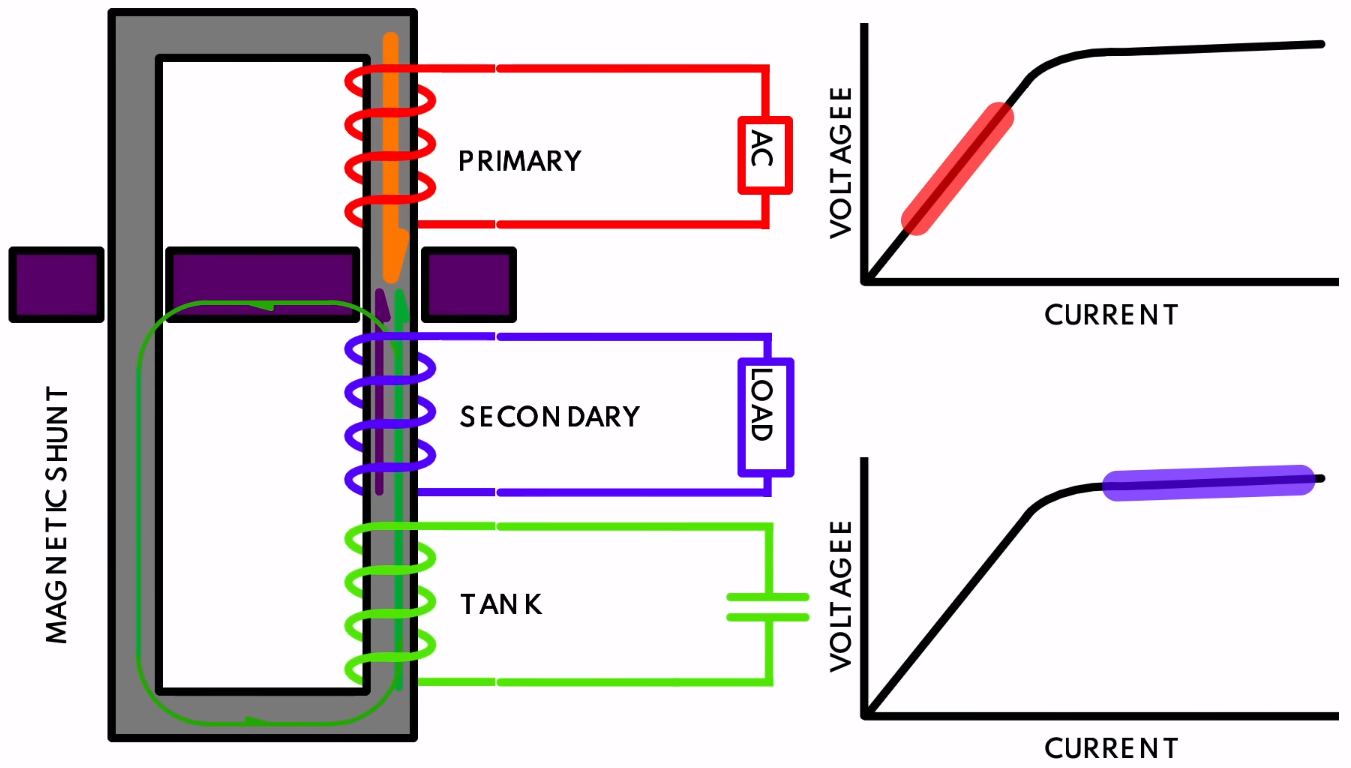
Ferroresonant (constant voltage) transformer diagram. Secondary side is kept in full saturation with the tank, keeping voltage constant. (Credit: Usagi Electric)
While troubleshooting the power supply of a 1970s Centurion system, [Usagi Electrics] came across a fascinating feature of these units: the ferroresonant, or constant voltage transformer (CVT). The main difference between a regular transformer and a CVT is that the former has a quite direct correlation between the input and output voltage, as the magnetic flux induced on the primary side is directly translated to the secondary (output) side.
A CVT adds a second element on the secondary side in the form of a tank circuit (LC circuit) – essentially a large capacitor – along with a magnetic shunt that ‘short circuits’ part of the magnetic flux between the primary and secondary side. The result of this is that even as the primary side is kept well below the saturation point where efficiency plummets, the secondary side is kept within this saturation region, enabling a very constant output voltage across a wide range of input voltages. For the Centurion’s power supply this input range goes from 90 to 130 VAC.
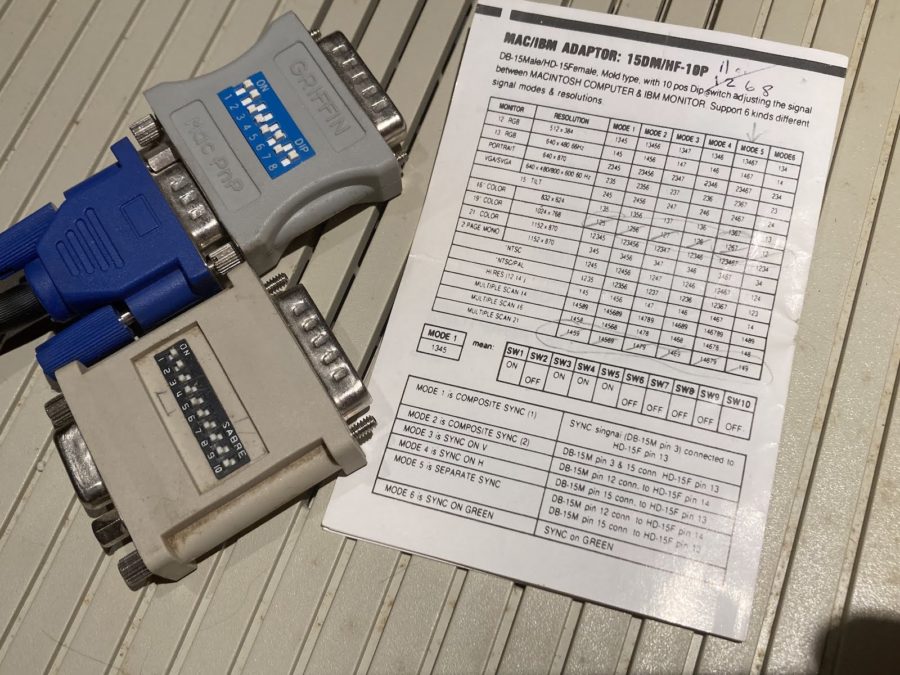
Old-school Macintosh-to-VGA adapter. Just solve for X, set the right DIP switches and you’re golden.
If you’re the happy owner of a vintage Apple system like a 1989 Macintosh IIci you may know the pain of keeping working monitors around. Unless it’s a genuine Apple-approved CRT with the proprietary DA-15-based video connector, you are going to need at least an adapter studded with DIP switches to connect it to other monitors. Yet as [Steve] recently found out, the Macintosh’s rather selective use of video synchronization signals causes quite a headache when you try to hook up a range of VGA-equipped LCD monitors. A possible solution? Extracting the sync signal using a Texas Instruments LM1881 video sync separator chip.
Much of this trouble comes from the way that these old Apple systems output the analog video signal, which goes far beyond the physical differences of the DA-15 versus the standard DE-15 D-subminiature connectors. Whereas the VGA standard defines the RGB signals along with a VSYNC and HSYNC signal, the Apple version can generate HSYNC, VSYC, but also CSYNC (composite sync). Which sync signal is generated depends on what value the system reads on the three sense pins on the DA-15 connector, as a kind of crude monitor ID.
Theoretically this should be easy to adapt to, you might think, but the curveball Apple throws here is that for the monitor ID that outputs both VSYNC and HSYNC you are limited to a fixed resolution of 640 x 870, which is not the desired 640 x 480. The obvious solution is then to target the one monitor configuration with this output resolution, and extract the CSYNC (and sync-on-green) signal which it outputs, so that it can be fudged into a more VGA-like sync signal. Incidentally, it seems that [Steve]’s older Dell 2001FP LCD monitor does support sync-on-green and CSYNC, whereas newer LCD monitors no longer list this as a feature, which is why now more than a passive adapter is needed.
Although still a work-in-progress, so far [Steve] has managed to get an image on a number of these newer LCDs by using the LM1881 to extract CSYNC and obtain a VSYNC signal this way, while using the CSYNC as a sloppy HSYNC alternative. Other ICs also can generate an HSYNC signal from CSYNC, but those cost a bit more than the ~USD$3 LM1881.
If you buy any kind of electronic gadget today, chances are it’s powered by a microcontroller with a program stored in its internal flash ROM. That program’s code is often jealously guarded by the manufacturer, who will try their best to make sure you can’t just read back the chip’s contents by using lock bits or some sort of encryption. Things were more laid back in the 1970s and ’80s, when code was stored unencrypted in standard EPROM chips, or, for high-volume applications, in mask ROMs integrated in microcontrollers. Reading back the code of such micros was still very difficult because chips simply didn’t have a way of dumping their contents. [Andrew Menadue] ran into this issue when trying to repair an old HP calculator printer, and had to apply a clever hack to dump the contents of its Mostek MK3870 chip.
The main trick [Andrew] used was one discovered by [Sean Riddle] and explained on his website. It makes use of the fact that the MK3870 has a TEST pin that can be used to disable the mask ROM and load alternative program code directly into the micro’s processing core. By setting up a LOAD instruction pointing at a ROM location and briefly disabling test mode while that instruction is executed, the ROM’s contents can be read out by the externally loaded program.
Simple as this hack may seem, actually implementing it was tricky enough because of the strict timing requirements between signals on the clock pins, the data bus, and the TEST pin. [Andrew] got it to work on his Raspberry Pi Pico setup most of the time, but somehow the micro still returned a plainly wrong value every few hundred bytes. Not willing to spend too much time debugging this issue, [Andrew] applied a rather crude hack to his code: instead of reading each byte once, it runs the read cycle 200 times, and only returns a result when all 200 runs return the same value. Dumping the entire 4 kB of ROM now takes several minutes, but this isn’t much of an issue since [Andrew] only has one chip to read out.
If you do have a bucketload of MK3870 chips that you need to dump, you might want to try and optimize the code on [Andrew]’s GitHub page. It’s a lucky coincidence that the ‘3870 has the exploitable TEST feature; often, the only way to get inside mask ROM code is by decapping the chip and optically reading the bits one by one. Mask ROMs are great for very long term data storage, however.
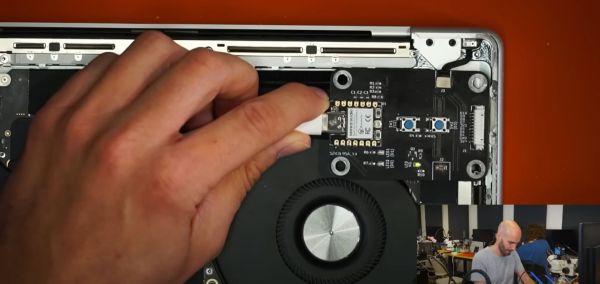
Among the changes made by Apple to its laptops over the years, the transition from a Hall sensor-based sleep sensor to an angle sensor that determines when the lid is closed is a decidedly unpopular one. The reason for this is the need to calibrate this sensor after replacement, using a tool that Apple decided to keep for itself. That is, until recently [Stephan Steins] created a tool which he creatively called the ‘nerd.tool.1‘. This widget can perform this calibration procedure with the press of its two buttons, as demonstrated on [Louis Rossmann]’s YouTube channel.
This new angle sensor was first introduced in late 2019, with Apple’s official reason being an increased level of ‘precision’. As each sensor has to be calibrated correctly in order to measure the magnetic field and determine the associated lid angle, this means that third-party repair shops and determined MacBook owners have to transplant the chip containing the calibration data to a replacement sensor system. Until now, that is. Although the nerd.tool.1 is somewhat pricey at €169 ($179 USD), for a third-party MacBook repair shop this would seem to be a steal.
It is however unfortunate that Apple persists in such anti-repair methods, with recently [Hugh Jeffreys] also calling Apple out on this during a MacBook Pro M1/M2 teardown video. During this teardown [Hugh] came across this angle sensor issue by swapping parts between two otherwise identical MacBook Pros, indicating just how annoying this need to calibrate one tiny lid angle sensor is.
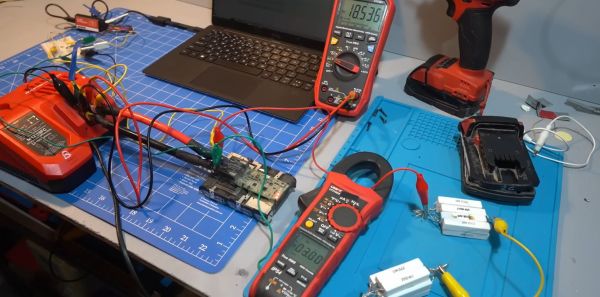
In an ideal world, every single battery pack for power tools would use the same physical interface and speak a clearly documented protocol with chargers. Since we live in a decidedly less-than-ideal world, we get to enjoy the fun pastime of reverse-engineering the interfaces and protocols of said battery packs.
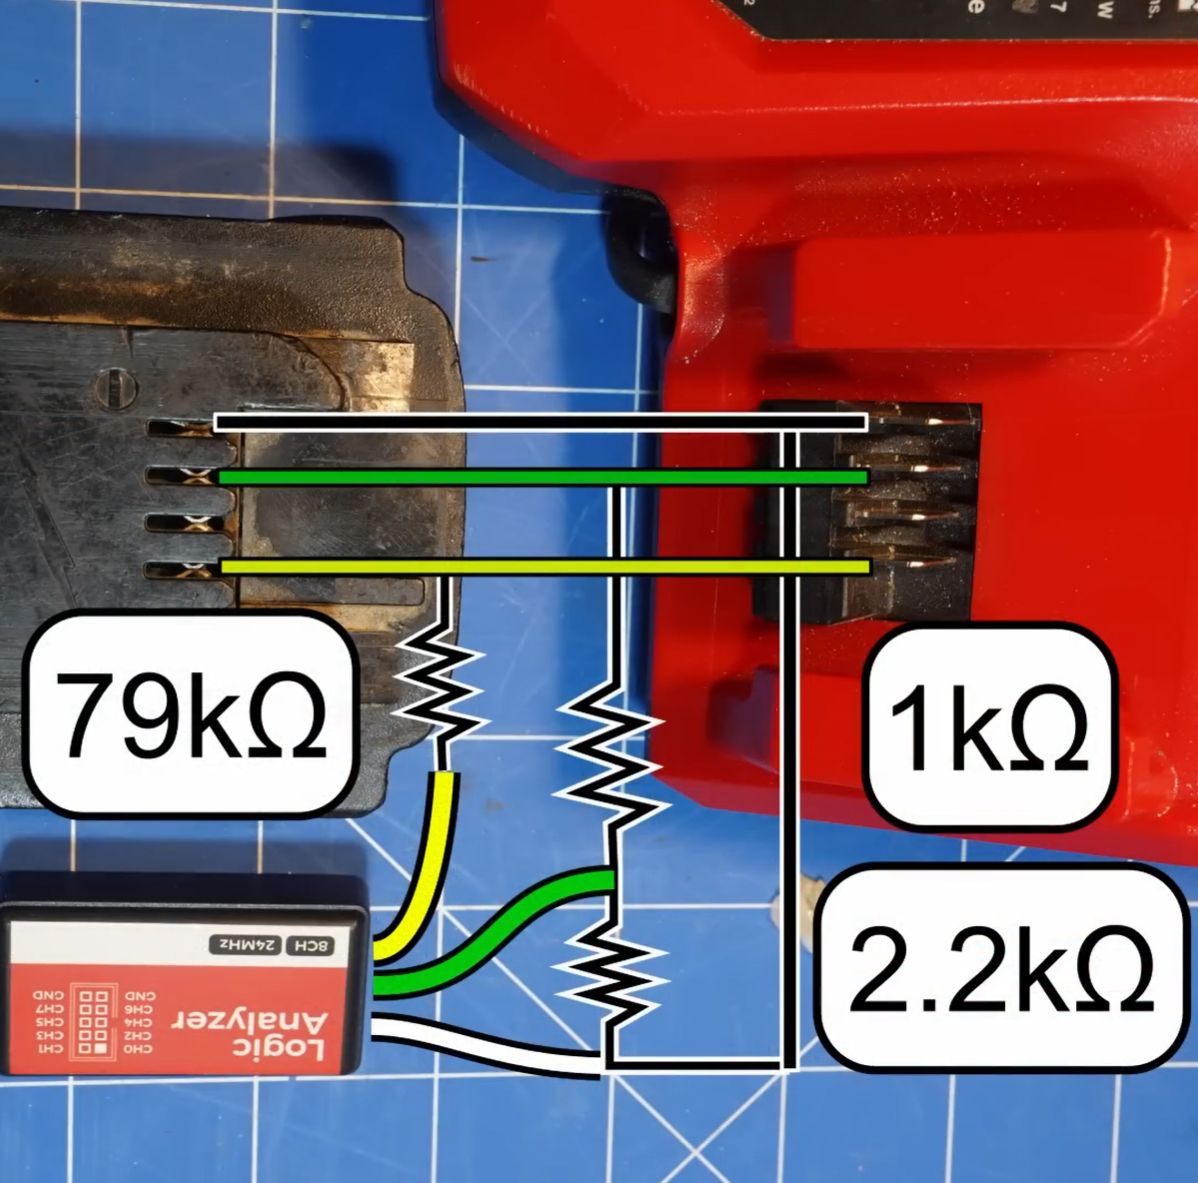
Hooking up a logic analyzer to a M18 battery and charger.
A recent video from the [Tool Scientist] goes over what is already known about the Milwaukee M18 Redlink protocol, used with the manufacturer’s M18-series of batteries, before diving into some prodding and poking of these packs’ sensitive parts to see what comes out of their interface.
Previously, [Buy It Fix It] shared their findings on Reddit, covering the basic protocol, including the checksum method, but without an in-depth analysis of the entire charging protocol. Meanwhile [Quagmire Repair] performed an in-depth teardown and reverse-engineering of the M18 hardware, including the circuitry of the BMS.
Putting these two things together, [Tool Scientist] was able to quickly get some of his M18 packs strapped down into the analysis chair for both passive analysis, as well as the effect of overvoltage, undervoltage, overheating and freezing the battery pack on the output reported by the battery’s BMS.
One of the lists of commands and response messages obtained by [Tool Scientist] on YouTube.The result is a rather comprehensive list of instructions obtained under these various conditions, including a fault condition (05) returned by the BMS of one pack indicating its likely demise. Overall, it does not appear to be a particularly special (or well-designed) protocol, but it does make for a good reverse-engineering target, while adding to the body of collective knowledge on these widely available battery packs.
Hopefully the same inertia that prevents people from moving outside the designated power tool ecosystem due to the incompatible battery packs will also ensure that this level of knowledge will remain relevant for the foreseeable future, especially since the manufacturers of knock-off battery packs seem rather unwilling to share the results of their own reverse-engineering efforts.


![One of the lists of commands and response messages obtained by [Tool Scientist] on YouTube.](https://hackaday.com/wp-content/uploads/2023/09/reverse_engineering_milwaukee_m18_redlink_protocol_startup_messages.jpg)


