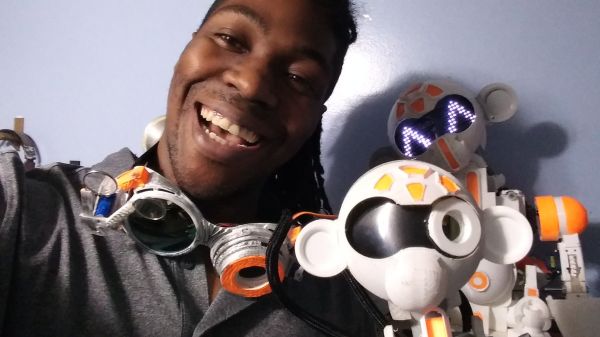
The main character of Dexter’s Laboratory is a genius child inventor who inspired a lot of fans to become makers and inventors in their own right. [Jorvon Moss] a.k.a. [Odd_Jayy] counts himself as one of them. A serial companion bot builder, his projects are constantly evolving. But every once in a while he pauses long enough to share construction details. Like how we can build our own monkey companion bot Dexter named after the cartoon.
A slightly earlier iteration of Dexter attended Hackaday Superconference 2019. Perched on [Odd_Jayy]’s back, Dexter joined in a presentation on companion bots. We’ve been a fan of his work since Asi the robot spider and several more robots have been posted online since. Recently at Virtually Maker Faire 2020, he joined [Alex Glow] and [Angela Sheehan] to talk about their respective experiences Making Companion Bots.
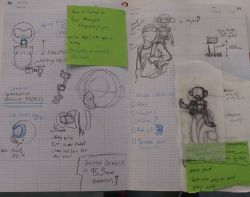 [Odd_Jayy] starts with sketches to explore how a project will look and act, striving to do something new and interesting every time. One of Dexter’s novelties is adding interactivity to companion bots. Historically people couldn’t do much more than just look at a companion bot, but Dexter can high five their fans! Sometimes the excited robot monkey ends up slapping [Odd_Jayy] instead, but they’re working through issues in their relationship. Everyone is invited to see rapid cycles of iterative improvements on Twitter and Instagram. As of this writing, a mini Dexter is underway with design elements similar to the “Doc Eyes” goggle project running in parallel. It’s always fun to watch these creations evolve. And by openly sharing his projects both online and off, [Odd_Jayy] is certainly doing his part to inspire the next wave of makers and inventors.
A couple of weeks ago we had the amazing @Odd_Jayy as a guest on my Maker Camp Live session. He talked about wearable companion bots. This week I noticed my 5YO with a little handmade bot on his shoulder. Had to snap a pic. ❤️🤖 Jayy… you are inspiring my family!!! Thank you! pic.twitter.com/hZI2wiSiJU
— Mario the Maker Magician (@MarioMagician) May 30, 2020