The average Hackaday reader likely knows, at least in the academic sense, what a magnetic field looks like. But as the gelatinous orbs in our skull can perceive only a tiny fraction of the EM spectrum, we have to take those textbook diagrams at face value. That is, unless you’ve got one of these nifty magnetic field visualizers developed by [Dr.Stone].
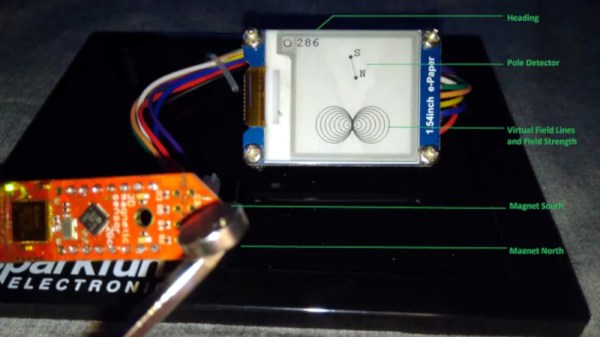
Using an XMC1100 microcontroller development board and a TLV49 3D magnetic sensor, the device is able to track the poles of a magnet in real-time and produce an approximation of what the field lines would look like on its electronic paper display. Relative field strength is indicated by the size of the visualization, which allows the user to easily compare multiple magnets. Incidentally, [Dr.Stone] notes that the current version of the hardware and software can only handle one magnet at a time; visualizing complex magnetic fields and more than two poles would take an array of sensors and likely a more powerful processor.
Do you need to visualize the field lines around a magnet? Perhaps not. But being able to quickly get an idea of how strong a magnet is and identify where its poles are could certainly come in handy. We’d like to see [Dr.Stone] take the project to the next phase and turn this into a handheld device for convenient workbench use. It would be a lot less messy than some of the previous methods we’ve seen for visualizing magnetic fields, though if you’re only worried about field strength, there’s arguably more straightforward ways to display it.
Continue reading “See The Unseen With This Magnetic Field Visualizer”