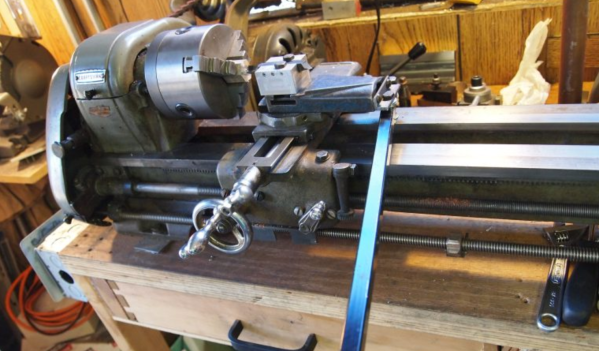
Lathe Turns The Corner, Makes A Cube

[Tim] was tired of using his lathe to turn round things. He decided to make a gaming die—something that’s iconically square—out of cylindrical scrap. As it turns out, this is possible to do on a lathe with a three jaw chuck. [Tim] discovered that the bevel on the jaws will hold a cylindrical puck of scrap sideways while he squares off the round sides into faces.

Turning a cube on a lathe looks pretty fiddly, so we applaud [Tim]’s lovely handiwork even more. As you’ll see in the video down below, things were going gangbusters until he went to make the last facing cut. Maybe the tool wasn’t lined up just so, or something was off in the chucking, but the first pass made a bit of a gouge in the stock. Looks like it was easy enough to fix, though. After four 90° turns and facing cuts, he had a nice looking rough cube to work with.

This is a regulation-sized die, so the next step was to trim it down to 16mm³. Then it was time to sand, polish, and add the dots. To lay them out, [Tim] sprayed the cube with layout fluid and scribed unique line patterns on each face. Then he drilled the indentations and filled them in with aluminium black.

Most of the dice we see are electronic, like this extremely random pair and these PIC-driven LED dice. We’d like to see [Tim] make a second D6 so he has a pair. And then make a D20. Please?

Continue reading “Lathe Turns The Corner, Makes A Cube”

Smart DC Tester Better Than A Dummy Load

Testing DC supplies can be done in many ways, from connecting an actual load like a motor, to using a dummy load in the manner of a big resistor. [Jasper Sikken] is opening up his smart tester for everyone. He is even putting it on Tindie! Normally a supply like a battery or a generator would be given multiple tests with different loads and periodic readings. Believe us, this can be tedious. [Jasper Sikken]’s simulated load takes away the tedium and guesswork by allowing the test parameters to be adjusted and recorded over a serial interface. Of course, this can be automated.

In the video after the break, you can see an adjustment in the constant-current mode from 0mA to 1000mA. His supply, meter, and serial data all track to within one significant digit. If you are testing any kind of power generator, super-capacitor, or potato battery and want a data log, this might be your ticket.

We love testers, from a feature-rich LED tester to a lead (Pb) tester for potable water.

Continue reading “Smart DC Tester Better Than A Dummy Load”

UV Light Box Cures Both Sides Of A PCB

[GiorgiQ] needed a UV light to cure the etch resist on his printed circuit boards, and what better way to accomplish this than to build the perfect UV light box himself? The box consists of a custom PCB (of course) featuring a pair of 12V relays tripping quad 9×12 matrices of 400nm UV LEDs, with a total of 432 diodes in use — not to mention resistors to protect the LEDs. All of it is run by an Arduino Nano.

The enclosure is made out of 12mm MDF and 3mm cast acrylic, and the circuit board fits into a tray sliding on drawer sliders, allowing a resist-covered board to be placed in a carrier and slid back in.

DIY light boxes mostly don’t look as slick as [GiorgiQ]’s, but they’re a fairly common project. This one also uses 9×12 matrices of UV LEDs, while a distinctly simpler project involves making a UV exposure box out of fluorescent lights.


DIY Injection Mold Design For The Home Shop

3D printing is great for prototyping, and not bad for limited runs of parts. Unfortunately though it really doesn’t scale well beyond a few pieces, so when you’re ready for the mass market you will need to think about injection molding your parts. But something like that has to be farmed out, right? Maybe not, if you know a thing or two about designing your own injection molds.

The video below comes from [Dave Hakkens] by way of his Precious Plastic project, whose mission it is to put the means of plastic recycling into the hands of individuals, rather than relying on municipal programs.  We’ve covered their work before, and it looks like they’ve come quite a way to realizing that dream. This tutorial by [Dave]’s colleague [Jerry] covers the basic elements of injection mold design, starting with 3D modeling in Solidworks. [Jerry] points out the limitations of a DIY injection molding effort, including how the thickness of parts relates to injection pressure. Also important are features like gentle curves to reduce machining effort, leaving proper draft angles on sprues, and designing the part to ease release from the mold. [Jerry] and [Dave] farmed out the machining of this mold, but there’s no reason a fairly complex mold couldn’t be produced by the home gamer.

When you’re done learning about mold design, you’ll be itching to build your own injection mold machine. Precious Plastic’s tutorial looks dead simple, but this machine looks a little more capable. And why CNC your molds when you can just 3D print them?

Continue reading “DIY Injection Mold Design For The Home Shop”

Automating A Bowl Feeder With Arduino

Search for “bowl feeder” on Hackaday and you’ll get nothing but automated cat and dog feeders. That’s a shame, because as cool as keeping your pets fed is, vibratory bowl feeders are cooler. If you’ve seen even a few episodes of “How It’s Made” you’re likely to have seen these amazing yet simple devices, used to feed and align small parts for automated assembly. They’re mesmerizing to watch, and if you’ve ever wondered how parts like the tiny pins on a header strip are handled, it’s likely a bowl feeder.

[John] at NYC CNC is building a bowl-feeder with Arduino control, and the video below takes us on a tour of the build. Fair warning that the video is heavy on the CNC aspects of milling the collating outfeed ramp, which is to be expected from [John]’s channel. We find CNC fascinating, but if you’re not so inclined, skip ahead to the last three minutes where [John] discusses control. His outfeed ramp has a slot for an optical sensor to count parts. For safety, the Arduino controls the high-draw bowl feeder through an external relay and stops the parts when the required number have been dispensed.

We know, watching someone use a $20,000 CNC milling station might seem overkill for something that could have been 3D printed, but [John] runs a job shop after all and usually takes on big industrial jobs. Or small ones, like these neat color-infill machine badges.

Continue reading “Automating A Bowl Feeder With Arduino”

Grease Gun Hydroforms Custom Motorcycle Parts

Never underestimate the power of an incompressible fluid at high pressure. Properly constrained and with a full understanding of the forces involved, hydraulic pressure can be harnessed to do some interesting things in the home shop, like hydroforming stainless steel into custom motorcycle parts.

From the look of [Clarence Elias]’s video below, it seems like he has a 100% custom motorcycle build going on in his shop. That means making every part, including the reflectors for the lights. While he certainly could have used a traditional approach, like beating sheet stainless with a planishing hammer or subjecting it to the dreaded English wheel, [Clarence] built a simple yet sturdy hydroforming die for the job. A thick steel ring clamps the sheet stainless to a basal platen with an inlet from the forming fluid, which is ordinary grease. [Clarence] goes through the math and the numbers are impressive — a 1,500-psi grease gun can be mighty persuasive under such circumstances. The result is a perfectly formed dish with no tool marks, in need of only a little polishing to be put into service.

Whether by a pressure washer, a puff of air, or 20-tons of pressure on a rubber pad, hydroforming is a great method to master for making custom parts.

Continue reading “Grease Gun Hydroforms Custom Motorcycle Parts”

The Clutter Manifesto

My basement workshop is so crammed full of stuff I literally can’t use it. My workbench, a sturdy hardwood library table, is covered in junk to the point that I couldn’t find a square foot that didn’t have two layers of detritus on it — the top layer is big things like old projects that no longer work, boxes of stuff, fragile but light things perched on top. Underneath is the magma of bent resistors, snippets of LED strip, #4 screws, mystery fasteners I’ll never use, purple circuit boards from old versions of projects, and a surprising number of SparkFun and Adafruit breakouts that have filtered down from higher up in the heap.

When work on something I bring the parts up to the dining room and work on the table, which is great for many reasons — more space, better light, and superior noms access top the list. The down side is that I don’t devote any time to making my real shop into a viable working place, and it becomes a cluttered store room by default.

I am therefore focusing on a four-part plan to reclaim my work space from heaps of junk.

Continue reading “The Clutter Manifesto”