Big Trak Gets A New Brain

If you were a kid in the 1980s you might have been lucky enough to score a Big Trak — a robotic toy you could program using a membrane keyboard to do 16 different motions. [Howard] has one, but not wanting to live with a 16-step program, he gave it a brain transplant with an Arduino and brought it on [RetroManCave’s] video blog and you can see that below.

If you want to duplicate the feat and your mom already cleaned your room to make it a craft shop, you can score one on eBay or there’s even a new replica version available, although it isn’t inexpensive. The code you need is on GitHub.

Continue reading “Big Trak Gets A New Brain”

Home Decorating With Tiny Arcade Cabinets

Thanks to the general miniaturization of electronics, the wide availability of cheap color LCD screens, and the fact that licensing decades old arcade games is something of a free-for-all, we can now purchase miniature clones of classic arcade cabinets for about $20 USD. In theory you could play these things, but given they’re less than 4 inches in height they end up being more of a desk novelty than anything. Especially since it seems like most of the effort went into making the cabinet itself; a classic example of “form over function”.

Unfortunately, if you want to buy these little arcade cabinets to use as decoration for your office or game room, they aren’t particularly well suited to the task. The “demo” mode where the game plays itself doesn’t last for very long, and even if it did, the game would chew through batteries at an alarming rate. [Travis] decided to tackle both issues head on by powering his Tiny Arcades over USB and locking them into demo mode.

The stock power for the Tiny Arcade comes from three AAA batteries, or 4.5 V. This made it easy enough to run over  5 V USB, and a four port USB charger is used to provide power to multiple machines at once. Forcing the game to stay in demo mode wasn’t much harder: a 555 timer was used to “push” the demo button with a frequency of every 10 seconds or so to keep the game up and running. A simple timer circuit was put together in the classic “dead bug” style, and sealed up with liquid rubber so it would play nice with the insides of the Tiny Arcade.

Since his little machines wouldn’t need their stock power switches anymore, [Travis] rewired the speaker lead through it. So now the machine stays on and in demo mode as long as it’s plugged into USB power, and you can flip the switch on the back to turn off the sounds. Perfect for sitting up on a shelf or the corner of your desk.

Usability issues not withstanding, there’s a pretty big (no pun intended) following for micro sized arcade cabinets. We’ve seen projects ranging from modding a Game Boy Advance to even tinier scratch builds.

Continue reading “Home Decorating With Tiny Arcade Cabinets”

How The Hero Droid BB-8 Rolls

By now we’ve come to expect a bountiful harvest of licensed merchandise to follow every Star Wars film. This year’s crop included many flavors of BB-8 so every fan can find something to suit their taste. At the top of this food chain is a mobile interactive “Hero Droid BB-8”. For those who want to see how it works, [TheMikeSenna] cracked open his unit to feed our curiosity.

Also called “Spin Master BB-8” for the manufacturer, this toy is impressively sophisticated for its price point. The video surveyed the mechanical components inside the ball. Showing how the droid travels, and how the head articulates.

Continue reading “How The Hero Droid BB-8 Rolls”

Fingerling Disemboweled For Your Entertainment

Due to the graphic nature of this post, small children and the elderly may want to leave the room. One of the hottest toys this holiday season has been gutted like a fish so that we may better understand the nature of its existence. Or maybe just what kind of sensors and motors the craftsmen over at WowWee managed to cram into a “robot” with an MSRP of only $15 USD.

[Josh Levine] mercilessly tears a Fingerling Monkey limb from limb on his blog, and points out some interesting design decisions made. While some elements of the toy are rather clever, there’s a few head-scratchers to be had inside the Fingerling. It’s interesting to see the final results of a decision process that had to balance the relatively rough life such a toy will live with the ever crucial cost of production.

The eyelids are particularly well thought out, operated by charging a coil under a magnet which is embedded in the plastic. Opening and closing the eyelids without a separate motor or gearbox is not only easier and cheaper, but prevents the possibility of damage if a child attempts to force open the eyes or otherwise manipulate the mechanism.

Other cost saving measures include the use of foil tape as a capacitive sensor, and simple ball-filled tilt sensors to detect orientation rather than an expensive accelerometer.

Interestingly, other parts of the toy seem overengineered in comparison. A cam and limit switch are used to detect when the Fingerling’s head has turned to its maximum angle, when it would have been cheaper and easier to simply detect motor stall current.

If you’re interested in seeing what makes popular toys tick, we’ve got a number of plaything tear downs which are sure to keep you satiated until the next big holiday toy rolls around.

Continue reading “Fingerling Disemboweled For Your Entertainment”

Fidget Spinner Becomes A Brushless Motor; Remains Useless

Your grandmother means well. But by the time she figures out something’s a fad, it is old news. So maybe you got a fidget spinner in your stocking this year. Beats coal. Before you regift it to your niece, you could repurpose it to be a motor. Technically, [B.Aswinth Raj] made a brushless motor, although it isn’t going to fly your quadcopter anytime soon, it is still a nice demonstrator.

You can see a video below. The idea is to put magnets on the spinner and use an electromagnet to impart energy into the spinner which is on a piece of threaded rod left over from your last 3D printer build. A hall effect sensor determines when to energize the electromagnet.

A brushed motor uses a spring-loaded brush to carry current through to the motor’s coils and keep the magnetic field oriented properly. A brushless motor works differently. There are several schemes that will work, but the one [Raj] uses is the most common. He adds fixed magnets on the rotor then uses an electromagnet to provide the correct push at the right time. A practical brushless motor will likely have more than one coil, though, and the controller has to do a particular sequence to move the rotor around the rotation.

If you want to see the insides of a real motor, we looked at how to rewind them earlier. If you’d rather repurpose your spinner to something more practical, you could always make some music.

Continue reading “Fidget Spinner Becomes A Brushless Motor; Remains Useless”

Frankendrones: Toy Quads With A Hobby Grade Boost

If you’re not involved in the world of remote controlled vehicles, you may not know there’s a difference between “toy” and “hobby” grade hardware. For those in the RC community, a toy is the kind of thing you’ll find at a big box store: cheap, works OK, but lacking in features and build quality. On the other hand, hobby hardware is generally considered to be of higher quality and performance, as well as being more modular. At the risk of oversimplification: if you bought it ready to go from a store it’s probably a toy, and if you built it from parts it would generally be considered hobby grade.

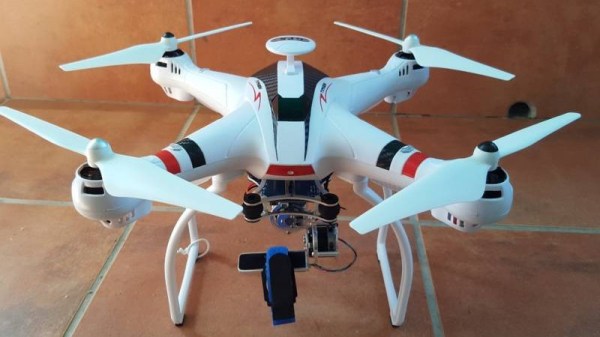
But with the rock bottom prices of toy quadcopters, that line in the sand is having a harder time than ever holding some in the community back. The mashup of toy and hobby grade components is giving rise to the concept of “frankendrones” that combine the low cost of toy hardware with key upgrades from the hobby realm. Quadcopter blogger [garagedrone] has posted a roundup of modifications made to the Bayangtoys X16, a $99 quadcopter which is becoming popular in the scene.

Some of the modifications are easy enough for anyone to do. Swapping out the original propellers for ones meant for the DJI Phantom 3 increases performance and doesn’t even require tools. If you want to go a bit further down the rabbit hole, you can cut off the X16’s battery connector and replace it with a standard XT60. That lets you use standard 3S LiPo batteries, which are cheaper and higher capacity than the proprietary ones the toy shipped with.

If you have a 3D printer, there are also a number of upgraded parts you can print which will bolt right onto the X16. Payload adapters, landing gear, and GoPro mounts are all just a few clicks (and some filament) away. This library of 3D printable parts is made possible in part because the X16’s frame is itself a clone of another toy quadcopter, the popular Syma X8C. So anything listed as compatible with the Syma X8C should work with the X16 (and vice versa).

Finally, if you really want to take the X16 to the next level, you can swap out the flight controller with an open source and better supported hobby grade model. Some of these flight controllers and associated new receivers can end up costing about half as much as the X16 did to begin with, but the vast improvement in performance and capability should more than make up for the cost.

We’ve covered previous efforts to increase the performance of low cost quadcopters in the past, as well as builds that put frugality front and center. It seems that no matter what your budget is a screaming angel of death is available if you want it.

Thanks to [Calvin] for the tip.

Continue reading “Frankendrones: Toy Quads With A Hobby Grade Boost”

This Coin Cell Can Move That Train!

[Mike Rigsby] has moved a train with a coin cell. A CR2477 cell to be exact, which is to say one of the slightly more chunky examples, and the train in question isn’t the full size variety but a model railroad surrounding a Christmas tree, but nevertheless, the train moved.

A coin cell on its own will not move a model locomotive designed to run on twelve volts. So [Mark] used a boost converter to turn three volts into twelve. The coin cell has a high internal resistance, though, so first the coin cell was discharged into a couple of supercapacitors which would feed the boost converter. As his supercaps were charging, he meticulously logged the voltage over time, and found that the first one took 18 hours to charge while the second required 51 hours.

This is important and useful data for entrants to our Coin Cell Challenge, several of whom are also going for a supercap approach to provide a one-off power boost. We suspect though that he might have drawn a little more from the cell, had he selected a dedicated supercap charger circuit.

Continue reading “This Coin Cell Can Move That Train!”