wifi scanner

Visualizing WiFi With A Converted 3D Printer

We all know we live in a soup of electromagnetic radiation, everything from AM radio broadcasts to cosmic rays. Some of it is useful, some is a nuisance, but all of it is invisible. We know it’s there, but we have no idea what the fields look like. Unless you put something like this 3D WiFi field strength visualizer to work, of course.

Granted, based as it is on the gantry of an old 3D printer, [Neumi]’s WiFi scanner has a somewhat limited work envelope. A NodeMCU ESP32 module rides where the printer’s extruder normally resides, and scans through a series of points one centimeter apart. A received signal strength indicator (RSSI) reading is taken from the NodeMCU’s WiFi at each point, and the position and RSSI data for each point are saved to a CSV file. A couple of Python programs then digest the raw data to produce both 2D and 3D scans. The 3D scans are the most revealing — you can actually see a 12.5-cm spacing of signal strength, which corresponds to the wavelength of 2.4-GHz WiFi. The video below shows the data capture process and some of the visualizations.

While it’s still pretty cool at this scale, we’d love to see this scaled up. [Neumi] has already done a large-scale 3D visualization project, using ultrasound rather than radio waves, so he’s had some experience in this area. But perhaps a cable bot or something similar would work for a room-sized experiment. A nice touch would be using an SDR dongle to collect signal strength data, too — it would allow you to look at different parts of the spectrum.

Continue reading “Visualizing WiFi With A Converted 3D Printer”

So. What’s Up With All These Crazy Event Networks Then?

As an itinerant Hackaday writer I am privileged to meet the people who make up our community as I travel the continent in search of the coolest gatherings. This weekend I’ve made the trek to the east of the Netherlands for the ETH0 hacker camp, in a camping hostel set in wooded countryside. Sit down, connect to the network, grab a Club-Mate, and I’m ready to go!

Forget the CTF, Connecting To WiFi Is The Real Challenge!

There no doubt comes a point in every traveling hacker’s life when a small annoyance becomes a major one and a rant boils up from within, and perhaps it’s ETH0’s misfortune that it’s at their event that something has finally boiled over. I’m speaking of course about wireless networks.

While on the road I connect to a lot of them, the normal commercial hotspots, hackerspaces, and of course at hacker camps. Connecting to a wireless network is a simple experience, with a level of security provided by WPA2 and access credentials being a password. Find the SSID, bang in the password, and you’re in. I’m as securely connected as I reasonably can be, and can get on with whatever I need to do. At hacker camps though, for some reason it never seems to be so simple.

Instead of a simple password field you are presented with a complex dialogue with a load of fields that make little sense, and someone breezily saying “Just enter hacker and hacker!” doesn’t cut it when that simply doesn’t work. When you have to publish an app just so that attendees can hook up their phones to a network, perhaps it’s time to take another look . Continue reading “So. What’s Up With All These Crazy Event Networks Then?”

Rolling Your Own Long-Range IoT Sensor Network

Homebrew wireless sensors are nothing new around these parts: grab an ESP8266, hang a BME280 from the I2C pins, and you’re just a few lines of code away from joining the Internet of Things on your own terms. Builds like this are so cheap and easy that they make an excellent first project for folks looking to get into the electronics game, but what if you’re looking for something a bit more bespoke?

In that case, you could follow in the footsteps of [Discreet Mayor] and put together a custom modular architecture for long-range wireless sensors. The core of the system is a breakout board for the Texas Instruments SimpleLink CC1312 wireless MCU which features a simple 2×11 header connector. This allows the module to either be plugged into a larger board or have a small sensor PCB attached directly to it.

Rather than using WiFi or requiring some existing radio infrastructure, the boards automatically create a private network using the IEEE 802.15.4 standard at a range of up to 600 meters. A dedicated receiver isn’t necessary, to pull data off the network, one of the CC1312 boards simply gets connected to a computer through a simple FT232 adapter.

[Discreet Mayor] has already created a number of projects that use these custom radios for communication, from a pool monitoring system to a temperature sensor for the BBQ. That portable battery operated devices are able to use this common communications backbone just as well as mains powered static devices is a testament to the work that went into the firmware to make it as robust and efficient as possible.

Like the idea of long-range private networks, but less enthusiastic about having to come up with your own hardware? Not to worry. Over the summer, Espressif announced that they’re working on an ESP32 variant that includes support for IEEE 802.15.4. Just as soon as this chip shortage is over, we might even get to see the thing.

Download From NFC Datalogger, No App Required

The plethora of wireless technologies has made internet-connected devices the norm, but it’s not always necessary if you don’t need real-time updates. Whether it’s due to battery life, or location and range constraints, downloading data directly from the device whenever possible might be a viable solution. [Malcolm Mackay] demonstrates an elegant solution on the open source cuplTag temperature/humidity logger, using any NFC-enabled smartphone, without requiring a custom app.

The cuplTag utilizes the feature on NFC-enabled smartphones to automatically open a URL provided by the cuplTag. It encodes the sensor data from the sensor unit as a circular buffer in a ~1 kB URL, which automatically uploads to a web frontend that plots the data. (You can use their server or run your own.)

This means that data can be collected by anyone with the appropriate phone with zero setup. The data is displayed on the web app and can be downloaded as a CSV. To deter spoofing, each tag ships with a secret key which is used to generate a unique HMAC every time the circular buffer changes.

Battery life is a priority on the cuplTag, and it’s theoretically capable of running seven years on a single CR1220 coin cell using the current-sipping Texas Instruments MSP430 microcontroller. The hardware, firmware, and server-side frontend and backend code are all open source and available on GitHub.

Earlier this year, we held a data logging contest, and featured submissions that monitored everything from your garden’s moisture levels to your caffeine intake.

Wireless Earbuds Charge Themselves

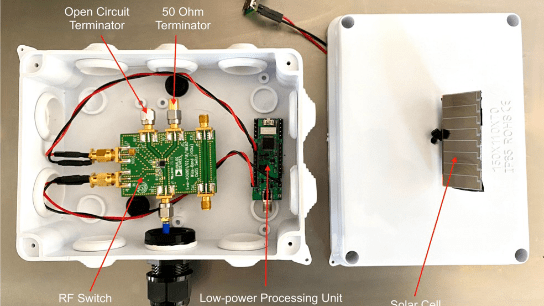
As more and more ports are removed from our smart devices, it seems that we have one of two options available for using peripherals: either buy a dongle to continue to use wired devices, or switch to Bluetooth and deal with perpetually maintaining batteries. If neither of these options suits you, though, there’s a third option available as [befinitiv] shows us in this build where he integrates a tiny solar panel to his earbud case to allow them to automatically charge themselves.

To start, he begins by taking apart the earbud case. For those who still haven’t tried out a set of these, they typically charge only when placed inside of their carrying case, which in his case also contains a small battery itself. Soldering wires directly to the battery allow for the battery to charge without as much electrical loss as he would have had if he had connected to the USB pins on the circuit board. Even then, the cell only generates a single volt so he needs a 5V boost converter to properly charge the battery. That came with its own problem, though, as it wouldn’t fit into the case properly. To solve that issue, he desoldered all of the components and deadbugged them together in order to fit the converter into a much smaller space without having to modify the case in any other way.

With all of that done and the small solar cell attached to the case, [befinitiv] has a smart solution to keep his wireless earbuds topped up without having to carry cables or dongles around every day. We’ve seen plenty of interesting solutions to the problem of various electronics manufacturers removing the ubiquitous 3.5 mm headphone jack too, and not all of them have dealt with this problem without certain other quirks arising as a result.

Continue reading “Wireless Earbuds Charge Themselves”

How The Flipper Zero Hacker Multitool Gets Made And Tested

Flipper Zero is an open-source multitool for hackers, and [Pavel] recently shared details on what goes into the production and testing of these devices. Each unit contains four separate PCBs, and in high-volume production it is inevitable that some boards are faulty in some way. Not all faults are identical — some are not even obvious —  but they all must be dealt with before they end up in a finished product.

One of several custom test jigs for Flipper Zero. Faults in high volume production are inevitable, and detecting them early is best.

Designing a process to effectively detect and deal with faults is a serious undertaking, one the Flipper Zero team addressed by designing a separate test station for each of the separate PCBs, allowing detection of defects as early as possible. Each board gets fitted into a custom test jig, then is subjected to an automated barrage of tests to ensure everything is as expected before being given the green light. A final test station gives a check to completed assemblies, and every test is logged into a database.

It may seem tempting to skip testing the individual boards and instead just do a single comprehensive test on finished units, but when dealing with production errors, it’s important to detect issues as early in the workflow as possible. The later a problem is detected, the more difficult and expensive it is to address. The worst possible outcome is to put a defective unit into a customer’s hands, where a issue is found only after all of the time and cost of assembly and shipping has already been spent. Another reason to detect issues early is that some faults become more difficult to address the later they are discovered. For example, a dim LED or poor antenna performance is much harder to troubleshoot when detected in a completely assembled unit, because the fault could be anywhere.

[Pavel] provides plenty of pictures and details about the production of Flipper Zero, and it’s nice to see how the project is progressing since its hyper-successful crowdfunding campaign.

Live Energy Monitor Helps Plan Power-Hungry Appliance Use

There are a lot of good reasons to have a better understanding of one’s household power use, and that is especially true for those that do their own solar power collection. For example, [Frederick] determined that it would be more efficient to use large appliances (like a dishwasher or washing machine) when there was excess solar power available, but the challenge was in accessing the right data in a convenient way. His Raspberry Pi-based live energy monitor was the solution, because it uses an LED matrix to display live energy data that can be consulted at a glance.

Interestingly, this project isn’t about hacking the power meter. What this project is really about is conveniently accessing that data when and where it is best needed. [Frederick] has a digital power and gas meter with the ability to accept a small wireless dongle. That dongle allows a mobile phone app to monitor power usage, including whether power is being taken from or exported to the grid.

Since [Frederick] didn’t want to have to constantly consult his mobile phone, a Raspberry Pi using a Pimoroni Unicorn HAT HD acts as a glanceable display. His Python script polls the power meter directly over WiFi, then creates a live display of power usage: one LED for every 250 W of power, with the top half of the display being power used, and the bottom half representing power exported to the grid. Now the decision of when to turn on which appliances for maximum efficiency is much easier, not by automating the appliances themselves, but simply by displaying data where it needs to be seen. (This kind of thing, incidentally, is exactly the idea behind the Rethink Displays challenge of the 2021 Hackaday Prize.)

As for those of us without a digital power meter that makes it easy for residents to access power data? It turns out there is no reason a power meter’s wireless service interface can’t be sniffed with RTL-SDR.