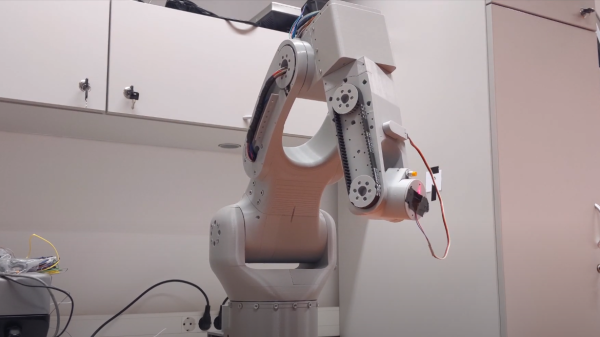
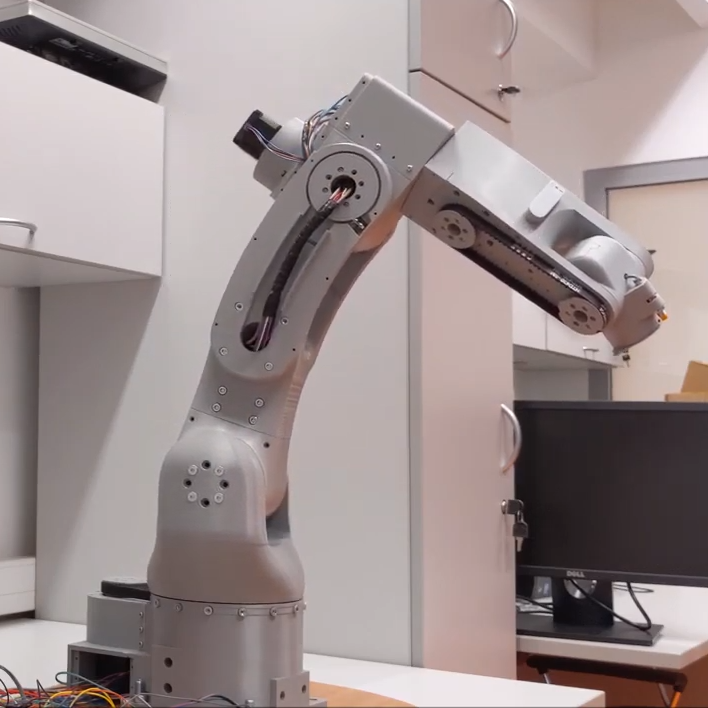
Cat Robot’s Secret To Slim Legs? Banish The Motors!

The first thing to notice about [Bijuo]’s cat-sized quadruped robot designs (link is in Korean, Google translation here) is how slim and sleek the legs are. That’s because unlike most legged robots, the limbs themselves don’t contain any motors. Instead, the motors are in the main body, with one driving a half-circle pulley while another moves the limb as a whole. Power is transferred by a cable acting as a tendon and is offset by spring tension in the joints. The result is light, slim legs that lift and move in a remarkable gait.

[Bijuo] credits the Cheetah_Cub project as their original inspiration, and names their own variation Mini Serval, on account of the ears and in keeping with the feline nomenclature. Embedded below are two videos, the first showing leg and gait detail, and the second demonstrating the robot in motion.

Continue reading “Cat Robot’s Secret To Slim Legs? Banish The Motors!”

3D Printed Radius Gauge, Just Add Calipers (And A Wee Bit Of Math)

With 3D printed arms of fixed measurements, the depth reading from a set of digital calipers can be used to calculate the radius of a curve.

Specialized tools that focus on one particular job tend to get distilled right down to their essentials and turned in an economical consumer product. One example of this is radius (or fillet) gauges: a set of curves in different sizes that one uses to measure the radius of a curved surface by trial and error. To some, such products represent solved problems. Others see opportunities for a fresh perspective, like this caliper-enabled 3D printed radius gauge by [Arne Bergkvist].

[Arne]’s 3D printed radius gauge is a simple object; a rigid attachment for a nearly ubiquitous model of digital caliper. By placing the curve to be measured between the two arms of the device and using the depth measurement of the caliper to measure distance to the curve’s surface, a simple calculation (helpfully printed on the unit itself) of radius = distance * 2.414 reveals the radius of the curve. However, this shortened calculation makes a number of assumptions and only works for [Arne]’s specific design.

Another version by [Fredrik Welander] represents a more flexible take on the same concept. His RadGauge design (pictured up top) has a few different sizes to accommodate a variety of objects, and his Git repository provides a calculator tool as well as some tips on fine tuning to allow for variations in the dimensions of the printed attachment.

3D printing has opened a lot of doors, and items like this show that the plastic doodads created aren’t always the end result in and of themselves; sometimes they are the glue that enables a tool or part to work in a different way. To help get the most out of 3D printing, check out the in-depth coverage of how to best tap 3D printed parts for fasteners, and [Roger Cheng]’s guide to using 3D printed brackets and aluminum extrusion to make just about anything.

The Tide Is High, And This Clock Lets You Know

In case you happen to have an ocean nearby, you’re probably familiar with its rising and falling tides. And if mudflat hiking is a thing in your area, you’re also aware of the importance of good timing and knowing when the water will be on its way back. Tide clocks will help you to be prepared, and they are a fun alternative to your usual clock projects. If you’re looking for a starting point, [rabbitcreek] put together an Arduino-based tide clock kit for educational purposes.

If you feel like you’re experiencing some déjà vu here, this indeed isn’t [rabbitcreek]’s first tide clock project. But unlike his prior stationary clock, he has now created a small and portable, coin-cell version to take with you out on the sea. And what shape would better fit than a 3D printed moon — unfortunately the current design doesn’t offer much waterproofing.

For the underlying tide calculation itself, [rabbitcreek] uses just like in his previous project [Luke Miller]’s location-based library for the ubiquitous DS1307 and DS3213 real-time clocks. Of course, if you also want to keep track of other events on your clock, why not set up calendar events for the next rising tide?

Moving 3D Printed Prosthetic Arms With A Pulse

One of the best uses of 3D printers we’ve seen are custom prosthetics. Even today, custom-built prosthetics cost an arm and a leg, but there’s no reason why they should. Right now, we can scan someone’s arm or leg, import that scan into a 3D-modeling program, and design a custom-fit orthotic that can be spit out on a 3D printer. Now, we’re seeing some interesting methods of turning those 3D-printed parts into the beginnings of a cybernetic design. This is a custom printed robotic hand controlled by a pulse sensor. It’s in its early stages right now, but so far the results are promising and this is a great entry to The Hackaday Prize

This project draws upon a few of the team’s other endeavours. The first is a 3D-printed mini linear actuator, a project that made it into the finals of the Hackaday Prize in the Robotics Module challenge. This tiny linear actuator is actually powered by a tiny hobby servo rigged up for continuous rotation. Add in some 3D printed gears and a well-designed frame, and you have something that’s just as good as fantastically expensive linear actuators as a bargain basement price. This pulse sensor arm also makes use of the team’s TNS 1i, a 3D printed robotic hand that makes use of those tiny little linear actuators.

Of course, if you’re going to build a prosthetic robotic arm, you have to have some sort of brain-machine interface. Previously, the team was using Myoware muscle sensors to control the opening and closing of the fingers. This changed, however, when [Giovanni] was trying to get his Samsung gear S3 to detect his pulse. Apparently, moving your wrist when trying to get a smartwatch to listen in on your heartbeat is an acceptable substitute for a muscle sensor.

3D Printed RC Jet Boat Gets Up To Speed

In one of those weird twists of fate, there’s currently a very high chance that anyone who owns a 3D printer has made a boat with it. In fact, they’ve probably printed several of them, so many that they might even have a shelf filled with little boats in different colors and sizes. That’s because it’s a popular benchmark to make sure the printer is well calibrated. But if you’re going to spend hours printing out a boat, why not print one that’s got some punch?

This 3D printable jet boat designed by [Jotham B] probably isn’t a great print to check your desktop machine’s calibration on, in fact you’re going to want to make sure you’ve got everything dialed in before taking on this challenge. If the classic “Benchy” is the beginners boat, then this is certainly for the 3D printing veterans. But if you’ve got the skills to pull it off, and some RC gear laying around to outfit it with, this could be a great project to end your summer on.

Unless you’ve got an exceptionally tall printer, the 460mm long hull will need to be printed in several pieces and then grafted back together. You could potentially use glue, but something a bit more robust like welding the parts together with a soldering iron is a better bet to make sure your printed boat doesn’t do its best Titanic reenactment out on the lake.

[Jotham] recommends printing the impeller at 0.15mm layer height, as you’ll want all the detail you can muster to provide a smooth surface. You’ll also need to use supports, so expect to spend a fair bit of time cleaning it up post-print. The rest of the model can be printed at 0.3mm, which is going to save a lot of time on the hull. All told, it will take about half a roll of filament to print all the parts for the boat (assuming no mistakes), which puts the pre-electronics cost at around $10 USD.

Speaking of electronics, you’ll need a RC receiver, a servo for steering, an electronic speed controller (ESC), and a suitable motor. [Jotham] used a 3674 brushless motor with a 120A water-cooled ESC, but notes that the setup is way overpowered. In the video after the break you can see the boat spends as much time airborne as it does in the water, which might look cool, but isn’t exactly efficient.

If you want to round out your 3D PLA fleet, we’ve also seen a printed FPV lifeboat as well as a hydrofoil that “flies” through the water.

[Thanks to Aidan for the tip.]

Continue reading “3D Printed RC Jet Boat Gets Up To Speed”

OpenSCAD Handles The Math In 3D Printed Holder For Magnetic Spheres

3D printed holder mounted to bike wheel, fitting precisely 38 magnetic spheres around its perimeter. Tedious math? Not if you make OpenSCAD do it.

Off-the-shelf components are great; the world and our work simply wouldn’t be the same without. But one of the constraints is that one has to design around them, and that’s what led [Antonio Ospite] to create a parametric design in OpenSCAD for a 3D printed holder which snugly fits a number of magnetic spheres around its diameter.

If that sounds a bit esoteric, it will become much clearer in the context of [Antonio]’s earlier work in making a DIY rotary encoder out of a ring of magnetic spheres. He found that such a ring in front of two Hall effect sensors was low in cost, high in precision, and thanks to 3D printing it also had a lot of potential for customizing. But hampering easy design changes was the need for the spheres to fit snugly around whatever shape was chosen for the hardware, which meant constraints on the encoder diameter.

In this case, [Antonio] wished to create an encoder that could be attached to a bicycle wheel but needed to know what outer diameter would best fit a ring of magnetic balls perfectly, given that the balls were each 5 mm. OpenSCAD did the trick, yielding a design that fit the bike wheel and spokes while perfectly nestling 38 magnetic balls around the outside edge with a minimum of wasted space.

OpenSCAD is a CAD program that’s really more like a programming language than anything else. For those who are not familiar with it, [Brian Benchoff] walked through how to make a simple object in OpenSCAD, and [Elliot] has sung the praises of a few advanced functions. Now that this project makes DIY encoders easier, perhaps they could be used to add intuitive new controls to OpenSCAD itself.

4-Mation Fish eats fish

Time-Stretching Zoetrope Animation Runs Longer Than It Should

3D printers have long since made it easy for anyone to make 3-dimensional zoetropes but did you know you can take advantage of a 4th dimension by stretching time? Previously the duration of a zoetrope animation would be however long it took for the platform to rotate once. To make it more interesting to watch for longer, you filled out the scene by creating concentric rings of animations. [Kevin Holmes], [Charlie Round-Turner], and [Johnathan Scoon] have instead come up with a way to make their animations last for multiple rotations, longer than three in one example. If you’re not at all familiar with these 3D zoetropes, you might want to check out this simpler version first.

4-Mation Fish eats Fish zoetropeTheir project name is 4-Mation but they call the time-stretching technique, animation multiplexing. One way to implement it is to use one long spiral beginning in the center and ending on the platform’s periphery. It’s the spiral path which make the animation last longer.

In their Fish eating Fish animation, the spiral is of a small fish which exits a clam at the center and gets progressively larger as it spirals outward until it swallows another fish located in a ring at the periphery. Of course when you look at it with a properly timed strobe light, there is no spiral. Instead, it appears as though a bunch of fish move more-or-less radially out from the center. The second video embedded below walks through the animation step-by-step, making it easier to follow the intricacies of what’s going on.

Other features include built-in strobe lighting and both manual and phone app control. This project is a product for a kickstarter campaign and so normally, details of the electronics would be absent. But clearly [Kevin] is familiar with Hackaday and sent in some additional info which you can find below, along with the videos.

Continue reading “Time-Stretching Zoetrope Animation Runs Longer Than It Should”