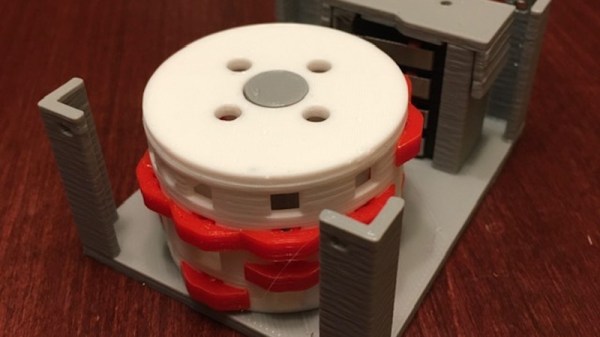
(Mis)use This Part To Attach 3D Printed Stuff To A Shaft

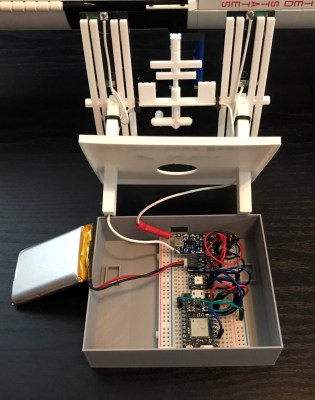
Interfacing a shaft to a 3D printed gear doesn’t have to be tricky. [Tlalexander] demonstrated a solution that uses one half of a spider coupling (or jaw coupling) to create an effective modular attachment. The picture above (and this older link) shows everything you need to know: the bottom of the coupling is mounted to the shaft, and a corresponding opening is modeled into the the 3D printed part. Slide the two together, and the result is a far sturdier solution than trying to mate a 3D printed gear directly to a motor shaft with a friction fit or a screw. This solution isn’t necessarily limited to attaching gears either, any suitable 3D printed part could be interfaced to a shaft in this way.

These couplings are readily available, and fortunately for hobbyists, come in sizes specifically designed for common stepper motors like NEMA 17 and NEMA 23. Ironically, these couplings are often used when building custom 3D printers for those same reasons. With this method interfacing anything at all to a motor shaft becomes mostly a matter of modeling a matching hole out of the part to be 3D printed. One coupling even provides two such attachments, since only one of the two sides is used.

The image up top is from [Tlalexander]’s Rover image gallery, which contains a ton of fantastic pictures of the work that went into the gearboxes, a major part of the Rover’s design that we’ve seen in the past.

FiberGrid: An Inexpensive Optical Sensor Framework

When building robots, or indeed other complex mechanical systems, it’s often the case that more and more limit switches, light gates and sensors are amassed as the project evolves. Each addition brings more IO pin usage, cost, potentially new interfacing requirements and accompanying microcontrollers or ADCs. If you don’t have much electronics experience, that’s not ideal. With this in mind, for a Hackaday prize entry [rand3289] is working on FiberGrid, a clever shortcut for interfacing multiple sensors without complex hardware. It doesn’t completely solve the problems above, but it aims to be a cheap, foolproof way to easily add sensors with minimal hardware needed.

The idea is simple: make your sensors from light gates using fiber optics, feed the ends of the plastic fibers into a grid, then film the grid with a camera. After calibrating the software, built with OpenCV, you can “sample” the sensors through a neat abstraction layer. This approach is easier and cheaper than you might think and makes it very easy to add new sensors.

Naturally, it’s not fantastic for sample rates, unless you want to splash out on a fancy high-framerate camera, and even then you likely have to rely on an OS being able to process the frames in time. It’s also not very compact, but fortunately you can connect quite a few sensors to one camera – up to 216 in [rand3289]’s prototype.

There are many novel uses for this kind of setup, for example, rotation sensors made with polarising filters. We’ve even written about optical flex sensors before.

STEP Up Your Jetson Nano Game With These Printable Accessories

Found yourself with a shiny new NVIDIA Jetson Nano but tired of having it slide around your desk whenever cables get yanked? You need a stand! If only there was a convenient repository of options that anyone could print out to attach this hefty single-board computer to nearly anything. But wait, there is! [Madeline Gannon]’s accurately named jetson-nano-accessories repository supports a wider range of mounting options that you might expect, with modular interconnect-ability to boot!

A device like the Jetson Nano is a pretty incredible little System On Module (SOM), more so when you consider that it can be powered by a boring USB battery. Mounted to NVIDIA’s default carrier board the entire assembly is quite a bit bigger than something like a Raspberry Pi. With a huge amount of computing power and an obvious proclivity for real-time computer vision, the Nano is a device that wants to go out into the world! Enter these accessories.

At their core is an easily printable slot-and-tab modular interlock system which facilitates a wide range of attachments. Some bolt the carrier board to a backplate (like the gardening spike). Others incorporate clips to hold everything together and hang onto a battery and bicycle. And yes, there are boring mounts for desks, tripods, and more. Have we mentioned we love good documentation? Click into any of the mount types to find more detailed descriptions, assembly directions, and even dimensioned drawings. This is a seriously professional collection of useful kit.

Lithophanes Ditch The Monochrome With A Color Layer

3D printed lithophanes are great, if a bit monochromatic. [Thomas Brooks] (with help from [Jason Preuss]) changed all that with a tool for creating color lithophanes but there’s a catch: you’ll need a printer capable of creating multi-color prints to do it.

A video (embedded below) begins with an intro but walks through the entire process starting around the 1:26 mark. The lithophane is printed as a single piece and looks like most other 3D printed lithophanes from the front, but the back is different. The back (which is the bottom printed layer) is made of up multiple STL files, one for each color, and together creates something that acts as a color filter. When lit from behind, light passes through everything and results in an image that pops with color in ways that lithophanes normally do not.

The demo print was created with a printer equipped with a Palette 2, an aftermarket device that splices together filament from different spools to create multicolored prints, but we think a Prusa printer with an MMU (multi material upgrade) should also do the trick.

[Thomas] already has a lot of ideas on how to improve the process, but these early results are promising. Need a gift? Lithophanes plus LED strips make great lamps, and adding a cheap clock movement adds that little extra something.

Continue reading “Lithophanes Ditch The Monochrome With A Color Layer”

Behold The Crimson Axlef*cker (Do Not Insert Finger)

Are your aluminum extrusions too straight? The Crimson Axlef*cker can help you out. It’s a remarkable 3D printed, 4-stage, 125:1 reduction gearbox driven by a brushless motor. Designer [jlittle988] decided to test an early prototype to destruction and while he was expecting something to break, he didn’t expect it to twist the 2020 aluminum extrusion shaft before it did. We suppose the name kind of stuck after that.

Internals of the first prototype, shaft of BLDC motor just visible at top. Twisted 2020 extrusion output shaft at bottom right.

[jlittle988] has been documenting the build progress on reddit, and recently posted a fascinating video (embedded below) of the revised gearbox twisting the output shaft even further. He’s a bit coy about the big picture, saying only that the unit is part of a larger project. In fact, despite the showy tests, his goal is not to simply obtain maximum torque. We can only speculate on what his bigger project is, but in the meantime, seeing the gearbox results is some good clean fun. He first announced the gearbox test results here, and swiftly followed it up with some revisions, then the aforementioned video. There’s also an image gallery of the internals, so check that out.

The Crimson Axlef*cker is driven by an ODrive brushless dual-shaft motor and an ODrive controller as well; that’s the same ODrive whose open source motor controller design impressed us so much in the past.

Between projects like this one and other gearboxes like this cycloidal drive, it’s clear that custom gearbox design is yet another door that 3D printing has thrown wide open, allowing hobbyists to push developments that wouldn’t have been feasible even just a few years earlier.

Continue reading “Behold The Crimson Axlef*cker (Do Not Insert Finger)”

Acoustic Lenses Show Sound Can Be Focused Like Light

Acoustic lenses are remarkable devices that just got cooler. A recent presentation at SIGGRAPH 2019 showed that with the help of 3D printing, it is possible to build the acoustic equivalent of optical devices. That is to say, configurations that redirect or focus sound waves. One fascinating demonstration worked like an acoustic prism, able to send different notes from a simple melody in different directions. Another was a device that dynamically varied the distance between two lenses in order to focus sound onto a moving target. In both cases, the sounds originate from an ordinary speaker and are shaped by passing through the acoustic lens or lenses, which are entirely passive devices.

Researchers from the University of Sussex used 3D printing for a modular approach to acoustic lens design. 16 different pre-printed “bricks” (shown here) can be assembled in various combinations to get different results. There are limitations, however. The demonstration lenses only work in a narrow bandwidth, meaning that the sound they work with is limited to about an octave at best. That’s enough for a simple melody, but not nearly enough to cover a human’s full audible range. Download the PDF for a quick read about the details, it’s only two pages but loaded with enough to whet your appetite to know more.

Directional sound can be done in other ways as well, such as using an array of ultrasonic emitters to create a coherent beam of sound. Ultrasonic emitters can even levitate lightweight objects. Ain’t sound neat?

3D Printing Makes Modular Payload For Model Rocket

Putting payloads into model rockets can be more complex than simply shoving stuff into an open spot, so [concretedog] put some work into making a modular payload tube for his current rocket. The nose cone for his rocket is quite large, so he opted to give it a secure payload area that doesn’t compromise or interfere with any of the structural or operational bits such as the parachute.

The payload container is a hollow tube with a 3D printed threaded adaptor attached to one end. Payload goes into the tube, and the tube inserts into a hole in the bulkhead, screwing down securely. The result is an easy way to send up something like a GPS tracker, possibly with a LoRa module attached to it. That combination is a popular one with high-altitude balloons, which, like rockets, also require people to retrieve them after not-entirely-predictable landings. LoRa wireless communications have very long range, but that doesn’t help if there’s an obstruction like a hill between you and the transmitter. In those cases, a simple LoRa repeater attached to a kite, long pole, or drone can save the day.

We’ve seen [concretedog]’s work before, when he designed stackable PCBs intended to easily fit inside model rocket bodies, allowing for easy integration of microcontroller-driven functions like delayed ignitions or altimeter triggers. Better development tools, hardware, and 3D printing has really helped make smarter rocketry more accessible to hobbyists.