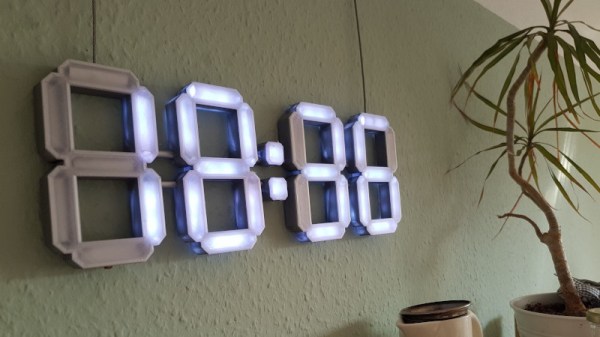
7-segment LED displays were revolutionary, finally providing a clear, readable and low-power numerical display solution. We’ve got plenty of other cheap display options now, but sometimes you just need the old nought-through-nine, and in a big, visible package, to boot. For those circumstances, consider whipping up a set of these 3D-printed seven-segment displays.
The build consists of a 3D printed frame, with each segment containing two WS2812B addressable LEDs. Each 7-segment assembly is then wired so they can be daisy chained, passing on data to the next digit in the chain. Paper is used to diffuse the LEDs for a smoother look, and a white 3D printed cover is printed for each digit to further spread the light and give a clean finish.
Being based on the WS2812Bs, it’s easy to drive such displays with just about any microcontroller or GPIO-equipped Linux board out there. We love big, beautiful displays – and the more artistic, the better. Video after the break.
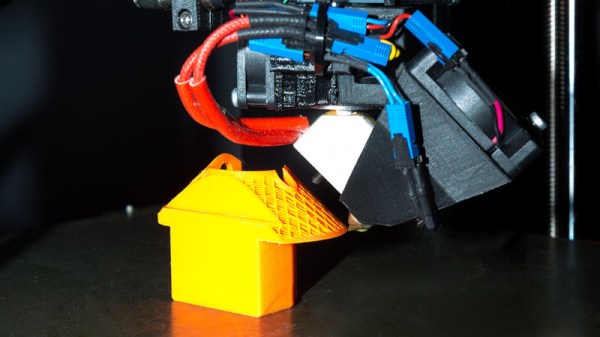
Fused Deposition Modelling (FDM) 3D printers which squirt out molten plastic layer by layer are by far the most popular type in general use. Most machines extrude plastic through a nozzle above print bed, and struggle to produce parts with overhangs without using support material. However, a German team of researchers have recently come up with a solution.
In a prototype built by researchers at the Zurich University of Applied Sciences (ZHAW), a standard Cartesian printer has a third rotary axis added, upon which the nozzle can rotate. Additionally, the nozzle is angled at 45 degrees to the print bed, rather than the usual perpendicular setup. This allows layers of a print to be built up in such a way that support material is not needed for the vast majority of typical overhangs. This is particularly useful for hollow parts, where removing support material can be particularly difficult.
The team believes that such technology could be implemented on existing printers by way of a simple upgrade kit, and we can imagine a few experimenters will be champing at the bit to try it out. If you do, be sure to drop us a line. Alternatively, consider using a marker to make removing supports easier. Video after the break.
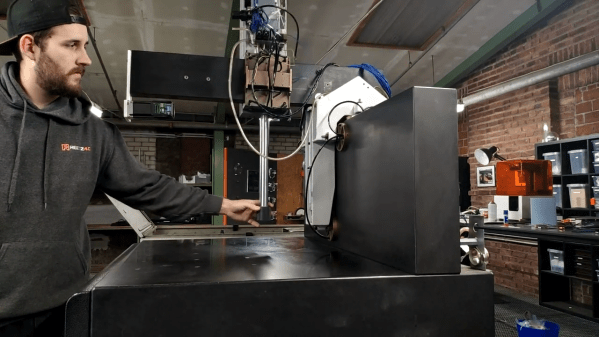
A CMM is a tool used to precisely measure the geometry of an object via gently lowering a calibrated probe. We’ve seen scratch build printers before, but this particular build benefits from having the CMM machinery and its 18 air bearings. The CMM head is moved by [Roetz 4.0]’s own custom system, but it takes advantage of the bearings. After some careful CAD planning as well as a fair bit of milling, lathing, and prototyping, he had buttery smooth controlled motion.
With an off the shelf driver board wired together with a large red button, he was ready for a maiden test print. A determination to finish before the year was out pushed things along. There are still a few quirks to fix, like the hole in the air drying system but those can be tackled next year. Ultimately, we think the results are stunning and it was a journey we were glad to go on with [Roetz 4.0]. The final episode of the series is after the break.
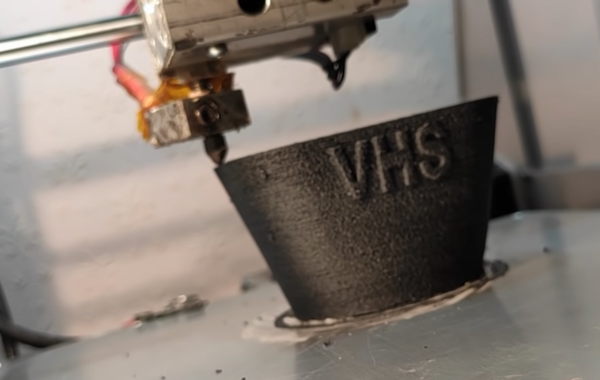
If you have a pile of old VHS tapes collecting dust in your attic or basement that you know you’ll never watch again, either because all of those movies are available on DVD or a streaming service, or because you haven’t had a working VCR since 2003, there might be a way of putting them to good use in another way. With the miles of tape available in just a few cassettes, [brtv-z] shows us how to use that tape as filament for a 3D printer.
The first step of the build is to actually create the filament. He uses a purpose-built homemade press to spin several tapes into one filament similar to how cotton or flax is spun into yarn. From there the filament is simply fed into the 3D printer and put to work. The tape filament needs to be heated higher than a standard 3D printer filament so he prints at a much slower rate, but the resulting product is indistinguishable from a normal print except for the color. It has some other interesting properties as well, such as retaining its magnetism from the magnetic tape, and being a little more brittle than PET plastic although it seems to be a little stronger.
While the VHS filament might not be a replacement for all plastic 3D prints, it’s still a great use for something that would likely otherwise head straight to the landfill. There are some other uses for this magnetic tape as well, like if you wanted to build a DIY particle accelerator.
Even when we share the design files for open source hardware, the step between digital files and a real-world mechatronics widget is still a big one. That’s why I set off on a personal vendetta to find ways to make that transfer step easier for newcomers to an open source mechantronics project.
Today, I want to spill the beans on one of these finds: part numbers, and showcase how they can help you share your project in a way that helps other reproduce it. Think of part numbers as being like version numbers for software, but on real objects.
I’ll showcase an example of putting part numbers to work on one of my projects, and then I’ll finish off by showing just how part numbers offer some powerful community-building aspects to your project.
3D printers are capable of creating complex geometries with a minimum of fuss, but one of the tradeoffs is the long period of time it takes to print a part. Often, printers are left to run for many hours with a minimum of supervision to complete their tasks. This can leave printers idling for long periods of time after their work is finished. Noting this, [TheGrim] put together the Advanced Printer Control.
The aim of the APC is to monitor 3D printers, and shut them off when their work is complete. The aim is to avoid leaving printers running for hours after their prints are finished, which causes needless wear on fans and screens which can have a limited life. This is achieved by putting an ESP8266 in charge of the printer’s AC power supply, via a triac. It measures the current drawn by the printer when idling and in use to set a baseline. Then, whenever the printer drops back to idle levels, a timer begins. When the timer runs out, the printer is switched off. There’s also an option to automatically trigger shutdown with an I/O pin, too.
When the slicer software for a 3D printer model files into GCode, it’s essentially creating a sequential list of connected line segments, organized by layer. But when the features of the original model are dense, or when the model is representing small curves, slicers end up creating a proliferation of teeny segments to represent this information.
This is just the nature of the beast; lots of detail translates into lots of teeny segments. Unfortunately, some printers actually struggle to print these models at the desired speeds, not because of some mechanical limitation, but because the processor cannot recalculate the velocities of these segments fast enough. The result is that some printers simply stutter or slow down the print, resulting in print times that are much higher than they should be.
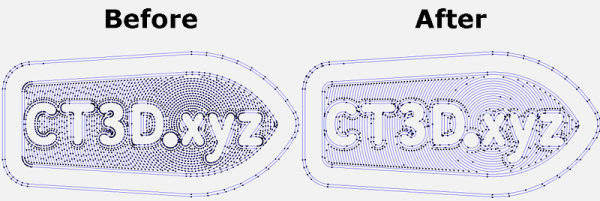
Enter Arc Welder, a GCode compression tool written by [FormerLurker] that scrutinizes GCode files, hunts for these tiny segments, and attempts to replace contiguous clusters of them with a smaller number of arcs. The result is that the number of GCode commands needed to represent the model drop dramatically as connected clusters of segment commands become single arc commands.
“Now wait”, you might say, “isn’t an arc an approximation of these line segments?” And yes–you’re right! But here lies the magic behind Arc Welder. The program is written such that arcs only replace segments if (1) an arc can completely intersect all the segment-to-segment intersections and (2) the error in distance between segment and arc representation is within a certain threshold. These constraints act such that the resulting post-processing is true to the original to a very high degree of detail.
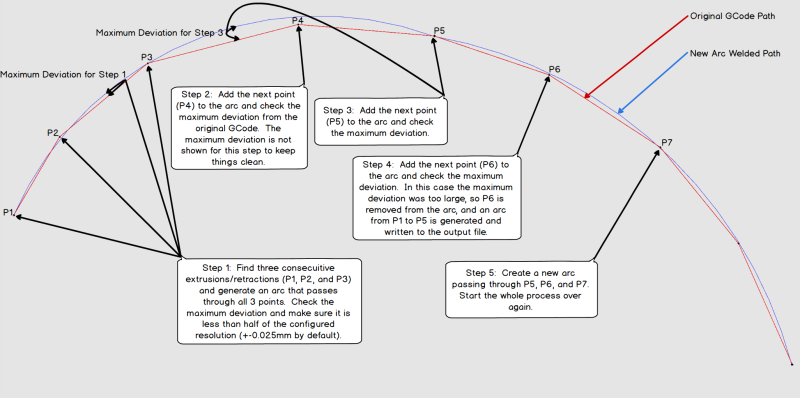
A concise description of Arc Welder’s main algorithm as pulled from the docs
This whole program operates under the assumption that your 3D printer’s onboard motion controller accepts arc commands, specifically G2 and G3. A few years ago, this would’ve been uncommon since, technically, 3D printing and STL file only requires moving in straight line segments. But with more folks jumping on the bandwagon to use these motion control boards for other non-printing applications, we’re starting to see arc implementations on boards running Marlin, Smoothieware, and the Duet flavor of RepRap Firmware.
For the curious, this program is kindly both well documented on operating principles and open source. And if [FormerLurker] seems like a familiar name before–you’d be right–as they’re also the mind behind Octolapse, the 3D printing timelapse tool that’s a hobbyist crowd favorite. Finally, if you give Arc Welder a spin, why not show us what you get in the comments?