Tearing Into Delta Sigma ADC’s

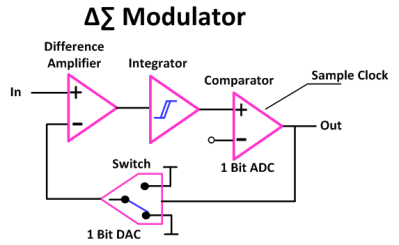
It’s not surprising that Analog to Digital Converters (ADC’s) now employ several techniques to accomplish higher speeds and resolutions than their simpler counterparts. Enter the Delta-Sigma (Δ∑) ADC which combines a couple of techniques including oversampling, noise shaping and digital filtering. That’s not to say that you need several chips to accomplish this, these days single chip Delta-Sigma ADCs and very small and available for a few dollars. Sometimes they are called Sigma-Delta (∑Δ) just to confuse things, a measure I applaud as there aren’t enough sources of confusion in the engineering world already.

I’m making this a two-parter. I will be talking about some theory and show the builds that demonstrate Delta-Sigma properties and when you might want to use them.

Continue reading “Tearing Into Delta Sigma ADC’s”

Using Missile Tech To See Like Predator

[Artem Litvinovich] wanted to see by heat vision like in the Predator movies. He not only succeeded but went on to see in color, medium-wave IR, short-wave IR, and ultraviolet using a very unique approach since his effort began back in 2009.

He started with a box based on the basic pinhole camera concept. In the box is a physical X-Y digitizer moving a photodiode to collect the thousands of points needed to create a picture. First all he got, due to the high signal amplification, was the 60 cycle hum that permeates our lives. A Faraday cage around the box helped but metal foil around the sensor and amplifier finally eliminated the noise. Now he had pictures in the near infrared (NIR). Continue reading “Using Missile Tech To See Like Predator”

Analog To Digital Converter (ADC): A True Understanding

Back in the day where the microprocessor was our standard building block, we tended to concentrate on computation and processing of data and not so much on I/O. Simply put there were a lot of things we had to get working just so we could then read the state of an I/O port or a counter.

Nowadays the microcontroller has taken care of most of the system level needs with the luxury of built in RAM memory and the ability to upload our code. That leaves us able to concentrate on the major role of a microcontroller: to interpret something about the environment, make decisions, and often output the result to energize a motor, LED, or some other twiddly bits.

Often the usefulness of a small microcontroller project depends on being able to interpret external signals in the form of voltage or less often, current. For example the output of a photocell, or a temperature sensor may use an analog voltage to indicate brightness or the temperature. Enter the Analog to Digital Converter (ADC) with the ability to convert an external signal to a processor readable value.

Continue reading “Analog To Digital Converter (ADC): A True Understanding”

Beyond Measure: Instrumentation Amplifiers

In the first article about measurement systems we looked at sensors as a way to bring data into a measurement system. I explained that a sensor measures physical quantities which are turned into a voltage with a variable conversion element such as a resistor bridge. There will always be noise in any system, and an operational amplifier (op-amp) can be used to remove some of that noise. The example we considered used an op-amp in a differential configuration that removes any disturbance signal that is common to both inputs of the op-amp.

But that single application of an op-amp is just skimming the surface of the process of bringing a real-world measurement of a physical quantity into a digital system. Often, you’ll need to do more work on the signal before it’s ready for sampling with a digital-to-analog converter. Signal conditioning with amplifiers is a deep and rich topic, so let me make it clear that that this article will not cover every aspect of designing and implementing a measurement system. Instead, I’m aiming to get you started without getting too technical and math-y. Let’s just relax and ponder amplifiers without getting lost in detail. Doesn’t that sound nice?

Continue reading “Beyond Measure: Instrumentation Amplifiers”

Rasberry Pi Analog Input Using Only Passive Components

The Raspberry Pi is a very capable device whose hardware has been pushed to the limit in all sorts of interesting ways. But even the most ingenious of experimenters have to agree on one point; it doesn’t possess an analog-to-digital converter. If you want analog inputs you will have to buy or build them.

[Mincepi] has done just that, but not as you might expect by adding an integrated circuit on one of the Pi’s interfaces. Instead the circuit [Mincepi] is using consists only of passive components, measuring the time taken to discharge the parasitic capacitance of one of the Pi’s inputs from logic 1 voltage to logic 0 voltage through a resistor into the voltage to be measured. This is a long-established approach to A to D conversion, one that was achieved back in the day with purpose-designed timers as microprocessor ancillaries.

The problem is that the Pi does not have a timer peripheral, so [Mincepi] has used the shift registers that form part of the Pi’s SPI and PCM inputs to perform this task on two channels. A sample rate of 100kHz and 6-bit resolution is claimed, with enough voltage range for a 1V peak-to-peak audio signal to be sampled.

Of course, simplicity does not guarantee a good ADC, and this circuit does not perform very well. It is noisy, non-linear, and as [Mincepi] puts it, probably sensitive to temperature. And though [Mincepi] talks in detail about the software to drive it, none is forthcoming. To quote: “It doesn’t include code since I’m in the process of writing a proper sound device module. My previous code was a simple character device, but it worked just fine, and served to prove the concept.

We really want this to work, even if it’s not the best ADC ever. So we eagerly await the sound device module, and look forward to more news from the project.

This may be the simplest of simple ADCs we’ve yet featured here on Hackaday, but it’s not the first we’ve seen. There is this one using a comparator for example, or this one using a flip-flop. It is the essence of creative electronics to eke a function from a component that was never meant to be, please keep them coming!

Aquire Awesome Audio For BeagleBone

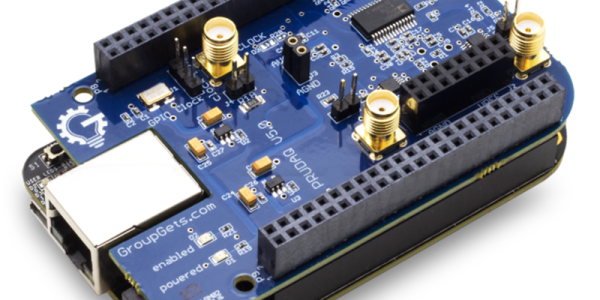
[Henrik Langer] put his powerful audio acquisition and output board up on Hackaday.io, and we thought we’d point it out to you. It’s one of those projects that used to be pro audio just a few years back, but is doable (and affordable) DIY today: dual stereo inputs and four(!) stereo outputs, all sampled at 24 bits and up to 192 kHz. It’s configured as a BeagleBone cape, and comes with a customized Linux distribution for the ‘Bone.

What would you do with such a thing? It’s essentially a recording studio in your pocket, with a computer attached. The video (linked below the break) demonstrates using the device as a real-time stereo delay effect unit, but that’s only making use of one channel. Between effects, recording, and then all sorts of much-better-than-CD quality sound synthesis and playback possibilities, it’s an open-ended audio playground.

And all that from what is essentially a (very well-done) breakout board for a fancy DAC/ADC chip from Analog Devices: the AD1938. We’d love to have one of these on our desktop. Check out [Henrik]’s GitHub for the PCB and build instructions and BOM and everything else you’d need to get started. Very nice job!

Continue reading “Aquire Awesome Audio For BeagleBone”

Touch Piano Hits All The Right Notes

We love a good musical build, and this one is no exception. For their ECE4760 final project, [Wendian Jiang], [Hanchen Jin], and [Lin Wang] of Cornell built the nicest-looking touch piano we’ve seen in a while. It has five 4051 multiplexers that take input from 37 capacitive touch keys fashioned from aluminium foil and copper tape. Thanks to good debounce code, the sounds are clean even though the keyboard is capable of four-note polyphony.

A PIC32 and a Charge Time Measurement Unit (CTMU) module generate a small, steady current that charges up the keys. The PIC scans the pins continuously waiting for touch input. When human capacitance is detected, the value is compared with the base capacitance using the ADC and the sound is generated with the Karplus-Strong algorithm.

The group’s original plans for the project included a TFT screen to show the notes on a staff as they are played. While that would have been awesome, there was just too much going on already to be able to accurately capture the notes as well as their duration. Check it out after the break.

Continue reading “Touch Piano Hits All The Right Notes”