ESP32 Becomes Music Player In Under 40 Lines Of Code

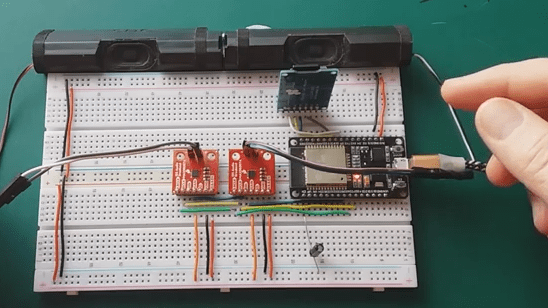
The demo code for [XTronical]’s ESP32-based SD card music player is not even 40 lines long, though it will also require a few economical parts before it all works. Nevertheless, making a microcontroller play MP3s (and other formats) from an SD card is considerably simpler today than it was years ago.

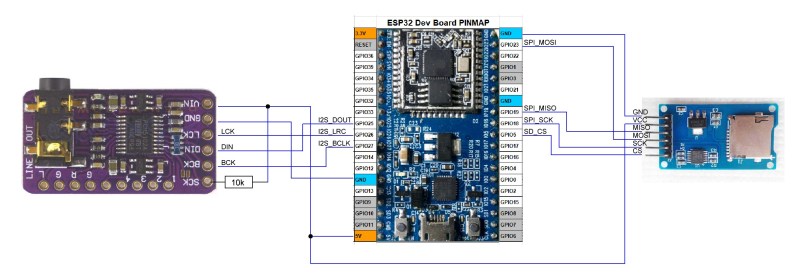
Part of what makes this all work is I2S (Inter-IC Sound), a format for communicating PCM audio data between devices. Besides the ESP32, at the heart of it all is an SD card reader breakout board and the MAX98357A, which can be thought of as a combination I2S decoder and Class D amplifier. The ESP32 reads audio files from the SD card and uses an I2S audio library to send the I2S data stream to the MAX98357A (or two of them for stereo.) From there it is decoded automatically and audio gets pumped though attached speakers.

A few economical components, and only a handful of connections between them.

It’s amazing how much easier audio is to work with when one can take advantage of shuffling audio data around digitally, and the decoder handles multiple formats with an amplifier built in. You can see [XTronical]’s ESP32 player in action in the video embedded below.

Continue reading “ESP32 Becomes Music Player In Under 40 Lines Of Code”

Whirling Shutters On This Field Mill Measure Electrostatic Charges At Distance

Hardly a person hasn’t experienced the sudden, sharp discharge of static electricity, especially on a crisp winter’s day. It usually requires a touch, though, the classic example being a spark from finger to doorknob after scuffing across the carpet. But how would one measure the electrostatic charge of an object without touching it? Something like this field mill, which is capable of measuring electrostatic charge over a range of several meters, will do the trick.

We confess to not having heard of field mills before, and found [Leo Fernekes]’ video documenting his build to be very instructive. Field mills have applications in meteorology, being used to measure the electrostatic state of the atmosphere from the ground. They’ve also played a role in many a scrubbing of rocket launches, to prevent the missile from getting zapped during launch.

[Leo]’s mill works much like the commercial units: a grounded shutter rotates in front of two disc-shaped electrodes, modulating the capacitance of the system relative to the outside world. The two electrodes are fed into a series of transimpedance amplifiers, which boost the AC signal coming from them. A Hall sensor on the shutter allows sampling of the signal to be synchronized to the rotation of the shutter; this not only generates the interrupts needed to sample the sine wave output of the amplifier at its peaks and troughs, but it also measures whether the electrostatic field is positive or negative. Check out the video below for a great explanation and a good looking build with a junk-bin vibe to it.

Meteorological uses aside, we’d love to see this turned toward any of the dozens of Tesla coil builds we’ve seen. From the tiny to the absurd, this field mill should be able to easily measure any Tesla coil’s output with ease.

Continue reading “Whirling Shutters On This Field Mill Measure Electrostatic Charges At Distance”

Guitar Effect Built From An Old Record Player

With little more than a gutted record player, a light bulb, and the legendary 555 timer IC, [Jacob Ellzey] has constructed this very slick optical tremolo effect for his guitar. By modulating the volume of the input signal, the device creates the wavering effect demonstrated in the video after the break.

The key is a vinyl record with large tabs cut out of it. As the record spins, these voids alternately block and unblock a small incandescent bulb. A common GL5537 photoresistor, mounted on the arm that originally held the player’s needle, picks up the varying light levels and passes that on to the electronics underneath the deck. An important note here is that different spacing and sizing of the cutouts will change the sound produced by the effect. [Jacob] has already produced a few different designs and plans on experimenting with more now that the electronics are completed.

Under the hood there’s a voltage divider and low gain amplifier connected to the photoresistor, and also a 555 timer circuit that’s driving the incandescent bulb. Once he was done fiddling with them, the circuit was moved to a neat little protoboard. A pair of potentiometers mounted through the side of the record player allow for adjusting the depth of the effect itself, as well as the output volume. Naturally, there’s also an external foot pedal that allows keying the effect on and off without taking your hands from the guitar.

As is usually the case, everything was going well on this project until the final moments, when [Jacob] found that the circuit and bulb were both browning out when powered from the same transformer. As a quick fix, he gutted a Keurig and used its transformer to drive the light bulb by itself. With independent power supplies, he was ready to rock.

Of course this isn’t the first time we’ve seen a piece of consumer electronics modified into a guitar effect, but if you’re looking for something a bit more built for purpose, there’s plenty of high-tech options to keep you busy.

Continue reading “Guitar Effect Built From An Old Record Player”

Fun With A 200-kW Fiber Laser

We’ve all heard the “Do not stare into laser with remaining eye” joke. It’s funny because it’s true, as pretty much any laser a hobbyist can easily come by can cause permanent damage to eyes unless the proper precautions are taken. But a fiber laser with 200kW peak power is in another hazard class entirely.

Granted, outsized power ratings like this are a bit misleading, based as they are on femtosecond-long pulses. And to be sure, the fiber laser that [Marco Reps] tears down in the video below was as harmless as a kitten when he got it, thanks to its output optics having been unceremoniously shorn from the amplifier by its former owner. Reattaching the output and splicing the fiber would be necessary to get the laser lasing again, but [Marco] had other priorities in mind. He wanted to understand the operation of a fiber laser, but the tangle of fibers on two separate levels inside the chassis was somewhat inscrutable. The coils of fiber wrapped around the aluminum drums inside the chassis turned out to be the amplifier; fed by a semiconductor seed laser, the light pulse travels through the ytterbium-doped fiber of the two-stage amplifier, which is the active gain medium where stimulated emission, and therefore amplification, occurs.

With a little reverse engineering and the help of an online manual, he was able to understand the laser’s operation. A laser company helped him splice the optics back together – seeing the splicing rig in action is worth the price of admission alone – and the unit seems to be in more or less working order at this point. Normally the most powerful laser we see around here are the CO2 lasers in those cheap Chinese laser cutters, so we’re looking forward to learning more about fiber lasers.

Continue reading “Fun With A 200-kW Fiber Laser”

Hackaday Links Column Banner

Hackaday Links: November 17, 2019

Friday, November 15, 2019 – PASADENA. The 2019 Hackaday Superconference is getting into high gear as I write this. Sitting in the Supplyframe HQ outside the registration desk is endlessly entertaining, as attendees pour in and get their swag bags and badges. It’s like watching a parade of luminaries from the hardware hacking world, and everyone looks like they came ready to work. The workshops are starting, the SMD soldering challenge is underway, and every nook and cranny seems to have someone hunched over the amazing Hackaday Superconference badge, trying to turn it into something even more amazing. The talks start on Saturday, and if you’re not one of the lucky hundreds here this weekend, make sure you tune into the livestream so you don’t miss any of the action.

The day when the average person is able to shoot something out of the sky with a laser is apparently here. Pablo, who lives in Argentina, has beeing keeping tabs on the mass protests going on in neighboring Chile. Huge crowds have been gathering regularly over the last few weeks to protest inequality. The crowd gathered in the capital city of Santiago on Wednesday night took issue with the sudden appearance of a police UAV overhead. In an impressive feat of cooperation, they trained 40 to 50 green laser pointers on the offending drone. The videos showing the green beams lancing through the air are quite amazing, and even more amazing is the fact that the drone was apparently downed by the lasers. Whether it was blinding the operator through the FPV camera or if the accumulated heat of dozens of lasers caused some kind of damage to the drone is hard to say, and we’d guess that the drone was not treated too kindly by the protestors when it landed in the midsts, so there’s likely not much left of the craft to do a forensic analysis, which is a pity. We will note that the protestors also trained their lasers on a police helicopter, an act that’s extremely dangerous to the human pilots which we can’t condone.

In news that should shock literally nobody, Chris Petrich reports that there’s a pretty good chance the DS18B20 temperature sensor chips you have in your parts bin are counterfeits. Almost all of the 500 sensors he purchased from two dozen vendors on eBay tested as fakes. His Github readme has an extensive list that lumps the counterfeits into four categories of fake-ness, with issues ranging from inaccurate temperature offsets to sensors without EEPROM that don’t work with parasitic power. What’s worse, a lot of the fakes test almost-sorta like authentic chips, meaning that they may work in your design, but that you’re clearly not getting what you paid for. The short story to telling real chips from the fakes is that Maxim chips have laser-etched markings, while the imposters sport printed numbers. If you need the real deal, Chris suggests sticking with reputable suppliers with validated supply chains. Caveat emptor.

A few weeks back we posted a link to the NXP Homebrew RF Design Challenge, which tasked participants to build something cool with NXP’s new LDMOS RF power transistors. The three winners of the challenge were just announced, and we’re proud to see that Razvan’s wonderfully engineered broadband RF power amp, which we recently featured, won second place. First place went to Jim Veatch for another broadband amp that can be built for $80 using an off-the-shelf CPU heatsink for thermal management. Third prize was awarded to a team lead by Weston Braun, which came up with a switch-mode RF amp for the plasma cavity for micro-thrusters for CubeSats, adorably named the Pocket Rocket. We’ve featured similar thrusters recently, and we’ll be doing a Hack Chat on the topic in December. Congratulations to the winners for their excellent designs.

Well-Engineered RF Amplifier Powers Ham Radio Contacts

Typically, amateur radio operators use the minimum power needed to accomplish a contact. That’s just part of being a good spectrum citizen, and well-earned bragging rights go to those who make transcontinental contacts on the power coming from a coin cell. But sometimes quantity has a quality all its own, and getting more power into the ether is what the contact requires. That’s where builds such as this well-engineered 600W broadband RF amplifier come into play.

We’re really impressed with the work that [Razvan] put into this power amp. One of the great joys of being a ham is being able to build your own gear, and to incorporate the latest technology long before the Big Three manufacturers start using it. While LDMOS transistors aren’t exactly new – laterally-diffused MOSFETs have been appearing in RF power applications for decades – the particular parts used for the amp, NXP’s MRF300 power transistors, are pretty new to the market. A pair of the LDMOS devices form the heart of the push-pull amp, as do an array of custom-wound toroids and transformers including a transmission line transformer wound with 17-ohm coax cable. [Razvan] paid a lot of attention to thermal engineering, too, with the LDMOS transistors living in cutouts in the custom PCB so they can mate with a hefty heatsink. Even the heatsink compound is special; rather than the typical silicone grease, he chose a liquid metal alloy called Gallinstan. The video below gives a tour of the amp and shows some tests with impressive results.

Continue reading “Well-Engineered RF Amplifier Powers Ham Radio Contacts”

It’s A TV-Scope-Guitar Amplifier!

Guitar amplifiers are a frequent project, and despite being little more than a simple audio amplifier on paper, they conceal a surprising quantity of variables in search of a particular sound. We’ve seen a lot of them, but never one quite like [Nate Croson]’s CRT TV guitar amplifier. The LM386 doesn’t just drive the speaker, he’s also using it to turn the TV into a crude oscilloscope to form a visualisation of the sound.

The video showing this feat is below the break, and it puts us in a quandary due to being short on technical information. He’s driving the horizontal coils with the TV’s 50 Hz sawtooth field timebase, and the vertical ones with the audio from the LM386. We aren’t sure whether he’s rotated the yoke or whether the connections have been swapped, but the result is certainly impressive.

So given that there’s not quite as much technical detail as we’d like, why has this project captured our interest? Because it serves as a reminder that a CRT TV is a bit more than a useless anachronism, it’s a complex analogue device with significant and unique hacking potential. The older ones in particular provide endless possibilities for modification and circuit bending, and make for a fascinating analogue playground at a very agreeable price. It’s worth pointing out however that some of the voltages involved can make them a hazardous prospect for the unwary hacker. If you’re interested though, take a look at our dive into an older model.

Continue reading “It’s A TV-Scope-Guitar Amplifier!”