GoPro Factory Goes Nomad To Dodge Tariff Threat

Despite the fact that the United States and China are currently in the middle of a 90-day “cease fire” in their ongoing trade war, with new tariffs on hold until March 2019 while the two countries try to reach agreement, not everyone is waiting around to see who comes out on top. In a recent press release, action camera manufacturer GoPro has announced their intention to move some production out of China in the face of potential tariff expansions; which many analysts fear will be the result of the current stalemate. That’s right, only some of their production is moving.

“We’re proactively addressing tariff concerns by moving most of our US-bound camera production out of China,” says GoPro CFO Brian McGee. “We believe this diversified approach to production can benefit our business regardless of tariff implications.” Reading his words carefully, the key phrase here is “diversified approach”. GoPro doesn’t intend to move their entire production capability out of China, but only the production of the cameras which are designated for importation into the United States. GoPro models which are to be sold to other parts of the world will still be made in China.

This might seem an extravagant move just to avoid US tariffs, but with better than 40% of GoPro’s revenue for the third quarter of 2018 coming from the Americas, the company stands to be hit hard by the proposed 25% tax. Combined with the fact they shuttered their drone division last year citing “an extremely competitive aerial market”, and the proliferation of “GoPro clones” available for pennies on the dollar, it seems pretty clear that belt-tightening is the name of the game for the company that was once synonymous with action cameras.

Continue reading “GoPro Factory Goes Nomad To Dodge Tariff Threat”

Watch The Low-Cost Mechatronics Lab Dispense Candy, Sort Cups

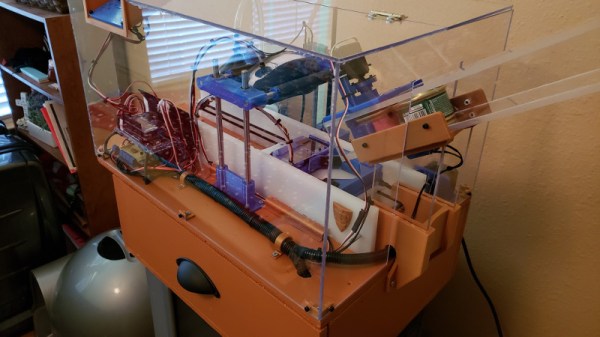
A lot can be done with simple motors and linear motion when they are mated to the right mechanical design and control systems. Teaching these principles is the goal behind the LCMT (Low Cost Mechatronics Trainer) which is intended primarily as an educational tool. The LCMT takes a “learn by doing” approach to teach a variety of principles by creating a system that takes a cup from a hopper, fills it with candy from a dispenser, then sorts the cups based on color, all done by using the proper combinations of relatively simple systems.

The Low Cost Mechatronics Trainer can be built for under $1,000 and is the wonderful work of a team from the Anne Arundel Community College in Maryland, USA. The LCMT is clearly no one-off project; there are complete CAD files and build documentation on the site, as well as a complete lab guide for educators.

A demo video of the assembled system is embedded below, with a walkthrough done by [Tim Callinan]. It’s worth a watch to see how cleanly designed the system is, and the visual learners among you may learn a thing or two just by watching the system go through its motions.

Continue reading “Watch The Low-Cost Mechatronics Lab Dispense Candy, Sort Cups”

Set Up A Headless Raspberry Pi, All From Another Computer’s Command Line

There are differences between setting up a Raspberry Pi and installing an OS on any other computer, but one thing in common is that if you do enough of them, you seek to automate the process any way you can. That is the situation [Peter Lorenzen] found himself in, and his solution is a shell script to install and configure the Raspberry Pi for headless operation, with no need to connect either a keyboard or monitor in the process.

[Peter]’s tool is a script called rpido, and with it the process for setting up a new Raspberry Pi for headless operation is super streamlined. To set up a new Pi, all [Peter] needs to do is:

  1. Plug an SD card into his laptop (which happens to be running Ubuntu.)
  2. Run: rpido -w -h myhostname -s which downloads and installs the newest version of Raspbian lite, does some basic setup (such as setting the hostname), configures for headless operation, and launches a root shell.
  3. Use the root shell to do any further tweaks or checks (like launching raspi-config for additional changes.)
  4. Exit the shell, remove the SD card from his laptop, and install the card into the Raspberry Pi.

There are clear benefits to [Peter]’s script compared to stepping through a checklist of OS install and setup tasks, not to mention the advantage of not needing to plug in a keyboard and monitor. Part of the magic is that [Peter] is mounting the SD card’s filesystem in a chroot environment. Given the right tools, the ARM binaries intended for the Pi run on his (Intel) Ubuntu laptop. It’s far more convenient to make changes to the contents of the SD card in this way, before it goes to its new home in a Pi.

Not everything has to revolve around an SD card, however. [Jonathan Bennet] showed that it’s possible to run a Raspberry Pi without an SD card by using the PXE boot feature, allowing it to boot and load its file system from a server on the same network, instead of a memory card.

Add Nest Functionality To Your Thermostat For $5

The Nest Thermostat revolutionized the way that people control the climate in their homes. It has features more features than even the best programmable thermostats. But, all of the premium features also come at a premium price. On the other hand, for only $5, a little coding, and the realization that thermostats are glorified switches, you can easily have your own thermostat that can do everything a Nest can do.

[Mat’s] solution uses a Sonoff WiFi switch that he ties directly into the thermostat’s control wiring. That’s really the easy part, since most thermostats have a ground or common wire, a signal wire, and a power wire. The real interesting work for this build is in setting up the WiFi interface and doing the backend programming. [Mat’s] thermostat is controlled by software written in Node-RED. It can even interface with Alexa. Thanks to the open source software, it’s easy to add any features you might want.

[Mat] goes through a lot of detail on the project site on how his implementation works, as far as interfacing all of the devices and the timing and some of the coding problems he solved. If you’ve been thinking about a Nest but are turned off by the price, this is a great way to get something similar — provided you’re willing to put in a little extra work. This might also be the perfect point to fall down the home automation rabbit hole, so be careful!

Continue reading “Add Nest Functionality To Your Thermostat For $5”

New Part Day: Put An Alexa In Everything

The last great hope for electronics manufactures is smart home assistants. The Alexas and Siris and OK Googles are taking over homes across the country. At its best, it’s HAL 9000, only slightly less homicidal. It will entertain your children, and you can order cat litter just by saying you want cat litter. This is the future, whether we like it or not.

In an attempt to capture the market, Amazon has released the Alexa Connect Kit. This is an Amazon-Echo-On-a-Chip — a piece of hardware that adds Alexa to microwaves, blenders, and whatever other bit of home electronics you can imagine.

The Alexa Connect Kit is the hardware behind Amazon’s efforts to allow developers easy integration with Alexa. The options for adding Alexa to a product up until now have been using Zigbee to connect an Echo Show or Echo Plus, or simply giving a device the ability to connect to an Echo through Bluetooth. The Alexa Connect Kit, however, is a pure hardware solution that puts Alexa in anything.

Unfortunately you can’t get one yet. Right now, the Alexa Connect Kit is just a preview, and if you want to get your hands on one — or get any specs on this bit of hardware — you’ll need to apply to the developer program. We’ve signed up and will share and juicy details that come our way as part of the program.

According to the Wall Street Journal (try Google referral link if you hit the pay wall), several companies are already working on integrating the Alexa Connect Kit into their existing product lines. Hamilton Beach and Procter & Gamble are both working on something, although the press doesn’t say what kind of device will now be loaded up with a voice assistant. Amazon, however, has a microwave using the technology that the owner can, “command the microwave to do things like defrost a half-pound of chicken, or set it up to automatically reorder a favorite type of popcorn on Amazon”.

Despite the sparse details, this is relatively game-changing when it comes to the world of homebrew electronics. We’ve seen dozens of projects using hacked Raspberry Pis and other microcontrollers to at Alexa to hacked coffee machines, to shoot Nerf darts, and to control a projector. If you can actually get one of these Alexas-on-a-chip, all those projects could be done with one simple piece of hardware.

Automagic Tool Makes KiCAD Schematic Symbols From PDFs

Last time we talked about a KiCAD tool it was to describe a way to make the zen-like task of manual assembly more convenient. But what about that most onerous of EE CAD tasks, part creation? Home makers probably don’t have access to expensive part library subscriptions or teams of people to create parts for them, so they are left to the tedium of creating them by hand. What if the dream tool existed that could read the darn PDF by itself and make a part? It turns out [Sébastien] made that tool and it’s called uConfig.

uConfig has a pretty simple premise. It scrapes manufacturer datasheets in PDF form, finds what it thinks are diagrams of parts with pin names, functions, etc, and emits the result as parts in a KiCAD library. To aid in the final conversion [Sébastien] added rules engine which consume his custom KiCAD Style Sheets which specify how to categorize pins. In the simple case the engine can string match or use regex to let you specify things like “all pins named VDD[A-C] should be power pins”. But it can also be used to move everything it thinks belongs to “GPIOB” and stick them on the bottom of the created symbol. We could imagine features like that would be of particular use breaking out gigantic parts like a 400 ball BeagleBone on a chip.

Thanks for the tip [arturo182]!

The How And Why Of Tungsten Carbide Inserts, And A Factory Tour

It seems a touch ironic that one of the main consumables in the machining industry is made out of one of the hardest, toughest substances there is. But such is the case for tungsten carbide inserts, the flecks of material that form the business end of most of the tools used to shape metal. And thanks to one of the biggest suppliers of inserts, Sweden’s Sandvik Coromant, we get this fascinating peek at how they’re manufactured.

For anyone into machining, the video below is a must see. For those not in the know, tungsten carbide inserts are the replaceable bits that form the cutting edges of almost every tool used to shape metal. The video shows how powdered tungsten carbide is mixed with other materials and pressed into complex shapes by a metal injection molding process, similar to the one used to make gears that we described recently. The inserts are then sintered in a furnace to bind the metal particles together into a cohesive, strong part. After exhaustive quality inspections, the inserts are ground to their final shape before being shipped. It’s fascinating stuff.

Coincidentally, [John] at NYC CNC just released his own video from his recent jealousy-inducing tour of the Sandvik factory. That video is also well worth watching, especially if you even have a passing interest in automation. The degree to which the plant is automated is staggering – from autonomous forklifts to massive CNC work cells that require no operators, this looks like the very picture of the factory of the future. It rolls some of the Sandvik video in, but the behind-the-scenes stuff is great.

Continue reading “The How And Why Of Tungsten Carbide Inserts, And A Factory Tour”