
[Alex] put together this handy cheat sheet to make pinout lookups much quicker. It covers the most common chips from the AVR line, ISP headers, and FTDI cables.
[Alex] put together this handy cheat sheet to make pinout lookups much quicker. It covers the most common chips from the AVR line, ISP headers, and FTDI cables.

The guys over at NerdKits put together a really informative video on a meat thermometer using predictive filtering which is viewable below. The video, supplemental text, and code is available on their website. The thermometer is constructed of a LM34 temperature sensor attached to a piece of 12 gauge solid copper wire. The thermometer signal is processed on an ATmega168 microcontroller and visualized using the pygame library for python. The real gem in this project is their excellent explanation of predictive filtering, which could easily be utilized for a large number of projects.
Continue reading “Meat Thermometer Using Predictive Filtering”
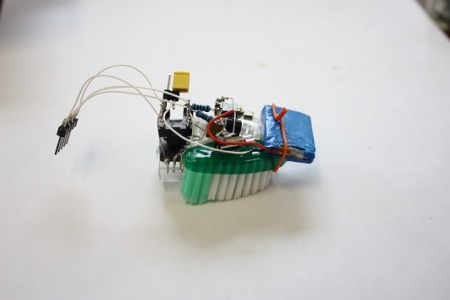
[sprite_tm], whose projects we have covered in the past, took the popular bristlebot to an extreme and created a controllable version. A bristlebot consists of a small vibrating motor mounted with a battery on the head of a toothbrush. These micro-robots buzz around randomly, and he attempted to tame them. He used a platform of twin bristlebots and added an optical sensor from a laser mouse and an ATtiny13. The optical sensor is used to determine the relative motion of the robot, so that the motors can be adjusted accordingly. He also has a video of the bot using the sensor to find a mark on the floor and stay within bounds. Although it isn’t as accurate, it acts like a traditional line-following robot.

[Hazard] wanted a full color POV display for his bike wheel. Adafruit’s SpokePOV is single color and Monkeylectric’s original version didn’t display images. He also balked at the cost and decided to manufacture his own version. It uses 16 RGB LEDs on a single layer board he manufactured himself. It’s an entirely through-hole design to make assembly easy. It uses a hall effect sensor to synchronize the image display. The two main components are an ATmega328p microcontroller, which should make it Arduino compatible, and a TLC5940 PWM LED driver. It’s a very well documented build and certainly a good looking effect.
[via adafruit]

Reader, [Lennon Luks] made a really slick MIDI sequencer/controller for his senior design project while studying at Western Carolina University. It has a grid of 64 LED buttons, 8 knobs, and a display with navigation buttons that allow him to sequence tracks with or without a computer. The controller is based off an ATmega644 and is programmed in C. [Lennon] clearly explains the inner workings of the project in detail on his website and has included a good number of pictures. [Lennon] made a nice video of the project which can be seen after the jump.

[Marcus] saw [Alex]’s 64 pixel project and decided it could be implemented in even less space. Pictured above is his Space Invader button with a bicolor LED matrix. The controller board is all SMD and piggybacked on the matrix. An ATmega164P drives the 24 pins via transistors. In addition to animation, the board can do LED sensing too. It’s a very clever project and [Marcus] has some notes about working with such tiny components. You can see a video of it below. Continue reading “Space Invader Button”

Have you ever wondered how high or how fast a model rocket goes when you launch it? [sprite_tm] did, so he decided to build a low cost, lightweight data logger that he could fit into the nose cone of his rocket. To keep the circuit small, he built it around the popular ATtiny13 microcontroller. The microcontroller collects data from a Freescale MMA7260, a 3-axis accelerometer that he extracted from a third-party Wii nunchuck controller. After the microcontroller collects the data, it’s stored in 32K of EEPROM on a 24C256. All of this is powered by a small 3.6v Li-ion battery, which is the largest part of the circuit. If this sounds like something you’d like to make, he has detailed instructions along with the software used available on his site. While we don’t launch a lot of model rockets here, we may soon start just so that we have an excuse to build this.


