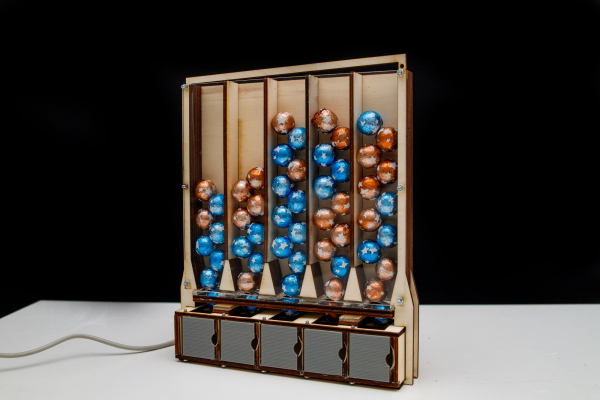
Basic Sequencer For Your Synth Rack

Sequencers are useful for bringing regular structure to your music, particularly if you enjoy noodling around with rackmount synthesizers. [little-scale] is here to share an ADC Binary Gate sequencer for your setup.

In a quest for ever greater minimalism, the build relies on a barebones ATMega328p without an external oscillator. Instead, the chip’s internal RC oscillator is used instead. It’s possible to still use this with the Arduino IDE, as [little-scale] shares here.

The music production begins with a clock input signal, which is patched in from elsewhere in the rack synth. The sequencing is controlled with potentiometers. There are four potentiometers, and four corresponding output channels.  The pots are all read with the onboard analog to digital converters, and the position transformed into an 8-bit value, from 0 to 255. Our best understanding is that the 8-bit number is then used as the sequence to follow. For example, if the potentiometer is set to 255, which is 11111111 in binary, the sequencer will trigger on every beat. If instead the potentiometer was turned to around 2/3rds of the maximum, and the ADC reads a value of 170, in binary this is 10101010 which would trigger on every second beat.

It’s an interesting way to sequence several channels with the bare minimum of input devices. While it may not be the most intuitive system, it really suits the knob-and-dial noodling so relished by rackmount fanatics. Be sure to check out the video below for [little-scale]’s rackmount sounds and impressively pretty videography.  Never before did breadboards look so good.

New to rack mount synths? Check this one out.


Injecting Code Into Mouse Firmware Should Be Your Next Hack

Here’s a DEF CON talk that uses tools you likely have and it should be your next hacking adventure. In their Saturday morning talk [Mark Williams] and [Rob Stanely] walked through the process of adding their own custom code to a gaming mouse. The process is a crash course in altering a stock firmware binary while still retaining the original functionality.

The jumping off point for their work is the esports industry. The scope of esporting events has blown up in recent years. The International 2016 tournament drew 17,000 attendees with 5 million watching online. The prize pool of $20 million ($19 million of that crowdfunded through in-game purchases) is a big incentive to gain a competitive edge to win. Contestants are allowed to bring their own peripherals which begs the questions: can you alter a stock gaming mouse to do interesting things?

The steelseries Sensei mouse was selected for the hack because it has an overpowered mircocontroller: the STM32F103CB. With 128 KB of flash the researchers guessed there would be enough extra room for them to add code. STM32 chips are programmed over ST-Link, which is available very inexpensively through the ST Discovery boards. They chose the STM32F4DISCOVERY which runs around  $20.

Perhaps the biggest leap in this project is that the firmware wasn’t read-protected. Once the data, clock, and ground pads on the underside of the board were connected to the Discovery board the firmware was easy to dump and the real fun began.

They first looked through the binary for a large block of zero values signifying unused space in flash. The injected firmware is designed to enumerate as a USB keyboard, open Notepad, then type out, save, and execute a PowerShell script before throwing back to the stock firmware (ensuring the mouse would still function as a mouse). Basically, this builds a USB Rubber Ducky into stock mouse firmware.

There are a few useful skills that make taking on this project a worthwhile learning experience. To compile your custom code correctly you need to choose the correct offset address for where it will end up once pasted into the firmware binary. The vector table of the original code must be rewritten to jump to the injected code first, and it will need to jump back to the mouse execution once it has run. The program flow on the left shows this. Both of these jumps require the program counter and registers to be saved and restored. The ARM stack is subtractive and the address will need to be updated to work with the added code.

The talk ended with a live demo that worked like a charm. You can check out the code in the MDHomeBrew repo. In this case the PowerShell script adds keyboard shortcuts for DOOM cheats. But like we said before, the experience of getting under the hood with the firmware binary is where the value will be for most people. With this success under your belt you can take on more difficult challenges like [Sprite_TM’s] gaming keyboard hack where the firmware couldn’t easily be dumped and an update binary was quite obsfucated.

New Take On The Binary Clock

By now it might seem like there’s no new way to build a binary clock. It’s one of the first projects many build to try out their first soldering irons, so it’s a well-traveled path. Every now and then, however, there’s a binary clock that takes a different approach, much like [Stephen]’s latest project which he calls the byte clock.

The clock works by dividing the 24-hour day into half and using an LED to represent this division, which coincidentally works out to representing AM or PM. The day is divided in half over and over again, with each division getting its own LED. In order to use this method to get one-second resolution it would need 16 LEDs, but since that much resolution isn’t too important for a general-use clock, [Stephen] reduced this to eight.

Additionally, since we’re in the Internet age, the clock has built-in WiFi courtesy of a small version of Python called WiPy which runs on its own microcontroller. A real-time clock rounds out the build and makes sure the clock is as accurate as possible. Of course an RTC might not have the accuracy as some other clocks, but for this application it certainly gets the job done.

This Binary Keyboard Is For ASCII Purists

So, you’re a keyboard enthusiast. The ‘board that came from Dell, HP, or whoever made your computer is just not for you. You have an ancient IBM, a decal-free Das Keyboard, or another similarly esoteric text input device. Your typing can be heard three blocks away as the unmistakable clack of bent-spring switches reverberates around you, but you don’t care because you’re in the Zone.

No keyboard can be as high-end as the one you already have, your position in the hierarchy of text entry is assured. But then along comes [Chris Johnston] with his project, and suddenly your desktop looks very cluttered. It’s a binary keypad with only a 0 key, a 1 key, and an OLED display. All input is as a series of binary bytes, so as a hardcore binary typist you’ll need to know your ASCII.

Behind the keys is an Arduino Pro Micro acting in USB HID mode, and running the code you can download from the GitHub link above. It’s a gloriously pointless input device, but we’re sure you’ll agree it has something of the 00110001 00110011 00110011 00110111 about it.

If you think you may have seen this before on Hackaday then you’re not quite right. We have had a binary keypad in the past, but that one had a return key and thus had three keys. This one’s a 2-key ‘board for binary purists.

[via /r/mechanicalkeyboards/]

Binary Keyboard Is The Purest Form Of Input Device

You may be a hardcore keyboard aficionado whose buckled-spring switches will be pried from your cold dead hands, but there is a new model on the street that relegates your blank-key Das Keyboard or your trusty IBM Model M to the toy chest.

The new challenger comes from Reddit user [duckythescientist], who has created a minimalist three-key binary keyboard. It features a 0 key, a 1 key, a return key, and nothing else. Characters are entered as ASCII or Unicode, and the device emulates either a QWERTY or Dvorak keyboard layout to the host computer’s USB interface. It couldn’t be a simpler layout to learn, though we’d concede that not everyone has the entire binary Unicode table memorised.

The keys are mounted in a custom 3D printed case, and the electronics come from the creator’s own “tinydev” board based on an ATtiny85. All the code is available in a GitHub repository, and there is a very short video of its Unicode ability below the break.

Continue reading “Binary Keyboard Is The Purest Form Of Input Device”

Micropython Binaries For The ESP8266 To Be Released

MicroPython is a Kickstarted project that brings Python to small, embeddable devices. As part of the terms of the Kickstarter, supporters were to get exclusive access to binary builds, with a few exceptions. Now it looks like the ESP8266-version is going to be added to the binary list. This is awesome news for anyone who enjoys playing around with the popular WiFi chip.

But even more heartwarming is the overwhelming response of the Kickstarter’s backers for making the binary builds public. Basically everyone was in favor of opening the binaries up to the general public, and many wrote that they wanted public binaries all along. People can be so giving.

But there’s also something in it for them! The more people get behind MicroPython, the more (free and paid) development support it will warrant, and the more bug reports it will garner. Wins all around. So keep clicking refresh on the binary list until you see it live. Or better yet, if you’re interested, head over to the forum. (Or just wait for us to cover it here. You know we will.)

Hackaday Prize Entry: Modular, Low Cost Braille Display

A lot of work with binary arithmetic was pioneered in the mid-1800s. Boolean algebra was developed by George Boole, but a less obvious binary invention was created at this time: the Braille writing system. Using a system of raised dots (essentially 1s and 0s), visually impaired people have been able to read using their sense of touch. In the modern age of fast information, however, it’s a little more difficult. A number of people have been working on refreshable Braille displays, including [Madaeon] who has created a modular refreshable Braille display.

The idea is to recreate the Braille cell with a set of tiny solenoids. The cell is a set of dots, each of which can be raised or lowered in a particular arrangement to represent a letter or other symbol. With a set of solenoids, this can be accomplished rather rapidly. [Madaeon] has already prototyped these miniscule controllable dots using the latest 3D printing and laser cutting methods and is about ready to put together his first full Braille character.

While this isn’t quite ready for a full-scale display yet, the fundamentals look like a solid foundation for building one. This is all hot on the heels of perhaps the most civilized patent disagreement in history regarding a Braille display that’s similar. Hopefully all the discussion and hacking of Braille displays will bring the cost down enough that anyone who needs one will easily be able to obtain and use one.

Continue reading “Hackaday Prize Entry: Modular, Low Cost Braille Display”