Web Matrix Control Proves Power Of ESP8266

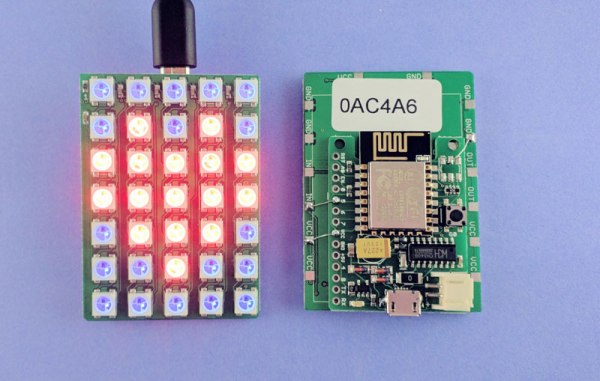
LED matrix projects are all over the place, but this one is interesting for its simplicity: it’s an LED matrix that is driven straight from an ESP8266 board. [Ray] put it together as a quick project for his students to teach the basics of LED programming.

It’s built using a WS2812 LED matrix board he designed himself and his own ESPToy ESP8266 dev board. But the gist of the hardware is simply an ESP8266 and some WS2812’s. Where this gets interesting is with the user interaction side of things. The ESP makes WiFi and web serving easy, and [Ray] has build a simple HTTP GET API into the firmware. This is a great combination for the web dashboard and JavaScript-based animation programs [Ray] is demonstrating in the video below.

Just get on the same network and load up the module’s WiFi address for a graphical representation of the 5×7 LED matrix. Pick a color, turn pixels on or off, or choose a predefined pattern and send it to the hardware. This is a powerful way to get use input and with this as a guide it’s fast to set up for pretty much an application you can think of. Just work your way through the documents he put together for the workshop (Zip file link), including all of the code and the slides he used to run the workshop.

Continue reading “Web Matrix Control Proves Power Of ESP8266”

Netbook Finds New Home In A Jaguar Dashboard

You’d figure a luxury car like a Jaguar would have a high-end infotainment system. [RichTatham]’s Jag did, but the trouble was that it was a high-end system when a cassette deck and trunk-mounted CD changer were big deals. So naturally, he saw this as a great reason to modernize the system by grafting a netbook into the Jag’s dash. The results are fantastic!

Even though the Jag’s original system didn’t have much left that made it into the final project — the navigation system, CD changer, phone and even the amps ended up on the scrap heap — at least the dashboard instrument cluster proved to be very amenable to his mods. By substituting a climate control cluster from another model into his car, he was able to free up tons of space for the netbook’s 8″ display. A custom bezel and some clever brackets completed the head-end of the new system, and the look is as close to a factory install as you’re likely to find in an aftermarket mod. With the netbook stashed in the bay vacated by the OEM system, a GPS dongle, and a USB sound card connected to a 5.1 amp using the original speakers this jag is ready to bump. We bet that the system sounds as good as it looks, and with the added functionality of a Windows PC to boot.

For obvious reasons, lots of computers make it into hackers’ dashboards, whether they be Windows like this one, Samsung tablets or Nexus tablets running Android, and even phones. But [Rich]’s build is top notch, and takes in-car integrations to the next level.

[via r/diy]

Good News! It’s The Dacia 1310!

Although we’ve never had the privilege to drive one, [skaarj] tells us Dacia made some terrible cars. The Dacia 1310, a communist clone of the Renault 12, was cheap, had sixty-two horses under the hood, and was easy to maintain. The cabin, by all accounts, is a bit lacking, giving [skaarj] the opportunity to improve the instrument cluster and dash. He’s not throwing a stereo in and calling it a day – [skaarj] is upgrading his Dacia with retro-futuristic components including a vacuum tube amp, a CRT computer display, and an unspeakably small dumb terminal.

[skaarj]’s build began with a hit and run accident. With most of the body panels on the passenger side of the car removed, [Skaarj] ground some rust, rattle canned some rust proof paint, and bondoed the most offensive corrosion. Work then began on the upgraded dash, with a few choice components chosen including an old Soviet television, a hardware neural network to determine hardware faults, and a bizarre implementation of a CAN bus on a car without any of the requisite electronics.

This is one of those projects that can go on forever; there’s a lot you can do with the dashboard of a car if you’re not constrained by a suffocating desire to appear normal. In that respect, [skaarj] has this one locked up – he’s got a vacuum tube amplifier and enough CRTs in this car to add retro satellite navigation. It’s a great entry for The Hackaday Prize, as something cool is sure to come out of this project.

The HackadayPrize2016 is Sponsored by:
Volvo Phone Holder

DIY IPhone Mount For A Volvo

[Seandavid010] recently purchased a 2004 Volvo. He really liked the car except for the fact that it was missing some more modern features. He didn’t come stock with any navigation system or Bluetooth capabilities. After adding Bluetooth functionality to the stock stereo himself, he realized he would need a secure location to place his iPhone. This would allow him to control the stereo or use the navigation functions with ease. He ended up building a custom iPhone mount in just a single afternoon.

The key to this project is that the Volvo has an empty pocket on the left side of the stereo. It’s an oddly shaped vertical pocket that doesn’t seem to have any real use. [Seandavid010] decided this would be the perfect place to mount his phone. The only problem was that he didn’t want to make any permanent changes to his car. This meant no drilling into the dash and no gluing.

[Seandavid010] started by lining the pocket with blue masking tape. He then added an additional lining of plastic wrap. All of this was to protect the dashboard from what was to come next. He filled about half of the pocket with epoxy putty. We’ve seen this stuff used before in a similar project. He left a small opening in the middle with a thick washer mounted perpendicular to the ground. The washer would provide a place for an off-the-shelf iPhone holder to mount onto. [Seandavid010] also placed a flat, wooden paint stirrer underneath the putty. This created a pocket that would allow him to route cables and adapters underneath this new mount.

After letting the epoxy putty cure for an hour, he removed the block from the pocket. The stick was then removed, and any gaps were filled in with putty. The whole block was trimmed and smooth down for a more streamlined look. Finally, it was painted over with some flat black spray paint to match the color of the dashboard. An aftermarket iPhone holder allows [Seandavid010] to mount his cell phone to this new bracket. The cell phone holder allows him to rotate the phone into portrait or landscape mode, and even is adjustable to accommodate different sized phones.

Nexus 7 Dashboard

Custom Double-Din Mount For Nexus 7 Carputer

Many new vehicles come with computers built into the dashboard. They can be very handy with features like GPS navigation, Bluetooth connectivity, and more. Installing a computer into an older car can sometimes be an expensive process, but [Florian] found a way to do it somewhat inexpensively using a Nexus 7 tablet.

The size of the Nexus 7 is roughly the same as a standard vehicle double-din stereo slot. It’s not perfect, but pretty close. [Florian] began by building a proof of concept mounting bracket. This model was built from sections of MDF hot glued and taped together. Plastic double-din mounting brackets were attached the sides of this new rig, allowing it to be installed into the dashboard.

Once [Florian] knew that the mounting bracket was feasible, it was time to think about power. Most in-vehicle devices are powered from the cigarette lighter adapter. [Florian] went a different direction with this build. He started with a cigarette lighter to USB power adapter, but he cut off the actual cigarette lighter plug. He ended up wiring this directly into the 12V line from the stereo’s wiring harness. This meant that the power cord could stay neatly tucked away inside of the dashboard and also leave the cigarette lighter unused.

[Florian] then wanted to replace the MDF frame with something stronger and nicer. He modeled up his idea in Solidworks to make sure the measurements would be perfect. Then the pieces were all laser cut at his local Techshop. Once assembled, the plastic mounting brackets were placed on the sides and the whole unit fit perfectly inside of the double-din slot.

When it comes to features, this van now has it all. The USB hub allows for multiple USB devices to be plugged in, meaning that Nexus only has a single wire for both power and all of the peripherals. Among these peripherals are a USB audio interface, an SD card reader, and a backup camera. There is also a Bluetooth enabled OBD2 reader that can monitor and track the car’s vitals. If this project seems familiar to you, it’s probably because we’ve seen a remarkably similar project in the past.

Grinding A Bicycle Crank For Power Analysis

For [Mark] and [Brian]’s final project for [Bruce Land]’s ECE class at Cornell, they decided to replicate a commercial product. It’s a dashboard for a bicycle that displays distance, cadence, speed, and the power being generated by the cyclist. Computing distance, cadence and speed is pretty easy, but calculating power is another matter entirely.

The guys are using an ATMega1284 to drive an LCD, listen in on some Hall Effect sensors, and do a few calculations. That takes care of measuring everything except power. A quick search of relevant intellectual property gave then the idea of measuring torque at the pedal crank. For that, [Mark] and [Brian] are using a strain gauge on a pedal crank, carefully modified to be stiff enough to work, but flexible enough to measure.

A custom board was constructed for the pedal crank that measures a strain gauge and sends the measurements through a wireless connection to the rest of the bicycle dashboard. It works, and the measurements in the classroom show [Brian] is generating about 450 W when pedaling at 33 mph.

Video below.

Continue reading “Grinding A Bicycle Crank For Power Analysis”

Garage Door Opener

Capacitive Garage Door Opener Hides Behind Your Dash

[Pyrow] wanted to upgrade his garage door opener remote. It worked just fine, but changing those tiny batteries out can be an inconvenience. Plus, the remote control was taking up valuable storage space and would always rattle around while driving. [Pyrow] decided to make use of an Omron E2K-F10MC2 capacitive touch sensor to fix these issues.

[Pyrow’s] circuit still makes use of the original remote control. He just added some of his own components to get it to do what he wanted. The circuit is powered by the car’s battery, so it never needs a battery replacement. The circuit is protected with a fuse and the power is regulated to prevent electrical spikes from burning up the original remote control. The actual circuit is pretty simple and uses mostly discrete components. It’s all soldered onto proto board to keep it together. He only had to solder to three places on the original remote control in order to provide power and simulate a button press.

Next, [Pyrow] took his dash apart. He used double-sided tape to attach the touch sensor to the back of the dash.  After securing the electronics in place with tape, he now has a working hidden garage door opener. Full schematics are available in the writeup linked above. Also, be sure to watch the demonstration video below.

Continue reading “Capacitive Garage Door Opener Hides Behind Your Dash”