Cinemas all over the world have become no-go zones with COVID-19 around, but watching the latest blockbuster on the small screen at home is simply not the same. You could bring the big screen home, but buying a quality projector is going to set you back a small pile of cash. Fortunately [Matt] from [DIY Perks] has an alternative for us, demonstrating how to build your own true 4K projector with parts bought off eBay, for a fraction of the price.
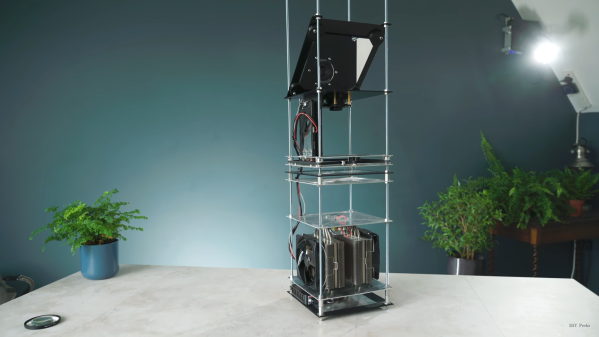
The core of the projector is a small 4K LCD panel, which is from a modified Sony smartphone. [Matt] disassembled the phone, removed the backlight from the LCD, which leaves it semi-transparent, and mounted it at a right angle to the rest of the phone body. The battery was also replaced with a voltage regulator to simulate a full battery. To create a practical projector, a much brighter backlight is needed. [Matt] used a 100W 10 mm diameter LED for this purpose. The LED needs some serious cooling to prevent it from burning itself out, and a large CPU cooler does the job perfectly. Two Fresnel lenses in series are used to turn the diverging light from the LED into a converging light source to pass through the LCD. An old 135 mm large format camera lens is placed at the focal point of light to act as a projection lens. The entire assembly is mounted on a vertical frame of threaded rods, nuts, and aluminium plates. [Matt] also used these threaded rods with GT2 pulleys to create a simple but effective moving platform for the projection lens that allows the focus of the projected image to be adjusted. The frame is topped off by a 45-degree mirror to project the image against a wall instead of the roof, and the frame is covered with aluminium panels.
The video after the break goes into incredible detail on how projector functions and how to build your own down. It definitely looks like a doable build for most hackers. [Matt] will also be releasing a complete PDF build guide in the next few weeks. Continue reading “A True 4K Projector From Scrap EBay Components”