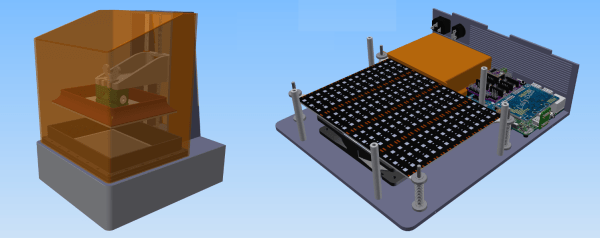
Make A PVC Drill Press

There are two types of people in this world: people who think that PVC is only suitable for plumbing, and people who don’t even know that you can use PVC to carry water. Instructables user [amjohnny] is clearly of the latter school. His PVC Dremel drill press is a bit of an oldie, but it’s still a testament to the pipefitter’s art. And you can watch it in action in the video embedded below.

Things we particularly like about this build include the PVC parallelogram movement, springs around tubes to push the Dremel head back up, and the clever use of a T-fitting and screw plug to hold the press in its lowest position. We wonder how one could add a depth stop to this thing. No matter, we love watching it work.

Anyway, this is just one hack of many that emphasizes the importance of a drill press in basically anyone’s life, as well as the ease of DIY’ing into one. If you’re in the PVC-haters camp, but have some scrap wood and drawer slides or plastic offcuts lying around, you have the makings of a rudimentary press — a welcome tool in the shop.

Continue reading “Make A PVC Drill Press”

Turn That Pi Zero Into A Streaming Camera, Step-by-Step

What makes [mwagner1]’s Raspberry Pi Zero-based WiFi camera project noteworthy isn’t so much the fact that he’s used the hardware to make a streaming camera, but that he’s taken care to document every step in the process from soldering to software installation. Having everything in one place makes it easier for curious hobbyists to get those Pi units out of a drawer and into a project. In fact, with the release of the Pi Zero W, [mwagner1]’s guide has become even simpler since the Pi Zero W now includes WiFi.

Using a Raspberry Pi as the basis for a WiFi camera isn’t new, but it is a project that combines many different areas of knowledge that can be easy for more experienced people to take for granted. That’s what makes it a good candidate for a step-by-step guide; a hobbyist looking to use their Pi Zero in a project may have incomplete knowledge of any number of the different elements involved in embedding a Pi such as basic soldering, how to provide appropriate battery power, or how to install and configure the required software. [mwagner1] plans to use the camera as part of a home security system, so stay tuned.

If Pi Zero camera projects catch your interest but you want something more involved, be sure to check out the PolaPi project for a fun, well-designed take on a Pi Zero based Polaroid-inspired camera.

DIY Conductive Glass You Could Actually Make

Transparent, conductive glass is cool stuff and enables LCD panels and more. But the commercial method involves sputtering indium-tin oxide, which means a high vacuum and some high voltages, which is doable, but not exactly hacker-friendly. [Simplifier] has documented an alternative procedure that uses nothing more than a camp-stove hotplate and an airbrush. And some chemistry.

Make no mistake, this is definitely do-it-outside chemistry. The mixture that [Simplifier] has settled on includes stannous (tin) chloride and ammonium bifluoride in solution. This is sprayed uniformly onto the heated glass (350-400° C), and after it’s evaporated there is a thin, strong, and transparent layer of fluorine-doped tin oxide. [Simplifier] reports resistances down in the single-digit Ohms per square, which is pretty awesome. [Simplifier] didn’t get the mix down perfectly on the first pass, of course, so it’s also interesting to read up on the intermediate steps.

Our thoughts immediately spring to masking sections of glass off and building DIY transparent circuits and panels, but we suspect that we’re getting ahead of ourselves. Still, this is an incredible early result, and we hope that it opens up the way to crazy transparent-conductive applications. What would you do if you could make glass circuits? Well, now you can, and it doesn’t look too hard.

Continue reading “DIY Conductive Glass You Could Actually Make”

Line Follower Has Lots Of Recycled Parts, But Zero Brains

Line Followers are a tried-and-true type of robot; both hardware and software need to be doing their job in harmony in order to be successful at a clearly defined physical task. But robots don’t always have microcontrollers and software, as [Mati_DIY]’s zero programming analog line follower demonstrates.

For readers used to seeing a Raspberry Pi or Arduino in almost everything, an analog robot whose “programming” exists only as a harmony between its discrete parts can be an eye-opener as well as an accessible project. A video of the robot in action is embedded below.

[Mati_DIY]’s design uses two CNY70 reflective sensors (which are essentially infrared emitter/phototransistor pairs) and an LM358 dual op-amp. Together, the sensors act as two near-sighted eyes. By using the output of each sensor to drive a motor via a transistor, the presence or absence of the black line is directly and immediately reflected by the motion of the attached motor. The more black the sensor sees, the more the motor turns. Electrically, that’s all that happens; but by attaching the right sensor to the left motor and the left sensor to the right motor, you get a robot that always tries to keep the black line centered under the sensors. Playing with the spacing of the motors and sensors further tweaks the performance.

Continue reading “Line Follower Has Lots Of Recycled Parts, But Zero Brains”

[Homo Faciens] Builds A Winchbot

The trademark hacker style of Hessian YouTuber [Homo Faciens] is doing a lot with a little. Given a package of parts from a sponsor, he could have made something “normal” like a fancy robot arm. Instead, he decided to make a winchbot. (Video embedded below.)

What’s a winchbot? It’s a big frame that supports three relatively heavy motors that pull steerable gripping arms around. It’s a little bit like the hanging Hektor / wallbot / plotterbot and a little bit like a delta-style 3D printer. Although [Homo Faciens]’s build doesn’t showcase it, a winchbot is also a great way to lift heavy things because the parts that need to be beefy — the frame and the lifting motors — don’t have to move. We love the gimballed square rod that works in concert with the winches!

With five extra servos on hand, and the computing power of a Raspberry Pi, [Homo Faciens] couldn’t just stop with lifting a claw. Instead, the gripping-arms part of the bot is mounted with four degrees of freedom and is powered with software that makes it stay parallel with the table and rotate around the gripper to make programming easier. Watch it in action in the video to see what we mean.

The biggest unsolved problem that we can see is the jerkiness that it displays in moving things around. That doesn’t stop it from building up a tower and a domino knock-down. We suspect that there’s some combination of firmware and hardware tweaking that can solve this problem, or it could just be run slowly so that the wobbles damp themselves out. We’re also quite confident that [Homo Faciens] will come up with an elegant and cheap solution. Have you seen his CNC machine?

Continue reading “[Homo Faciens] Builds A Winchbot”

Flappy Bird Is The New “Does It Run Doom?”

Back in 2014 [Johan] decided to celebrate BASIC’s 30 50 year anniversary by writing his own BASIC interpreter. Now, a few years later, he says he feels he has hit a certain milestone: he can play Flappy Bird, written in his own version of BASIC, running on his own home-built computer, the BASIC-1.

Inside the BASIC-1 is an Atmel XMega128A4, a keyboard from a broken Commodore 64, a joystick port, a serial to TV out adapter, and an SD card adapter for program storage. An attractively laser-cut enclosure with kerf bends houses the keyboard and hardware. The BASIC-1 boots into BASIC just like many of its home computer counterparts from the 80s.

Continue reading “Flappy Bird Is The New “Does It Run Doom?””

DIY Barrel Rifling With 3D Printed Help

[Jeff Rodriguez] has been busy testing a feasible DIY method for rifling a barrel and has found some success using salt water, a power supply, wire, and 3D printed parts to create the grooves of rifling without the need for any moving parts or cutting tools. Salt water flows between the barrel’s inside surface and a 3D-printed piece that holds wires in a precise pattern. A current flows between the barrel and the wires (which do not actually touch the inside of the barrel) and material is eroded away as a result. 10-15 minutes later there are some promising looking grooves in the test piece thanks to his DIY process.

Rifled barrels have been common since at least the 19th century (although it was certainly an intensive process) and it still remains a job best left to industrial settings; anyone who needs a barrel today normally just purchases a rifled barrel blank from a manufacturer. No one makes their own unless they want to for some reason, but that’s exactly where [Jeff] is coming from. The process looks messy, but [Jeff] has had a lot of space to experiment with a variety of different methods to get different results.

Continue reading “DIY Barrel Rifling With 3D Printed Help”