Sometimes, less is more. Sometimes, more is more. There is a type of person who believes that if enough photos of the same subject are taken, one of them will shine above the rest as a gleaming example of what is possible with a phone camera and a steady hand. Other people know how to frame a picture before hitting the shutter button. In some cases, the best method may be snapping a handful of photos to get one good one, not by chance, but by design.
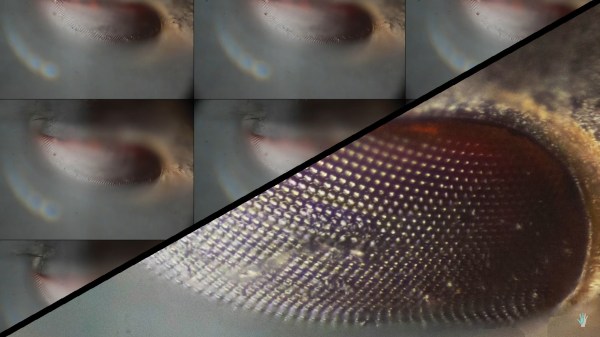
[The Thought Emporium]’s video, also below the break, is about getting crisp pictures from a DSLR camera and a microscope using focus stacking, sometimes called image stacking. The premise is to take a series of photos that each have a different part of the subject in focus. In a microscope, this range will be microscopic but in a park, that could be several meters. When the images are combined, he uses Adobe products, the areas in focus are saved while the out-of-focus areas are discarded and the result is a single photo with an impossible depth of focus. We can’t help but remember those light-field cameras which didn’t rely on moving lenses to focus but took many photos, each at a different focal range.
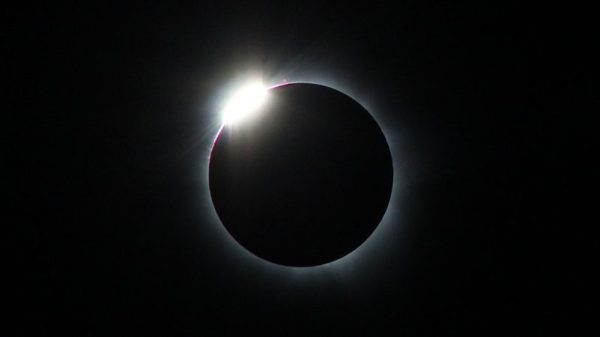
On August 21, 2017, the Moon will cast its shadow across the entire breadth of the United States for the first time in almost a century. It is estimated that 12 million people live within the path in which the sun will be blotted out, and many millions more are expected to pour into the area to experience the wonders of totality.
We’d really love it if you would tell us where you’ll be during the eclipse by creating your own event page, but that’s not what this article’s about. With millions gathered in a narrow swath from Oregon to South Carolina, and with the eclipse falling on a Monday so that the prior two weekend days will be filled with campouts at prime viewing locations, I expect that Eclipse 2017 will be one big coast-to-coast party. This is an event that will attract people of all stripes, from those with no interest in astronomy that have only the faintest idea of what’s actually happening celestially, to those so steeped in the science that they’ll be calling out the exact beginning of totality and when to expect Baily’s Beads to appear.
I suspect our readership leans closer to the latter than the former, and some may want to add to the eclipse experience by participating in a little citizen science. Here’s how you can get involved.
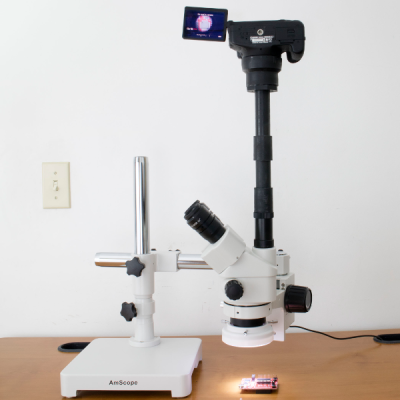
Microscopes are a great way to see the mysteries of the universe hidden at the smaller scale. When they were first developed, scientists had to rely on illustration to convey their findings through the lens. Thankfully we can now rely on photography to help us out instead. Many microscopes come with a special port — often called a trinocular port — for mounting a camera. Using this, [Brian] developed a DSLR mount for his microscope using a hacker staple: PVC pipe.
The virtues of PVC pipe are many and varied. It’s readily available in all manner of shapes and sizes, and there’s a wide variety of couplers, adapters, solvents and glues to go with it. Best of all, you can heat it to a point where it becomes soft and pliable, allowing one to get a custom fit where necessary. [Brian] demonstrates this in using a heat gun to warm up a reducer to friction fit the DSLR lens mount. Beyond that, the mount uses a pair of lenses sourced from jeweller’s loupes to bring the image into focus on the camera’s sensor, mounted tidily inside the PVC couplers.
Like any Moore’s Law-inspired race, the megapixel race in digital cameras in the late 1990s and into the 2000s was a harsh battleground for every manufacturer. With the development of the smartphone, it became a war on two fronts, with Samsung eventually cramming twenty megapixels into a handheld. Although no clear winner of consumer-grade cameras was ever announced (and Samsung ended up reducing their flagship phone’s cameras to sixteen megapixels for reasons we’ll discuss) it seems as though this race is over, fizzling out into a void where even marketing and advertising groups don’t readily venture. What happened?
The Technology
A brief overview of Moore’s Law predicts that transistor density on a given computer chip should double about every two years. A digital camera’s sensor is remarkably similar, using the same silicon to form charge-coupled devices or CMOS sensors (the same CMOS technology used in some RAM and other digital logic technology) to detect photons that hit it. It’s not too far of a leap to realize how Moore’s Law would apply to the number of photo detectors on a digital camera’s image sensor. Like transistor density, however, there’s also a limit to how many photo detectors will fit in a given area before undesirable effects start to appear.
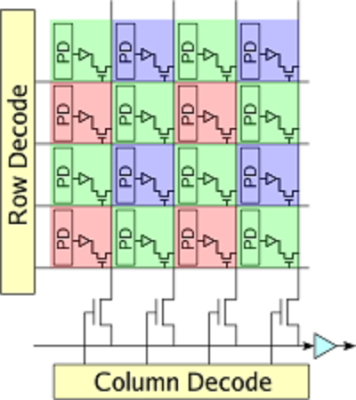
Image sensors have come a long way since video camera tubes. In the ’70s, the charge-coupled device (CCD) replaced the cathode ray tube as the dominant video capturing technology. A CCD works by arranging capacitors into an array and biasing them with a small voltage. When a photon hits one of the capacitors, it is converted into an electrical charge which can then be stored as digital information. While there are still specialty CCD sensors for some niche applications, most image sensors are now of the CMOS variety. CMOS uses photodiodes, rather than capacitors, along with a few other transistors for every pixel. CMOS sensors perform better than CCD sensors because each pixel has an amplifier which results in more accurate capturing of data. They are also faster, scale more readily, use fewer components in general, and use less power than a comparably sized CCD. Despite all of these advantages, however, there are still many limitations to modern sensors when more and more of them get packed onto a single piece of silicon.
While transistor density tends to be limited by quantum effects, image sensor density is limited by what is effectively a “noisy” picture. Noise can be introduced in an image as a result of thermal fluctuations within the material, so if the voltage threshold for a single pixel is so low that it falsely registers a photon when it shouldn’t, the image quality will be greatly reduced. This is more noticeable in CCD sensors (one effect is called “blooming“) but similar defects can happen in CMOS sensors as well. There are a few ways to solve these problems, though.
First, the voltage threshold can be raised so that random thermal fluctuations don’t rise above the threshold to trigger the pixels. In a DSLR, this typically means changing the ISO setting of a camera, where a lower ISO setting means more light is required to trigger a pixel, but that random fluctuations are less likely to happen. From a camera designer’s point-of-view, however, a higher voltage generally implies greater power consumption and some speed considerations, so there are some tradeoffs to make in this area.
Another reason that thermal fluctuations cause noise in image sensors is that the pixels themselves are so close together that they influence their neighbors. The answer here seems obvious: simply increase the area of the sensor, make the pixels of the sensor bigger, or both. This is a good solution if you have unlimited area, but in something like a cell phone this isn’t practical. This gets to the core of the reason that most modern cell phones seem to be practically limited somewhere in the sixteen-to-twenty megapixel range. If the pixels are made too small to increase megapixel count, the noise will start to ruin the images. If the pixels are too big, the picture will have a low resolution.
There are some non-technological ways of increasing megapixel count for an image as well. For example, a panoramic image will have a megapixel count much higher than that of the camera that took the picture simply because each part of the panorama has the full mexapixel count. It’s also possible to reduce noise in a single frame of any picture by using lenses that collect more light (lenses with a lower f-number) which allows the photographer to use a lower ISO setting to reduce the camera’s sensitivity.
Gigapixels!
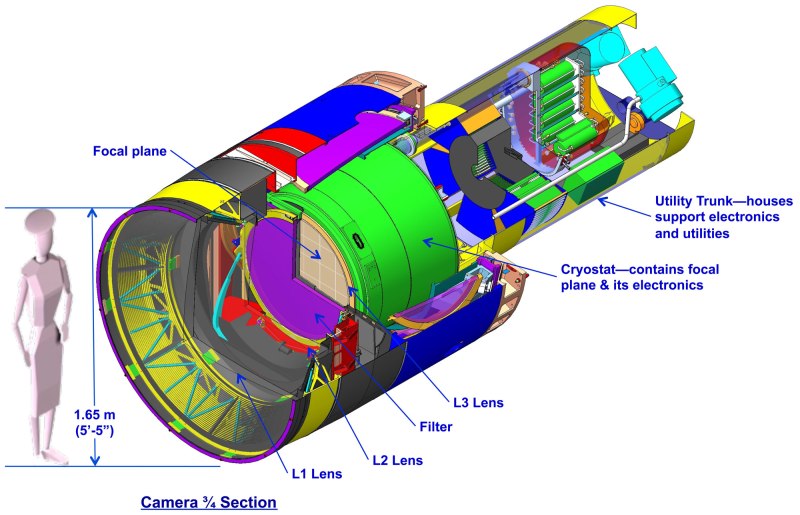
Of course, if you have unlimited area you can make image sensors of virtually any size. There are some extremely large, expensive cameras called gigapixel cameras that can take pictures of unimaginable detail. Their size and cost is a limiting factor for consumer devices, though, and as such are generally used for specialty purposes only. The largest image sensor ever built has a surface of almost five square meters and is the size of a car. The camera will be put to use in 2019 in the Large Synoptic Survey Telescope in South America where it will capture images of the night sky with its 8.4 meter primary mirror. If this was part of the megapixel race in consumer goods, it would certainly be the winner.
With all of this being said, it becomes obvious that there are many more considerations in a digital camera than just the megapixel count. With so many facets of a camera such as physical sensor size, lenses, camera settings, post-processing capabilities, filters, etc., the megapixel number was essentially an easy way for marketers to advertise the claimed superiority of their products until the practical limits of image sensors was reached. Beyond a certain limit, more megapixels doesn’t automatically translate into a better picture. As already mentioned, however, the megapixel count can be important, but there are so many ways to make up for a lower megapixel count if you have to. For example, images with high dynamic range are becoming the norm even in cell phones, which also helps eliminate the need for a flash. Whatever you decide, though, if you want to start taking great pictures don’t worry about specs; just go out and take some photographs!
(Title image: VISTA gigapixel mosaic of the central parts of the Milky Way, produced by European Southern Observatory (ESO) and released under Creative Commons Attribution 4.0 International License. This is a scaled version of the original 108,500 x 81,500, 9-gigapixel image.)
The next giant leap for mankind is to the stars. While we are mostly earthbound — for now — that shouldn’t stop us from gazing upwards to marvel at the night sky. In saying that, if you’re an amateur astrophotographer looking to take long-exposure photos of the Milky Way and other stellar scenes, [Anthony Urbano] has devised a portable tracking setup to keep your photos on point.
When taking pictures of the night sky, the earth’s rotation will cause light trails during long exposures. Designed for ultra-portability, [Urbano’s] rig uses an Arduino UNO controlled Sanryusha P43G geared stepper motor coupled to a camera mounting plate on a small tripod. The setup isn’t designed for anything larger than a DSLR, but is still capable of taking some stellar pictures.
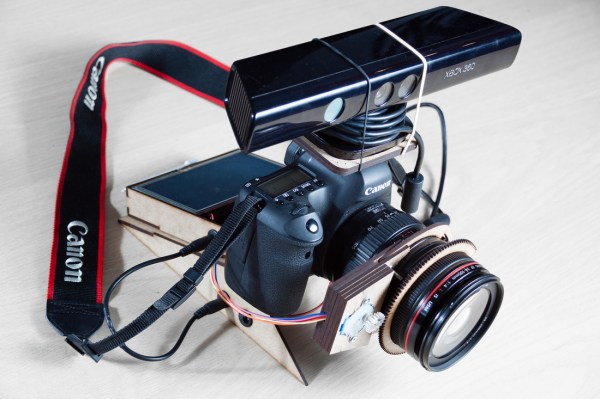
Prosumer DSLRs have been a boon to the democratization of digital media. Gear that once commanded professional prices is now available to those on more modest budgets. Not only has this unleashed a torrent of online content, it has also started a wave of camera hacks and accessories, like this automatic focus puller based on a Kinect and a Raspberry Pi.
For [Tom Piessens], the Canon EOS 5D has been a solid platform but suffers from a problem. The narrow depth of field possible with DSLRs makes it difficult to maintain focus on subjects that are moving relative to the camera, making follow-focus scenes like this classic hard to reproduce. Aiming for a better system than the stock autofocus, [Tom] grafted a Kinect sensor and a stepper motor actuator to a Raspberry Pi, and used the Kinect’s depth map to drive the focus ring. Parts are laser-cut, including a nice enclosure for the Pi and display that makes the whole thing reasonably portable. The video below shows the focus remaining locked on a selected region of interest. It seems like movement along only one axis is allowed; we’d love to see this system expanded to follow a designated object no matter where it moves in the frame.
The sensor on your digital camera picks up a lot more than just the light that’s visible to the human eye. Camera manufacturers go out of their way to reduce this to just the visible spectrum in order to produce photos that look right to us. But, what if you want your camera to take photos of the full light spectrum? This is particularly useful for astrophotography, where infrared light dramatically adds to the effect.
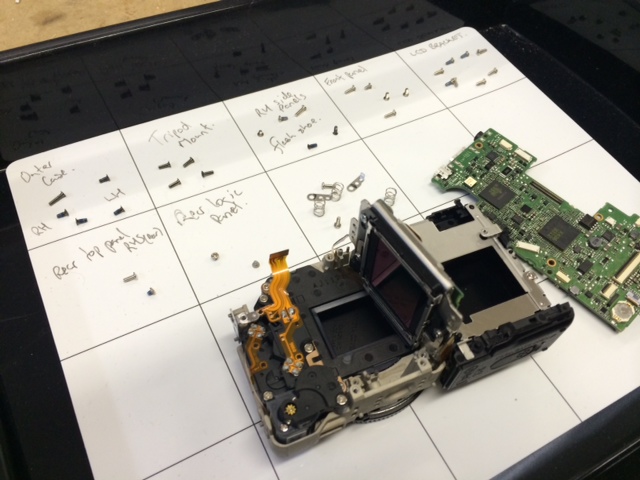
Generally, accomplishing this is just a matter of removing the internal IR-blocking filter from your camera. However, most of us are a little squeamish about tearing into our expensive DSLRs. This was the dilemma that [Gavin] faced until a couple of years ago when he discovered the Canon EOS-M.
Now, it’s important to point out that one could do a similar conversion with just about any cheap digital camera and save themselves a lot of money (the practically give those things away now). But, as any photography enthusiast knows, lenses are just as important as the camera itself (maybe even more so).
So, if you’re interested in taking nice pictures, you’ve got to have a camera with an interchangeable lens. Of course, if you’re already into photography, you probably already have a DSLR with some lenses. This was the case for [Gavin], and so he needed a cheap digital camera that used Canon interchangeable lenses like the ones he already had. After finding the EOS-M, the teardown and IR-blocking filter removal was straightforward with just a couple of hiccups.
When [Gavin] wrote his post in 2014, the EOS-M was about $350. Now you can buy them for less than $150 used, so a conversion like this is definitely into the “cheap enough to tinker” realm. Have a Nikon camera? The Nikon 1 J3 is roughly equivalent to the original EOS-M, and is about the same price. Want to save even more money, and aren’t concerned with fancy lenses? You can do a full-spectrum camera build with a Raspberry Pi, with the added benefit of being able to adjust what light is let in.

 The virtues of PVC pipe are many and varied. It’s readily available in all manner of shapes and sizes, and there’s a wide variety of couplers, adapters, solvents and glues to go with it. Best of all, you can heat it to a point where it becomes soft and pliable, allowing one to get a custom fit where necessary. [Brian] demonstrates this in using a heat gun to warm up a reducer to friction fit the DSLR lens mount. Beyond that, the mount uses a pair of lenses sourced from jeweller’s loupes to bring the image into focus on the camera’s sensor, mounted tidily inside the PVC couplers.