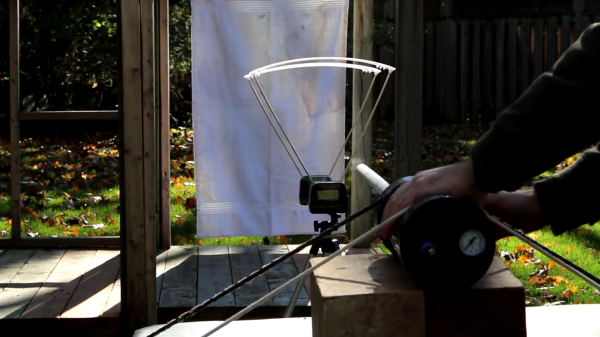
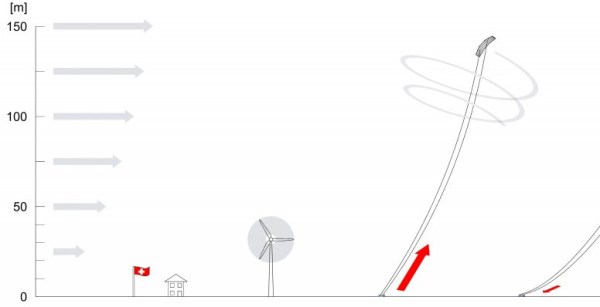
Simplest Electricity Monitoring Solution Yet

Monitoring your home’s energy use is the best way to get a handle on your utility bills. After all, you can’t manage what you can’t measure! The only problem is that most home energy monitoring systems are cumbersome, complicated, or expensive. At least, until now. [Kevin] has created a new electricity meter based on Particle Photons which should alleviate all of these problems.

The Particle Photon (we get confused on the naming scheme but believe this the new version of what used to be called the Spark Core) is a WiFi-enabled development board. [Kevin] is using two, one to drive the display and one to monitor the electricity usage. This part is simple enough, each watt-hour is accompanied by a pulse of an LED on the meter which is picked up by a TLS257 light-to-voltage sensor. The display is a Nextion TFT HMI (touch screen) which is pretty well suited for this application. The data is corralled by emoncms, part of the OpenEnergyMonitor platform, which ties everything together.

For a project that has been done more than a few times, this one does a great job of keeping the price down while maintaining a great aesthetic. Make sure to check out the video below to see it in action.

Continue reading “Simplest Electricity Monitoring Solution Yet”

Disassembled Mouse Keeps Track Of Gas Meter

After building devices that can read his home’s electricity usage, [Dave] set out to build something that could measure the other energy source to his house: his gas line. Rather than tapping into the line and measuring the gas directly, his (much safer) method was to simply monitor the gas meter itself.

The major hurdle that [Dave] had to jump was dealing with an ancient meter with absolutely no modern electronics like some other meters have that make this job a little easier. The meter has “1985” stamped on it which might be the manufacturing date, but for this meter even assuming that it’s that new might be too generous. In any event, the only option was to build something that could physically watch the spinning dial. To accomplish this, [Dave] used the sensor from an optical mouse.

The sensor is surrounded by LEDs which illuminate the dial. When the dial passes a certain point, the sensor alerts an Arduino that one revolution has occurred. Once the Arduino has this information, the rest is a piece of cake. [Dave] used KiCad to design the PCB and also had access to a laser cutter for the enclosure. It’s a great piece of modern technology that helps integrate old analog technology into the modern world. This wasn’t [Dave]’s first energy monitoring system either; be sure to check out his electricity meter that we featured a few years ago.

We Have A Problem: Household Electrical

Hackaday, we have a problem. The electricity in your house is on. It’s always on. How fast are those kilowatt-hours ticking by and what is causing it? For most people the only measurement they have of this is the meter itself (which nobody looks at), and the electric bill (which few people actually analyze). Is it silly that people pay far more attention to the battery usage on their phone than the electricity consumption in their abode? I think it is, and so appears another great seed idea for Hackaday Prize entries.

A Better Way to Measure

breaker-panelThe tough part of the problem here is getting at reliable data. Just yesterday we saw an incredible resource monitoring project that uses an optical sensor to measure the turning or the wheel in an electric meter. We’ve seen similar projects for meters that have a blinking LED, and a few other methods. But in many cases the electrical meter is outdoors which makes cheap, easily installed sensors a difficult goal to achieve. Even if we did, this still provides just one stream of data, the entire house.

Alternatively you could tap into the breaker box. We’ve seen [Bill Porter] do just that and there are some commercially available kits that include an octopus of clamp-style current sensors. This is a bit of an improvement, but still requires the user to open the electrical panel (don’t scoff at that statement, you know most people shouldn’t be doing that) to install them. I’m sure there are other methods that I’m missing and would love to hear about them in the comments below.

The Point

To sum up what I’m getting at here, think about the Kill-A-Watt which proved to be a very interesting hack. People liked not just seeing how much power something uses but extending where that data can be accessed. We don’t remember seeing any successful efforts to move the concept ahead a few generations. But if someone can crack that nut it could yield a wave of energy savings as people are able to be better connected with what is using a lot of electricity in their homes.

Your Turn (and Lessons from Last Week)

As with last week, now it’s your turn to come up with some ideas… wild, fantastic, good, bad, outlandish, let’s hear them. Better yet, document your idea on Hackaday.io and tag it with “2015HackadayPrize“. You can win prizes just for a well presented idea!

Speaking of last week, I shared the idea of adding some feedback to how long you’ve been in the shower. There were many opinions about the value and worthiness of that idea so I thought I’d close by covering some of them. Yes, there are much bigger wastes of water (and electricity in this case) in the world but why limit our solutions to only the largest offenders? The low-hanging fruit tends to be stuff a lot of people can understand and relate to. If we only talked about large-scale fixes (I dunno; reducing mercury emissions from power plants?) there is little momentum to crank-start a movement. If you found yourself thinking the ideas from this week and last are far too simple to win The Hackaday Prize that means you better get your project going. The world is hacked together by those who show up.

I’d love to hear suggestions for future installments of We have a problem. Leave those ideas in the comments and we’ll see you here next week!


The 2015 Hackaday Prize is sponsored by:

Power Meter

Solar Panel System Monitoring Device Using Arduino

[Carl] recently upgraded his home with a solar panel system. This system compliments the electricity he gets from the grid by filling up a battery bank using free (as in beer) energy from the sun. The system came with a basic meter which really only shows the total amount of electricity the panels produce. [Carl] wanted to get more data out of his system. He managed to build his own monitor using an Arduino.

The trick of this build has to do with how the system works. The panel includes an LED light that blinks 1000 times for each kWh of electricity. [Carl] realized that if he could monitor the rate at which the LED is flashing, he could determine approximately how much energy is being generated at any given moment. We’ve seen similar projects in the past.

Like most people new to a technology, [Carl] built his project up by cobbling together other examples he found online. He started off by using a sketch that was originally designed to calculate the speed of a vehicle by measuring the time it took for the vehicle to pass between two points. [Carl] took this code and modified it to use a single photo resistor to detect the LED. He also built a sort of VU meter using several LEDs. The meter would increase and decrease proportionally to the reading on the electrical meter.

[Carl] continued improving on his system over time. He added an LCD panel so he could not only see the exact current measurement, but also the top measurement from the day. He put all of the electronics in a plastic tub and used a ribbon cable to move the LCD panel to a more convenient location. He also had his friend [Andy] clean up the Arduino code to make it easier for others to use as desired.

Camry Battery

Fixing A Toyota Camry Hybrid Battery For Under Ten Dollars

[scoodidabop] is the happy new owner of a pre-owned Toyota Camry hybrid. Well at least he was up until his dashboard lit up like a Christmas tree. He did some Google research to figure out what all of the warning lights meant, but all roads pointed to taking his car into the dealer. After some diagnostics, the Toyota dealer hit [scoodidabop] with some bad news. He needed a new battery for his car, and he was going to have to pay almost $4,500 for it. Unfortunately the car had passed the manufacturer’s mileage warranty, so he was going to have to pay for it out-of-pocket.

[scoodidabop] is an electrician, so he’s obviously no stranger to electrical circuits. He had previously read about faulty Prius batteries, and how a single cell could cause a problem with the whole battery. [scoodidabop] figured it was worth testing this theory on his own battery since replacing a single cell would be much less expensive than buying an entire battery.

He removed the battery from his car, taking extra care not to electrocute himself. The cells were connected together using copper strips, so these were first removed. Then [scoodidabop] tested each cell individually with a volt meter. Every cell read a voltage within the normal range. Next he hooked up each cell to a coil of copper magnet wire. This placed a temporary load on the cell and [scoodidabop] could check the voltage drop to ensure the cells were not bad. Still, every cell tested just fine. So what was the problem?

[scoodidabop] noticed that the copper strips connecting the cells together were very corroded. He thought that perhaps this could be causing the issue. Having nothing to lose, he soaked each and every strip in vinegar. He then wiped down each strip with some steel wool and placed them into a baking soda bath to neutralize the vinegar. After an hour of this, he reassembled the battery and re-installed it into his car.

It was the moment of truth. [scoodidabop] started up his car and waited for the barrage of warning lights. They never came. The car was running perfectly. It turned out that the corroded connectors were preventing the car from being able to draw enough current. Simply cleaning them off with under $10 worth of supplies fixed the whole problem. Hopefully others can learn from this and save some of their own hard-earned money.

Wimshurst

3D Printed Wimshurst Machine

Steampunk extraordinaire [Jake von Slatt] has released his latest creation. This time he’s built a Wimshurst machine from mostly 3D printed parts. The Wimshurst machine is an electrostatic generator and was originally invented in the late 1800’s by James Wimshurst. It uses two counter-rotating disks to generate an electrostatic charge which is then stored in two Leyden jars. These jars are also connected to a spark gap. When the voltage raises high enough, the jars can discharge all at once by flashing a spark across the gap.

[Jake’s] machine has a sort of Gothic theme to it. He designed the parts using Autodesk’s 123D Design. They were initially printed in PLA. Skate bearings were used in the center of the disks to ensure a smooth rotation. The axle was made from the fiberglass shaft of a driveway reflector. The vertical supports were attached the base with machine screws.

The Leyden jars were made from sections of clear plastic tube. The caps for the jars were 3D printed and are designed to accept a short length of threaded 1/8″ pipe. Copper wire was used for the interior contacts and are held in place with electrical tape. The metal sectors on each disk were made from pieces of cut aluminum tape.

You may be wondering how this machine works if it’s almost entirely made out of plastic. [Jake] actually painted most of the parts with a carbon paint. This makes them electrically conductive and he can then use the parts to complete electrical circuits. Unfortunately he found this to be rather ineffective. The machine does work, but it only produces sparks up to 1/2″ in length. For comparison, his other machine is capable of 6″ sparks using similar sized Leyden jars.

[Jake] actually tried rebuilding this project using ABS, thinking that the PLA may have been collecting moisture from his breath, but the result is still only 1/2″ sparks. He suspects that the bumpy surface of the plastic parts may be causing the charge to slowly leak away, preventing a nice build up. He’s released all of his designs on Thingiverse in case any other hackers want to give it a whirl.

Power Meter

Electricity Usage Monitor Is Linked To Google Spreadsheets

If you want to make your home more energy-efficient, chances are you will need a way to monitor your electricity usage over time. There are off-the-shelf solutions for this of course, but hackers like us tend to do things our own way. Take [Karl] for example. He recently built himself a solution with only a few smart components. We’ve seen similar projects in the past, but none quite like this.

[Karl’s] home has a power meter that blinks an LED to indicate the current amount of used electricity in Watt-hours. He knew all he needed was a way to electronically detect the blinking LED and he’d be able to accurately track his usage without modifying the meter.

The primary components used in this project were a CC3200 development kit and a photoresistor module. The dev kit contained a WiFi module built-in, which allows the system to upload data to Google spreadsheets as well as sync the built-in clock with an accurate time source. The photoresistor module is used to actually detect the blinking LED on the power meter. Everything else is done easily with code on the dev kit.