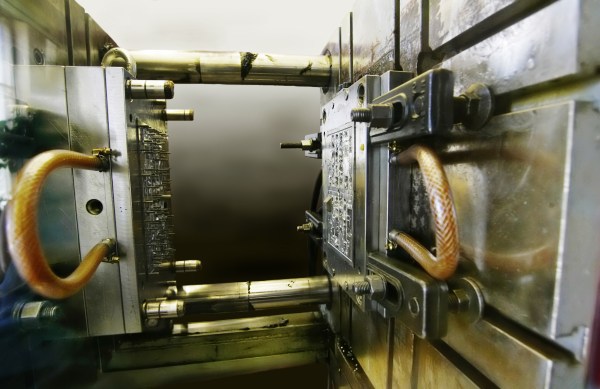
Tools Of The Trade — Injection Molding

Having finished the Tools of the Trade series on circuit board assembly, let’s look at some of the common methods for doing enclosures. First, and possibly the most common, is injection molding. This is the process of taking hot plastic, squirting it through a small hole and into a cavity, letting it cool, and then removing the hardened plastic formed in the shape of the cavity.

The machine itself has three major parts; the hopper, the screw, and the mold. The hopper is where the plastic pellets are dumped in. These pellets are tiny flecks of plastic, and if the product is to be colored there will be colorant pellets added at some ratio. The hopper will also usually have a dehumidifier attached to it to remove as much water from the pellets as possible. Water screws up the process because it vaporizes and creates little air bubbles.

Next the plastic flecks go into one end of the screw. The screw’s job is to turn slowly, forcing the plastic into ever smaller channels as it goes through a heating element, mixing the melted plastic with the colorant and getting consistent coloring, temperature, and ever increasing pressure. By the time the plastic is coming out the other end of the screw, and with the assistance of a hydraulic jack, it can be at hundreds of tons of pressure.

Finally, the plastic enters the mold, where it flows through channels into the empty cavity, and allowed to sit briefly to cool.  The mold then separates and ejector pins push the part out of the cavity.

Continue reading “Tools Of The Trade — Injection Molding”

Custom Gaming Keypad Developed With PSoC And Fusion 360

There was a time when building something yourself probably meant it didn’t look very much like a commercial product. That’s not always a bad thing. We’ve seen many custom builds that are nearly works of art. We’ve also seen plenty of builds that are–ahem–let’s say were “hacker chic”.

[AlexanderBrevig] decided to take on a project using a PSoC development board he picked up. In particular, he wanted to build a custom game keypad. He prototyped a number of switches with the board and got the firmware working so that the device looks like a USB HID keyboard.

Continue reading “Custom Gaming Keypad Developed With PSoC And Fusion 360”

Building Better Cases With A Laser Cutter

[Ryan] just got his Raspberry Pi, and what better way to add a new toy to your workbench than by building a case for it? Using a laser cutter and 3D printer, [Ryan] managed to make a case that is sure to be the envy of all the other tinkerers at his hackerspace.

The build started off with a piece of dark red acrylic in a laser cutter. After cutting the Raspberry Pi logo out of this acrylic, [Ryan] cut the same logo – a little bit larger – out of plywood. Because he was very careful to measure the kerf (or the width of the laser beam/saw blade/what have you), the wooded version of the Raspi logo fit snugly inside the acrylic cut out.

The sides of the enclosure are a single piece of plywood with a kerf bend, making for a very attractive rounded case. Finally, the Raspberry Pi is mounted on a Pi plate printed on a Ultimaker.

For as many builds we see using a laser cutter here on Hackaday, there’s surprisingly little information on exploiting the true potential of these machines with marquetry, intarsia, or fretwork. Enclosures are always cool, so if you have a very elegant laser cut box, send it in and we’ll put it up.

Need Cheap And Plentiful Project Boxes? Hit Up Your Local Hardware Store

open_hardware_project_boxes

One thing that really makes a project complete is the way in which you package your final product. Some people are fine with a piece of protoboard with wires sticking out in every direction, and truth be told, so are we – depending on the application.

[Daniel] over at archive.org was seeking out enclosures to wrap up some humidity and temperature monitors he was working on. He suddenly realized that electrical junction boxes were cheap, widely available, and perfectly suited for the job. He hauled off to the hardware store and bought a few different boxes, then spent some time cleaning them up a bit before putting them into service.

While he couldn’t put the PVC-based plastic lids into his laser cutter, he did grab some birch plywood at the store, which fit his needs nicely. A few minutes in the cutter and a few coats of paint later, he had some great looking covers for his project boxes. He added a piece of ply to the inside of the metal enclosures to protect his components, and when everything was finished, he was quite pleased with the results.

Let’s say you don’t happen to have a laser cutter on hand. Plastic boxes would do fine in most scenarios, but if you absolutely required a metal enclosure, a few coats of Plastidip on all interior surfaces would keep your electronics safe as well.

Now, no one is calling the use of junction boxes for electronics projects revolutionary by any means. It’s just one of those items you can blindly pass by in the hardware store countless times without giving them a second glance, until someone happens to point out that they would make a perfect enclosure. That’s something we can appreciate.

If you’re interested in putting some of your own together, [Daniel] has made his laser cutter templates available online.

Tips On Picking The Right Case


Finding the right enclosure to house your latest project can be tricky, so Sparkfun wrote up some handy tips on the how to pick the right one.

The most important tip is to have your components measured before acquiring a case; even being a few milimeters too small can put you back at square one. To do this right, it’s useful to look at the dimensional drawings of prospective cases to get a sense for the size. These typically include recommended shapes for PCBs too.

You may find a case that meets your dimensional needs but doesn’t have the appropriate mounting bosses. To get the placement right, screw some plastic standoffs to the PCB, then use super glue to attach them firmly to the case.

Tips on button choices, hole drilling, and other typical issues with case modification can also be found in this guide. If this is something that’s been stumping you, give it a look.