Artwork Spans Fifty Years Of Display Technology

Swiss artist and designer [Jürg Lehni] was commissioned to create an artwork called Four Transitions which has been installed in the HeK (House of electronics Arts) in Basel. This piece visually depicts the changes in technologies used by public information displays, such as those in airports and train stations. As the title of the installation suggests, four different technologies are represented:

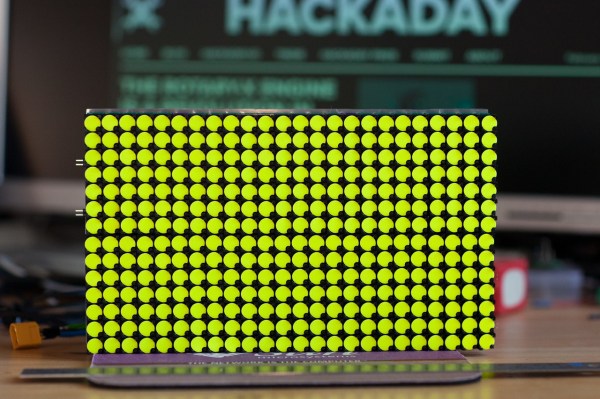
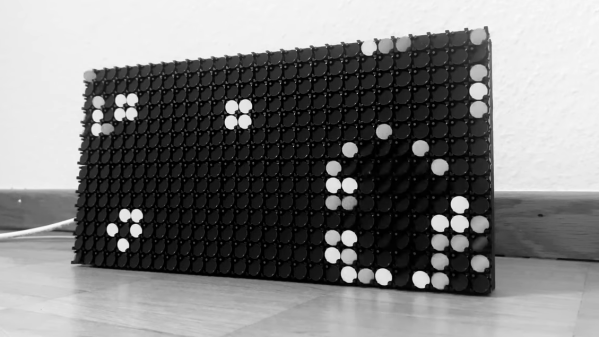
  • Flip-Dot, early 1960s, 15 each 7 x 7 modules arrayed into a 21 x 35 pixel panel
  • LCD, 1970s and 1980s, two each 36 x 52 modules arrayed into 52 x 76 pixel panel
  • LED, 2000s, six each 16 x 16 RGB modules arrayed into a 32 x 48 pixel panel
  • TFT, current, one 24 inch module, 1200 x 1920 pixel panel

The final work is quite striking, but equally interesting is the summary of the the design and construction process that [Jürg] provides on Twitter. We hope he expands this into a future, more detailed writeup — if only to learn about reverse engineering the 20 year old LCD controller whose designer was in retirement. His tweets also gives us a tantalizing glimpse into the software, controllers, and interconnections used to drive all these displays. There is quite a lot of interesting engineering going on in the background, and we look forward to future documentation from [Jürg].

You may recognize [Jürg] as the creator of Hektor, a graffiti output device from 2002 which we’ve referenced over the years in Hackaday. Check out the short video below of the displays in operation, and be sure to unmute the volume so you can listen to the satisfying sound of 735 flip-dots changing state. [Jürg] also gives in interview about the project in the second video below. Thanks to [Niklas Roy] for sending in the tip about this most interesting exhibition.

Continue reading “Artwork Spans Fifty Years Of Display Technology”

30 FPS Flip-Dot Display Uses Cool Capacitor Trick

Most people find two problems when it comes to flip-dot displays: where to buy them and how to drive them. If you’re [Pierre Muth] you level up and add the challenge of driving them fast enough to rival non-mechanical displays like LCDs. It was a success, resulting in a novel and fast way of controlling flip-dot displays.

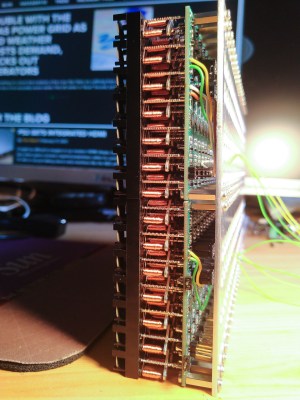
Gorgeous stackup of the completed display. [Pierre] says soldering the 2500 components kept him sane during lockdown.
If you’re lucky, you can get a used flip-dot panel decommissioned from an old bus destination panel, or perhaps the arrivals/departures board at a train station. But it is possible to buy brand new 1×7 pixel strips which is what [Pierre] has done. These come without any kind of driving hardware; just the magnetized dots with coils that can be energized to change the state.

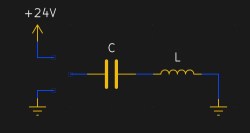
The problem comes in needing to reverse the polarity of the coil to achieve both set and unset states. Here [Pierre] has a very interesting idea: instead of working out a way to change the connections of the coils between source and sink, he’s using a capacitor on one side that can be driven high or low to flip the dot.

Using this technique, charging the capacitor will give enough kick to flip the dot on the display. The same will happen when discharged (flipping the dot back), with the added benefit of not using additional power since the capacitor is already charged from setting the pixel. A circuit board was designed with CMOS to control each capacitor. A PCB is mounted to the back of a 7-pixel strip, creating modules that are formed into a larger display using SPI to cascade data from one to the next. The result, as you can see after the break, does a fantastic job of playing Bad Apple on the 24×14 matrix. If you have visions of one of these on your own desk, the design files and source code are available. Buying the pixels for a display this size is surprisingly affordable at about 100 €.

We’re a bit jealous of all the fun displays [Pierre] has been working on. He previously built a 384 neon bulb display that he was showing off last Autumn.

Continue reading “30 FPS Flip-Dot Display Uses Cool Capacitor Trick”

Watch Conway’s Game Of Life Flutter Across A Flip-Dot Display

Like many of us, [John Whittington] was saddened with the news that John Horton Conway passed away a little earlier this year, and in honor of his work, he added the Game of Life to a flip-dot display that he has been working on. The physicality of an electromechanical display seems particularly fitting for cellular automata.

Like what you see? If you’re curious about what makes it all tick, the display shown is an Alfa-Zeta XY5 28×14 but [John] is currently working on building them into a much larger 256 x 56 display. GitHub hosts the flip-dot simulator and driver software [John] is using, and the Game of Life functions are here.

If you’re new to the Game of Life and are not really sure what you’re looking at, [Elliot Williams] tells you all you need to know in his writeup celebrating its profound impact and lasting legacy. Watch the flip-dot display in action in the video embedded below.

Continue reading “Watch Conway’s Game Of Life Flutter Across A Flip-Dot Display”

The Clickiest Game Of Tetris You’ll Ever Play, On A Flip-Dot

Like many other classics it’s easy to come up with ways to ruin Tetris, but hard to think of anything that will make it better. Adding more clickiness is definitely one way to improve the game, and playing Tetris on a flip-dot display certainly manages to achieve that.

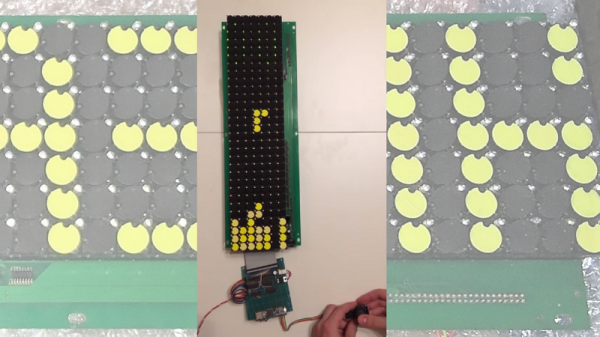
The surplus flip-dot display [sinowin] used for this version of Tetris is a bit of an odd bird that needed some reverse engineering to be put to work. The display is a 7 x 30 matrix with small dots, plus a tiny green LED for each dot. Those LEDs turned out to be quite useful for replicating the flashing effect used in the original game when a row of blocks was completed, and the sound of the dots being flipped provides audio feedback. The game runs on a Teensy through a custom driver board and uses a Playstation joystick for control. The video below, in perfectly acceptable vertical format, shows the game in action and really makes us want to build our own, perhaps with a larger and even clickier flip-dot display.

The best thing about Tetris is its simplicity: simple graphics, simple controls, and simple gameplay. It’s so simple it can be played anywhere, from a smartwatch to a business card and even on a transistor tester.

Continue reading “The Clickiest Game Of Tetris You’ll Ever Play, On A Flip-Dot”

Dozens Of Servos Flip The Segments Of This 3D-Printed Digital Clock

A digital clock based on seven-segment displays? Not exciting. A digital clock with seven-segment displays that’s really big and can be read across a football field? That’s a little more interesting. A large format digital clock that uses electromechanical seven-segment displays? Now that’s something to check out.

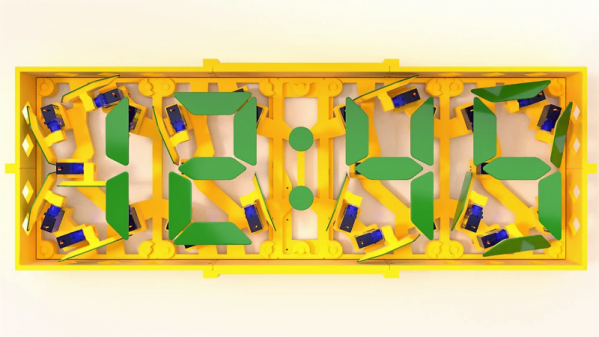
This clock comes to us by way of [Otvinta] and is a nice example of what you can do with 3D-printing and a little imagination. Each segment of the display is connected to a small hobby servo which can flip it 90°. Mounted in a printed plastic frame, the segments are flipped in and out of view as needed to compose the numerals needed to display the time. The 28 servos need two Pololu controller boards, which talk to a Raspberry Pi running Windows IoT, an interesting design choice that we don’t often see. You’d think that 28 servos clattering back and forth might be intolerable, but the video below shows that the display is actually pretty quiet. We’d love to see this printed all in black with white segment faces, or even a fluorescent plastic; how cool would that look under UV light?

We’re not saying this is the only seven-segment servo clock we’ve seen, but it is a pretty slick build. And of course there’s more than one way to use servos to tell the time.

Continue reading “Dozens Of Servos Flip The Segments Of This 3D-Printed Digital Clock”

Air Bubble Characters Float Along This Unique Scrolling Display

We’ve seen a lot of unique large-format scrolling message boards on these pages, but most of them use some sort of established technology – LEDs, electromechanical flip-dots, and the like – in new and unusual ways. We’re pretty sure this air-bubble dot matrix display is a first, though.

While it may not be destined for the front of a bus or a train station arrivals and departures board, [jellmeister]’s bubble display shows some pretty creative thinking. It started with a scrap of multiwall polycarbonate roofing – Corotherm is the brand name – of the type to glaze greenhouses and other structures. The parallel tubes are perfect for the display, although individual tubes could certainly be substituted. A plastic end cap was fabricated; air nozzles in each channel were plumbed to an air supply through solenoid valves. An Arduino with a couple of motor driver hats allows pulses of air into each channel to create reasonably legible characters that float up the tube. The video below shows it in use at a Maker Faire, where visitors could bubble up their own messages.

It took some tweaking to get it looking as good as it does, but there’s plenty of room for improvement. We wonder whether colored liquid might help, or perhaps adding a Neopixel or even a laser to each channel to add some contrast. Maybe something to cloud the water slightly would help; increasing the surface tension with a salt solution might make the bubbles more distinct. We doubt it’ll ever have the contrast ratio of a flip-dot display, but it certainly has a charm all its own.

Continue reading “Air Bubble Characters Float Along This Unique Scrolling Display”

DIY Magnetic Actuator, Illustrated And Demonstrated

Electromagnetic actuators exert small amounts of force, but are simple and definitely have their niche. [SeanHodgins] took a design that’s common in flip-dot displays as well as the lightweight RC aircraft world and decided to make his own version. He does a good job of explaining and demonstrating the basic principles behind how one of these actuators works, although the “robotic” application claimed is less clear.

It’s a small, 3D printed lever with an embedded magnet that flips one way or another depending on the direction of current flowing through a nearby coil. Actuators of this design are capable of fast response and have no moving parts beyond the lever itself, meaning that they can be made very small. He has details on an imgur gallery as well as a video, embedded below.

Continue reading “DIY Magnetic Actuator, Illustrated And Demonstrated”