Debugging With Serial Print At 5333333 Baud

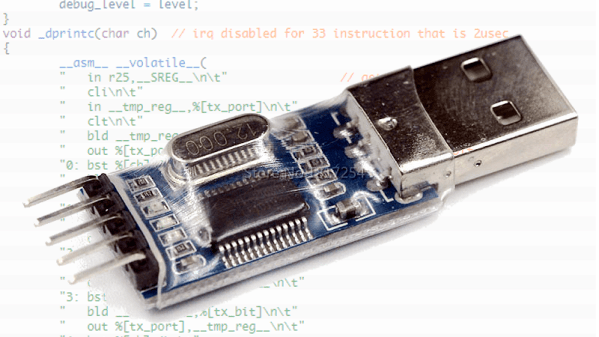
Debugging with printf is something [StorePeter] has always found super handy, and as a result he’s always been interested in tweaking the process for improvements. This kind of debugging usually has microcontrollers sending messages over a serial port, but in embedded development there isn’t always a hardware UART, or it might already be in use. His preferred method of avoiding those problems is to use a USB to Serial adapter and bit-bang the serial on the microcontroller side. It was during this process that it occurred to [StorePeter] that there was a lot of streamlining he could be doing, and thanks to serial terminal programs that support arbitrary baud rates, he’s reliably sending debug messages over serial at 5.3 Mbit/sec, or 5333333 Baud. His code is available for download from his site, and works perfectly in the Arduino IDE.

The whole thing consists of some simple, easily ported code to implement a bare minimum bit-banged serial communication. This is output only, no feedback, and timing consists of just sending bits as quickly as the CPU can handle, leaving it up to the USB Serial adapter and rest of the world to handle whatever that speed turns out to be. On a 16 MHz AVR, transmitting one bit can be done in three instructions, which comes out to about 5333333 baud or roughly 5.3 Mbit/sec. Set a terminal program to 5333333 baud, and you can get a “Hello world” in about 20 microseconds compared to 1 millisecond at 115200 baud.

He’s got additional tips on using serial print debugging as a process, and he’s done a followup where he stress-tests the reliability of a 5.3 MBit/sec serial stream from an ATMega2560 at 16 MHz in his 3D printer, and found no missed packets. That certainly covers using printf as a debugger, so how about a method of using the debugger as printf?

DIY Capacitive Rotational Encoder On The Cheap With FR4

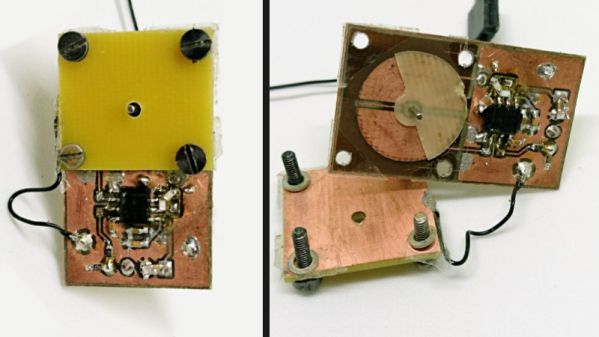
Rotary encoders are critical to many applications, even at the hobbyist level. While considering his own rotary encoding needs for upcoming projects, it occurred to [Jan Mrázek] to try making his own DIY capacitive rotary encoder. If successful, such an encoder could be cheap and very fast; it could also in part be made directly on a PCB.

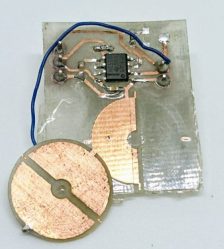
First prototype, two etched plates with transparent tape as dielectric material. Disc is 15 mm in diameter.

The encoder design [Jan] settled on was to make a simple adjustable plate capacitor using PCB elements with transparent tape as the dielectric material. This was used as the timing element for a 555 timer in astable mode. A 555 in this configuration therefore generates a square wave that changes in proportion to how much the plates in the simple capacitor overlap. Turn the plate, and the square wave’s period changes in response. Response time would be fast, and a 555 and some PCB space is certainly cheap materials-wise.

The first prototype gave positive results but had a lot of problems, including noise and possibly a sensitivity to temperature and humidity. The second attempt refined the design and had much better results, with an ESP32 reliably reading 140 discrete positions at a rate of 100 kHz. It seems that there is a tradeoff between resolution and speed; lowering the rate allows more positions to be reliably detected. There are still issues, but ultimately [Jan] feels that high-speed capacitive encoders requiring little more than some PCB real estate and some 555s are probably feasible.

This project is a reminder that FR4 (whether copper-clad, etched, or blank) shows up in clever applications: copper tape and blank FR4 can be used to quickly prototype RF filters, PocketNC built an entire small CNC tool around FR4, and our own [Voja] wrote a full guide on making beautiful enclosures from FR4.

CD launcher

Fully-Automatic CD Launcher Looks Dangerously Fun

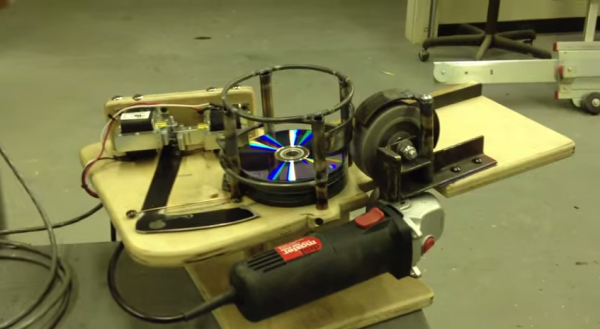
When [JZSlenker] was challenged to find a creative way to destroy a bunch of compact discs that were burned incorrectly, he did not disappoint. He came up with a rather simple but fun contraption that launches the CD’s at high speeds and with a fast rate of fire. He doesn’t share many details about how this machine was built, but the 18 second video makes it pretty obvious how it works.

The CD gun is built mainly from a piece of plywood. This provides a flat base with which to mount the other components. A stack of compact discs is held in place by what appears to be a metal cage that was welded together. An inexpensive angle grinder is used as the propulsion mechanism. The grinding wheel is mounted just in front of the stack of CD’s in a vertical orientation. The wheel must be placed just high enough above the plywood base for a CD to fit in between the wheel and the base. This design is remarkably similar to the Sticker Gun which our own [Brian Benchoff] is building.

Some type of linear actuator is used as the firing mechanism. The actuator is hooked up to a thin piece of metal, cut into an L shape. It almost looks like a reaper tool. When a button is pressed, the actuator fires instantly. This pushes the metal hammer into the CD on the bottom of the stack. The CD is pressed forward into the grinder wheel which then shoots the CD into the air. Based on the below video, it looks like [JZSlenker] is able to fire at a rate of about three CD’s per second with this rig.

This has got to be a super-villain weapon for an upcoming movie, right? Maybe AOL-man?

Continue reading “Fully-Automatic CD Launcher Looks Dangerously Fun”

Delving Deep Into High Speed Digital Design

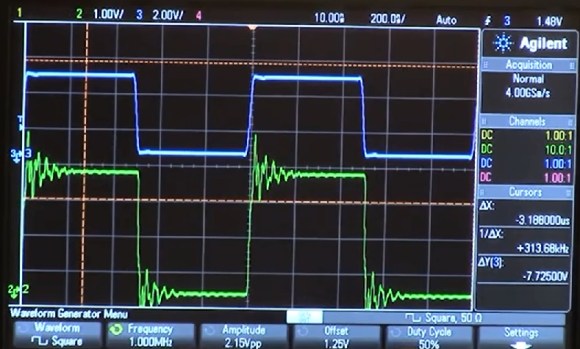
scope capture showing ringing affect in a high speed digital signal

In high speed digital circuits, fast doesn’t necessarily mean “high clock rate”. [Jack Ganssle]  does an excellent job at explaining how the transition time of signals in high speed digital circuits is just as important as the speed of the signal itself. When the transition time is large, around 20 nanoseconds, everything is fine. But when you cut it down to just a few nanoseconds, things change. Often you will get a ringing effect caused by impedance mismatch.

As the signal travels down the trace from the driver and hits the receiver, some of the signal will get reflected back toward the driver if the impedance, which is just resistance with a frequency component, does not exactly match. The reflected signal then heads back to the driver where the impedance mismatch will cause another reflection. It goes back and forth, creating the ‘ringing’ you see on the scope.

[Jack Ganssle] goes on to explain how a simple resistor network can help to match the impedance and how these should be used in circuits with fast transition times, especially where you will be taking readings with a scope. As the scope probe itself can introduce impedance and cause the ringing.

In case you didn’t pick up on it, [Jack Ganssle] also happens to be one of the judges for The Hackaday Prize.

Continue reading “Delving Deep Into High Speed Digital Design”

A High-Speed Logic Gate Board For The Easy-Phi Project

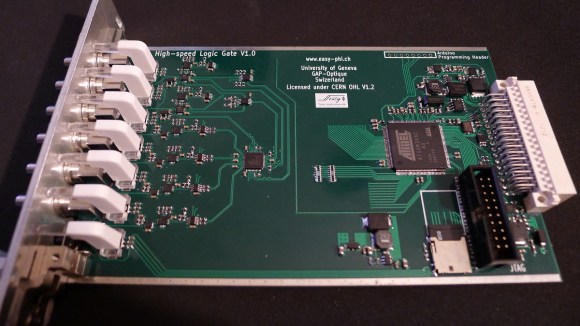
A (long) while ago I presented you the Easy-phi project, which aims at building a simple, cheap but intelligent rack-based open hardware/software platform for hobbyists. With this project, you simply have a rack to which you add cards (like the one shown above) that perform the functions you want.

During these last months my team has been finishing the design and production of several different boards so I’ll start showing them off during these next weeks. Today I present you the High Speed Logic Gate Board, a quantum-physicist requested easy-phi module that can perform logic AND/OR functions at <2GHz speeds. This quite technical write-up is mainly about the constraints that high-speed signals pose for schematics design but is also about the techniques that are used for HS signals termination and monitoring. I hope, however, it’ll give our readers a nice overview of what the insides of a high-speed system may look like. All the files used for this board may be found on the official GitHub repository.

High Speed Circuit Design For Quantum Physics Light Sensing

high-speed-sensor-sampling

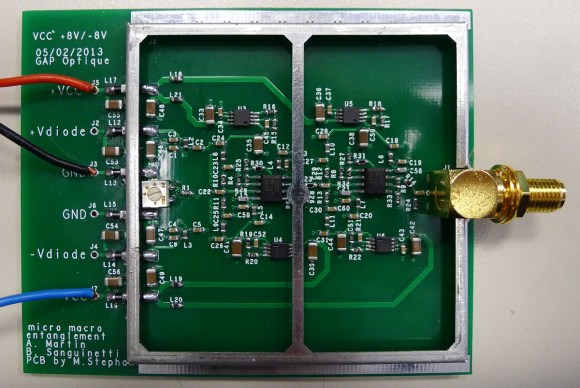
[Limpkin] designs circuits for a living. This board is one of his recent projects, and although his skills are light years ahead of our own experiences, he did a pretty good job of explaining how he put this board together.

He was tasked with measuring the light intensity of two photodiodes. The expected impulses picked up by those components will be less than a nanosecond in duration, putting some special design constraints upon him. To register this signal he’s using three cascading op-amps per input. To ward off false readings from RF interference he also designed in the shielding which you see surrounding the majority of the circuit.

His package choice for the THS3202 op-amps is quite interesting. He didn’t go with the footprint that includes a thermal pad to dissipate heat because he didn’t want to interrupt the ground plane on the underside of the board. To keep the parts from melting he added an aluminum spacer that contacts the top of the package, then a heat sink that covers the entire shield frame. In a future revision he figures he’ll move to a four-layer board so that the can opt for the MSOP package that does the work for him.

Robot Juggler Sure Handles A Lot Of Balls

This robot juggler, pictured above during its appearance at Amper 2010, can keep five balls in the air at once. It was designed by the Department of Control Engineering at the Czech Technical Institute in Prague. We know it doesn’t look like much in that still image, but the two videos embedded after the break are pure gold.

To arms on vertical tracks do the juggling. They can move up and down on said tracks, and circular grippers attached to each can pivot horizontally. A third actuator resides at the bottom of the machine, collecting any balls that might drop, and launching them back into the realm of the juggling hands. A high-speed camera facilitates object tracking in much the same ways that it’s been used for quadcopter control.

The objects being thrown around in that protective enclosure are billiards balls. We guess the added mass helps to dampen any small irregularities in the throw or the catch.

Continue reading “Robot Juggler Sure Handles A Lot Of Balls”