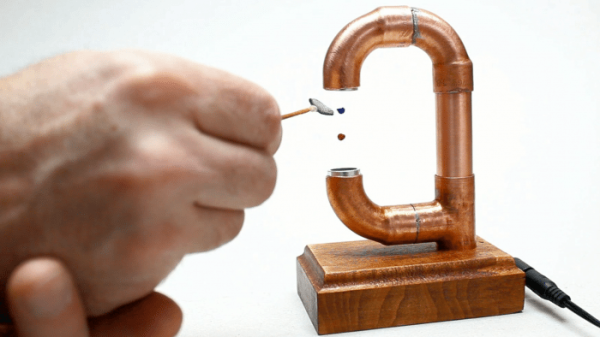
Curved Wood LED Lamp Needs No Fancy Tools

Those of us who aren’t familiar with woodworking might not expect that this curved wood and acrylic LED lamp by [Marija] isn’t the product of fancy carving, just some thoughtful design and assembly work. The base is a few inches of concrete in a plastic bowl, then sanded and given a clear coat. The wood is four layers of beech hardwood cut on an inverted jigsaw with the middle two layers having an extra recess for two LED strips. After the rough-cut layers were glued together, the imperfections were rasped and sanded out. Since the layers of wood give a consistent width to the recess for the LEDs, it was easy to cut a long strip of acrylic that would match. Saw cutting acrylic can be dicey because it can crack or melt, but a table saw with a crosscut blade did the trick. Forming the acrylic to match the curves of the wood was a matter of gentle heating and easing the softened acrylic into place bit by bit.

Giving the clear acrylic a frosted finish was done with a few coats of satin finish clear coat from a spray can, which is a technique we haven’t really seen before. Handy, because it provides a smooth and unbroken coating along the entire length of the acrylic. This worked well and is a clever idea, but [Marija] could still see the LEDs and wires inside the lamp, so she covered them with some white tape. A video of the entire process is embedded below.

Continue reading “Curved Wood LED Lamp Needs No Fancy Tools”

The (Unnecessary?) Art Of Connector Crimping

The “Completion Backwards Principle” is a method of reasoning through a problem by visualizing the end result and then working your way backwards from that point. The blog post that [Alan Hawse] has recently written about the intricacies of crimping wires for plug connectors is a perfect example of this principle. The end result of his work is the realization that you probably shouldn’t bother crimping your own connectors, but watching him work backwards from that point is still fascinating. It’s also the name of a rock album from the 80’s by The Tubes, but this is not a useful piece of information in regards to electrical wiring.

Of course, sometimes people do silly things. Even though there are pre-crimped wires available online for a pittance, you might still want to do your own. With this in mind, [Alan] has put together an exceptionally detailed and well-research post that gives you all the information you could possibly want to know about crimping what is often erroneously referred to as the “JST connector”.

He starts by showing off some common examples of this connector, which if you’ve ever opened a piece of consumer electronics will be like looking through a High School yearbook. You might not know their names without reading them, but you definitely remember what they look like.

We’re then treated to an array of macro shots showing the scale of the pieces involved. If getting up close and personal with metal bits that are only a few millimeters long is your kind of thing, then you’re really going to love this part.

Finally, the post is wrapped up with a few words about the kind of crimping tools that are available on the market, and then a demonstration of his personal crimping method. While some tools would have you crimp both sets of “wings” at the same time, [Alan] tells us he finds taking them on individually leads to better results in his experience.

If this this little taste has left you hungry for a true feast of hyper-specialized knowledge, be sure to check out the Superconference talk by [Bradley Gawthrop].

Continue reading “The (Unnecessary?) Art Of Connector Crimping”

Life On Contract: How Much Do I Charge?

If you’re comfortable with the technical side of becoming a consultant or contractor but are unsure what to charge for your services, you’re not alone. “How much do I charge?” is a tough question, made even tougher by the fact that discussing money can be awkward, and at times virtually taboo.

As a result it’s not uncommon for the issue to get put off because it’s outside one’s comfort zone. Technical people in particular tend to suffer from an “if you build it, they will come” mentality; we get the technical side of things all figured out and just sort of assume that the rest — customers, money, and so forth — will fall into place afterward. If you’re lucky, it will! But it’s better to do some planning.

The short and simple answer of how much to charge is a mix of “it depends” and “whatever the market bears” but of course, that’s incredibly unhelpful all by itself. It’s time to make the whole process of getting started a bit less opaque.

A stubborn determination to solve my own problems has given me plenty of opportunity to make mistakes and commit inefficiencies over the years; I’ve ended up with a process that works for me, but I also happen to think it is fairly generally applicable. Hopefully, sharing the lessons I’ve learned will help make your own process of figuring out what to charge easier, or at least make the inevitable blunders less costly.

Continue reading “Life On Contract: How Much Do I Charge?”

Make Your Own Compound Bow From PVC Pipe

Have you ever wanted to make your own compound bow for fun or even fishing? [New creative DIY] shows us how in their YouTube video. Compound bows are very powerful in comparison to their longbow grandparents, relying on the lever principle or pulleys. meaning less power exertion for the same output.

Compound bows can be really sophisticated in design using pulleys and some exotic materials, but you can make your own with a few nuts and bolts, PVC pipe, string and a tyre inner tube. The PVC pipe can be melted into shape using a heat source such as a portable stove or even a blow torch, and once you have shaped your bow you will want to put a small piece of pipe at both ends with a nut and bolt. Then you can use rubber to give the flexibility your bow needs to shoot arrows, using the tyre inner tube cut to the right size. A piece of string for the ends of your arrows to rest on is then all you need, attach this to either end of your pipe and you should have a DIY PVC compound bow ready for shooting arrows. Alternatively you could always make a recurve bow out of skis.

–Update [Leithoa] in the comments has pointed out this is neither a bow nor a compound and that they are often confused. This is actually a slingshot, of sorts.–
Continue reading “Make Your Own Compound Bow From PVC Pipe”

Bessel Filter Design

Once you fall deep enough into the rabbit hole of any project, specific information starts getting harder and harder to find. At some point, trusting experts becomes necessary, even if that information is hard to find, obtuse, or incomplete. [turingbirds] was having this problem with Bessel filters, namely that all of the information about them was scattered around the web and in textbooks. For anyone else who is having trouble with these particular filters, or simply wants to learn more about them, [turingbirds] has put together a guide with all of the information he has about them.

For those who don’t design audio circuits full-time, a Bessel filter is a linear, passive bandpass filter that preserves waveshapes of signals that are within the range of the filter’s pass bands, rather than distorting them in some way. [turingbirds]’s guide goes into the foundations of where the filter coefficients come from, instead of blindly using lookup tables like he had been doing.

For anyone else who uses these filters often, this design guide looks to be a helpful tool. Of course, if you’re new to the world of electronic filters there’s no reason to be afraid of them. You can even get started with everyone’s favorite: an Arduino.

Give Your Bench Power Supply A Helping Hand

[Sverd Industries] have created a pretty cool bench power supply integrating soldering helping hands into the build. This helps free up some much-needed bench space along with adding that wow factor and having something that looks unique.

The build is made from a custom 3D printed enclosure (Thingiverse files here), however if you have no access to a 3D printer  you could always just re-purpose or roll your own instrument enclosure. Once the enclosure is taken care of, they go on to install the electronics. These are pretty basic, using a laptop PSU with its output attached to the input of a boost/buck module. They did have to change the potentiometers from those small PCB mounted pots to full size ones of the same value though. From there they attach 4 mm banana sockets to the output along with a cheap voltmeter/ammeter LCD module. Another buck converter is attached to the laptop PSU’s output to provide 5 V for a USB socket, along with a power switch for the whole system.

Where this project really shines is the integrated helping hands. These are made from CNC cooling tubes with alligator clips super glued to the end, then heat shrink tubing is placed over the jaws to stop any accidental short circuiting while using them.

This isn’t a life changing hack but it is quite a clever idea if space is a hot commodity where you do your tinkering, plus a DIY bench power supply is almost a rite of passage for the budding hacker.

Continue reading “Give Your Bench Power Supply A Helping Hand”

Make Your Own Reed Switches

[Lucid Science] shows us how to make some simple reed switches. Reed switches are simple components that detect a magnetic field and can close or open a circuit once detected. While not really a thing of beauty, these DIY reed switches should help you out if you just can’t wait to order some or you fancied trying your hands at making some components from scratch.

Reed switches normally come in very small form factors so if you need something small then this may not be for you however the video does show you on a macro scale the fundamental workings of a reed switch. To make your own reed switch you need only a few parts: some copper, enamelled wire and magnets. They really are simple devices however sometimes it’s easy to overlook how simple some things are when they are so small that you can’t really see how they work.

Making your own components from scratch is probably the best way to understand the inner workings of said component. In the past we have seen some pretty awesome self built components from these beautiful DIY Nixie tubes to even making your own LEDs

Continue reading “Make Your Own Reed Switches”