What’s Inside A Super-Cheap Projector? Not A Lot!

[Raymond Ma] has a penchant for browsing Aliexpress and purchasing curious pieces of hardware that are as high on promises as they are low on cost. This is a process he aptly sums up with his opening line of “I should have known better, but…” Luckily, these devices all get torn down and analyzed so we can each enjoy and share a little slice of disappointment.

One such item is the $30 USD YT200 mini projector, which at 320×180 is almost as low on pixels as it is on cost. Still, [Raymond] looks inside to find out if there is perhaps more hacking potential than there is image resolution.

The YT200 lacks any kind of normal video input, and the anemic 15 lumen output is brazenly branded as a feature to protect children’s eyes from excessive brightness.

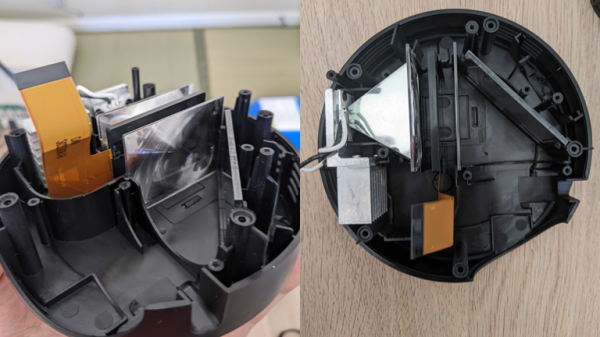
Light from the single LED is collimated with some Fresnel lenses. That light passes through an LCD panel, and from there the image bounces off a mirror and through a focusing lens housed in a spiral guide. Focal adjustments are made with a small lever, and the whole assembly provides just enough friction to prevent the lens from moving out of focus on its own.

The device actually does work fairly well for what it is: a way to play a range of different media types off a connected USB storage device. As long as one is in a dark room, anyway.

[Raymond] hopes to find some alternate use for the device. Might we suggest projecting into a frosted glass globe to create a sort of spherical display? A spooky eye animation on a USB stick might pair well with that.

A Game Boy Advance – Downgraded!

We feature a large number of game console mods here, because enhancing the experience of using a classic machine often involves some really clever work. But here’s one that’s a bit different, instead of upgrading his Game Boy Advance, [Wenting Zhang] has downgraded it from a colour screen to a monochrome LCD. Take a look at the video below the break.

One might ask why this would be necessary, given that there are plenty of backlit colour LCD upgrades already for the GBA, but perhaps people who played the original might understand that it’s about improving the viewability over the rather poor-quality colour LCD original.

Interesting too is the choice of display controller. Where it might be expected to find an FPGA, instead there’s an PR2040. He goes into detail about its programming, and we hope it might inspire any others looking at screen transplants. Meanwhile if the name [Wenting Zhang] means anything to you, it should be for his other work with mono LCDs.

Continue reading “A Game Boy Advance – Downgraded!”

2022 Cyberdeck Contest: Prototype Cyberdeck Is Anything But Questionable

We see many projects here at Hackaday, about which their creators are unreasonably modest. We like a good cyberdeck, and we think [betaraybiff] is one of those creators from their project description for a Prototype Cyberdeck of Questionable Practical Use. It may be a prototype, but we think it could be quite a practical computer.

At its heart is the ubiquitous Raspberry Pi 4 paired with a PiSugar power supply and a minimalist mechanical keyboard. The case is the interesting part, because it’s well-designed to be 3D printed in sections with the HDMI display hinging up from above the keyboard. The Pi is open and visible on top of the deck, but this could easily be covered with another printed piece if desired.

So we disagree on the practicality, given a train journey and this cyberdeck we think we could easily crack out a Hackaday article or two. Never undersell your creations, like this one they’re almost certainly better than you think.

If you’d like to see more of the 2022 Cyberdeck Contest, take a look at the best of the best.

An ortholinear keyboard with predominantly blank white keycaps. There are two red keycaps on the bottom outside corners. The center of the keyboard houses a large LCD in portrait orientation on a red PCB.

2022 Cyberdeck Contest: Keezyboost40 Is A Cyberdeck Masquerading As A Keyboard

There’s something to be said for über-powerful cyberdecks, but there’s also a certain appeal to less powerful decks squeezed into a tiny form factor. [Christian Lo] has designed a cyberdeck that looks like a simple ortholinear keyboard but is running a more flexible environment.

There are games and animations you can play on QMK, but [Lo] felt that a different framework would give him more flexibility to really stretch the limits of what this Raspberry Pi Pico-powered deck could do. He decided to go with a Rust-based firmware with the keyberon library and says, “it felt like I was in control of the firmware.” While the board is using Rust for now, [Lo] says he’s open to conversations about other firmware options to achieve his goals, like a virtual pet game for the board.

The PCB is described as “bog standard” with the possible exception of placing the Pi in a cutout on the board to keep things as low profile as possible. The trade-off comes in the form of reduced board rigidity and potentially increased strain on the connections to the microcontroller.

Looking for more cool cyberdecks? Check out the Winners of the 2022 Cyberdeck Contest or go see all the entries on the Contest Page.
Continue reading “2022 Cyberdeck Contest: Keezyboost40 Is A Cyberdeck Masquerading As A Keyboard”

battery powered wall mounted clock with LCD display and 10 capacitive touch buttons

A Peppy Low Power Wall Mounted Display

[Phambili Tech] creates a battery powered mountable display, called “the Newt”, that can be used to display information about the time, calendar, weather or a host of other customizable items.

The Newt tries to strike a balance between providing long operating periods while still maintaining high refresh rates and having extensive features. Many of the battery powered devices of this sort use E-Ink displays which offer long operating windows but poor refresh rates. The Newt uses an LCD screen that, while not being as low power as an E-Ink display, offers extended battery operation while still being daylight readable and providing high refresh rates.

The display itself is a 2.7 inch 240×400 SHARP “Memory In Pixel” LCD that provides the peppy display at low power. The Newt is WiFi capable through its ESP32-S2-WROVER module with a RV-3028-C7 Real Time Clock, a buzzer for sound feedback and capacitive touch sensors for input and interaction. A 1.85Wh LiPo battery (3.7V, 500mAh) is claimed to last for 1-2 months, with the possibility of using a larger battery for longer life.

Continue reading “A Peppy Low Power Wall Mounted Display”

This Simple Media Player Will Inspire Beginners And Invite Experimentation

While it would have been considered science-fiction just a few decades ago, the ability to watch virtually any movie or TV show on a little slab that fits in your pocket is today no big deal. But for an electronics beginner, being able to put together a pocketable video player like this one would be quite exciting, and might even serve as a gateway into the larger world of electronics design.

For inspiration, [Alex] from Super Make Something on YouTube looked to the Rickrolling keychain media players we featured back in January. His player is quite a bit larger and more capable, with a PCB design that allows the player to be built in multiple configurations, from audio-only to full video and a LiPo battery. The guts of the player center around an ESP32 module, with an audio amp and speakers plus a 1.8″ LCD screen with SD card reader for storing media files. Add in a few controls and switches and a little code, and you’ll be playing back media files in a snap. Build info and demo in the video below.

It may be a simple design, but we feel like that’s the whole point. [Alex] has taken pains to make this as approachable a build as possible. All the parts are cheap and easily available, and the skills needed to put it together are minimal — with the possible exception of soldering down the ESP32 module, which lacks castellated edge terminals. For a beginner, getting a usable media player by mixing together just a few modules would be magical, and the fact that it’s still pretty hackable afterward is just icing on the cake.

Continue reading “This Simple Media Player Will Inspire Beginners And Invite Experimentation”

A ’70s TV With ’20s Parts

Keeping older technology working becomes exponentially difficult with age. Most of us have experienced capacitor plague, disintegrating wire insulation, planned obsolescence, or even the original company failing and not offering parts or service anymore. To keep an antique running often requires plenty of spare parts, or in the case of [Aaron]’s vintage ’70s Sony television set, plenty of modern technology made to look like it belongs in a machine from half a century ago.

The original flyback transformer on this TV was the original cause for the failure of this machine, and getting a new one would require essentially destroying a working set, so this was a perfect candidate for a resto-mod without upsetting any purists. To start, [Aaron] ordered a LCD with controls (and a remote) that would nearly fit the existing bezel, and then set about integrating the modern controls with the old analog dials on the TV. This meant using plenty of rotary encoders and programming a microcontroller to do the translating.

There are plenty of other fine details in this build, including audio integration, adding modern video and audio inputs like HDMI, and adding LEDs to backlight the original (and now working) UHF and VHF channel indicators. In his ’70s-themed display wall, this TV set looks perfectly natural. If your own display wall spotlights an even older era, take a look at some restorations of old radios instead.

Continue reading “A ’70s TV With ’20s Parts”