Stecchino Game Is All About Balancing A Big Toothpick

Stecchino demo by the creator

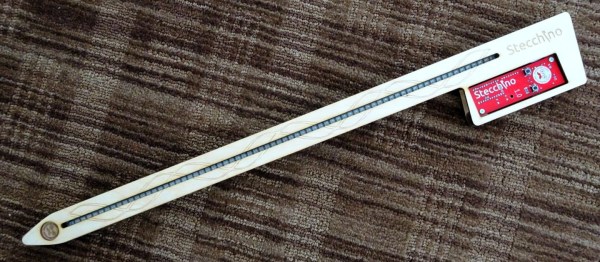
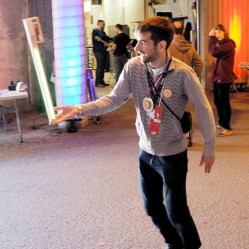
Self-described “Inventor Dad” [pepelepoisson]’s project is called Stecchino (English translation link here) and it’s an Arduino-based physical balancing game that aims to be intuitive to use and play for all ages. Using the Stecchino (‘toothpick’ in Italian) consists of balancing the device on your hand and trying to keep it upright for as long as possible. The LED strip fills up as time passes, and it keeps records of high scores. It was specifically designed to be instantly understood and simple to use by people of all ages, and we think it has succeeded in this brilliantly.

To sense orientation and movement, Stecchino uses an MPU-6050 gyro and accelerometer board. An RGB LED strip gives feedback, and it includes a small li-po cell and charger board for easy recharging via USB. The enclosure is made from a few layers of laser-cut and laser-engraved material that also holds the components in place. The WS2828B WS2812B LED strip used is technically a 5 V unit, but [pepelepoisson] found that feeding them direct from the 3.7 V cell works just fine; it’s not until the cell drops to about three volts that things start to glitch out. All source code and design files are on GitHub.

Games are great, and the wonderful options available to people today allow for all kinds of interesting experimentation like a blind version of tag, or putting new twists on old classics like testing speed instead of strength.

Curved Wood LED Lamp Needs No Fancy Tools

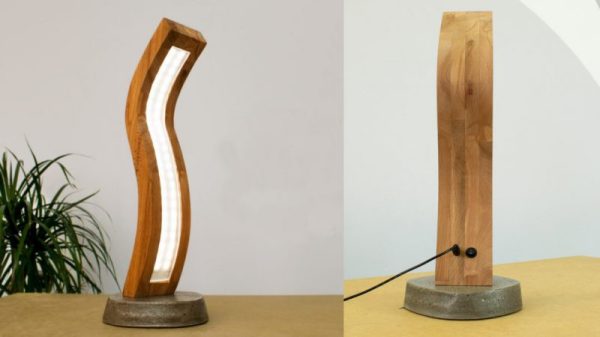
Those of us who aren’t familiar with woodworking might not expect that this curved wood and acrylic LED lamp by [Marija] isn’t the product of fancy carving, just some thoughtful design and assembly work. The base is a few inches of concrete in a plastic bowl, then sanded and given a clear coat. The wood is four layers of beech hardwood cut on an inverted jigsaw with the middle two layers having an extra recess for two LED strips. After the rough-cut layers were glued together, the imperfections were rasped and sanded out. Since the layers of wood give a consistent width to the recess for the LEDs, it was easy to cut a long strip of acrylic that would match. Saw cutting acrylic can be dicey because it can crack or melt, but a table saw with a crosscut blade did the trick. Forming the acrylic to match the curves of the wood was a matter of gentle heating and easing the softened acrylic into place bit by bit.

Giving the clear acrylic a frosted finish was done with a few coats of satin finish clear coat from a spray can, which is a technique we haven’t really seen before. Handy, because it provides a smooth and unbroken coating along the entire length of the acrylic. This worked well and is a clever idea, but [Marija] could still see the LEDs and wires inside the lamp, so she covered them with some white tape. A video of the entire process is embedded below.

Continue reading “Curved Wood LED Lamp Needs No Fancy Tools”

GhettoLED boombox with LED strips lighting up speakers

This Boombox Hack Is Lit

Old boomboxes make great hacks. Their design is iconic; yes they look dated but that really just builds on the nostalgic urge to have one hanging around. Plus their big cases simply invite adding things inside in a way impossible with contemporary electronics.

[Danc0rp] hacked his JVC M70 boombox to make the speakers glow with animated light, bumping VU meters, and a pulsing horizontal bar above the tape deck. The effect is superb. The cones of the speakers act like a projection surface and the grilles hide the LEDs until they activate, and enhance the effects once unleashed. It is one of the best LED speaker hacks we’ve ever seen.

Custom board with Arduino UNO

The light effects are provided by LED strips, which for the speakers are attached just inside the outer rim. The brains behind it all is an Arduino UNO. To connect to it, he soldered components to a blank Arduino prototyping board. That board takes input from the boombox’s line-out and does some filtering (an attempt to address some ground noise) before passing the signal on to the Arduino. That board also interfaces between the Arduino and the LED strips. The schematic is available on his GitHub page. He’d like to replace the board with a custom PCB instead and is looking for design help.

The result is not only beautiful but professional looking too. This makes us wonder why boomboxes don’t come this way. See it for yourself in the video below.

Continue reading “This Boombox Hack Is Lit”

Aluminum Foil Heatsink Keeps LEDs In Check

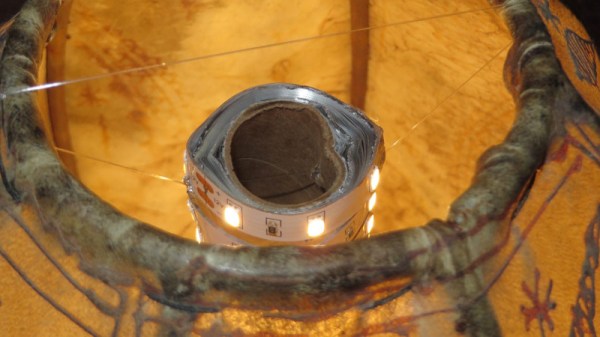
In your kitchen is very likely a roll of aluminum foil, like most people you probably use it to line pans or wrap food for baking. If you heard somebody used aluminum foil in the cooling of items, you could be forgiven for thinking they were referring to wrapping leftovers and tossing them in the refrigerator. But rather than preserving Mom’s famous meatloaf, [Michael Dunn] is using that classic kitchen staple to protect his LED strips.

Cheap LED strips are becoming extremely popular and have been popping up in more and more projects, but they have a pretty serious flaw: heat dissipation. Left on their own they can get hot enough to cook themselves, which is sort of a problem when you’re looking to replace as much of your home lighting with them like [Michael] is.

Heat was of particular concern as he was looking to retrofit a delicate shade with his beloved LED strips. Since he wanted a column of LEDs inside the unique shape of the shade, he reasoned that some kind of heat-conductive tubular structure could be used as both a mandrel to wrap the LEDs around and a way to dissipate heat. Like most of us, his first thought was copper pipe. But unfortunately the only copper pipe he had handy was of too small a diameter.

The tube of foil on the other hand was the perfect diameter, and while aluminum isn’t as good a conductor of heat as copper, it’s certainly no slouch either. Early tests weren’t that great when the tube was laying on the bench, but once it stood vertically convection got the air moving and cooled the LEDs down to where [Michael] was comfortable enough to put them inside the shade. Though he does have some lingering doubts about leaving the cardboard tube in such a toasty environment.

Going back through the archives, we’ve seen some absolutely fantastic projects utilizing LED strips in the past, some of which have come up with their own creative ways of beating the heat.

FoTW: LED Strips Make Awful Servo Drivers

We must all have at some time or another spotted a hack that seems like an incredible idea and which just has to be tried, but turns out to have been stretching the bounds of what is possible just a little too far. A chunk of our time has disappeared without trace, and we sheepishly end up buying the proper part for the job in hand.

[Orionrobots] had a conversation with a YouTube follower about LED strips. An LED strip contains a length of ready-made PWM drivers, they mused. Wouldn’t it be great then, if each of the drivers on a strip could be connected to a servo, making the strip a ready-made single-stop SPI servo driver. With a large multi-servo robot to build, he set to work on a strip of WS2801s.

If you are in the Soldering Zone and have elite skills at the iron, then soldering a wire to a surface mount driver chip is something entirely possible. For mere mortals though it’s a bit of a challenge, and he notes just how much extra time it’s added to the project. The fun starts though when the servo is hooked up, the best that can be said is that it vibrates a bit. On paper, the LED drivers should be able to drive a servo, because they can create the correct waveform. But in practice the servo is designed to accept a logic level input while the driver is designed to sit in series with an LED and control its current. In practice therefore the voltages required for a logic transition can’t quite be achieved.

He concludes by recommending that viewers splash out on a servo driver board rather than trying an LED strip. We applaud him for the effort, after all it’s a hack any of us might have thought of trying for ourselves.

Continue reading “FoTW: LED Strips Make Awful Servo Drivers”

Heads-Up Display Turns Car Into Fighter Jet

While most of us will never set foot in a fighter jet, some of us can still try to get as close as possible. One of the most eye-catching features of a fighter jet (at least from the pilot’s point-of-view) is the heads-up display, so that’s exactly what [Frank] decided to build into his car to give it that touch of fighter jet style.

Heads-up displays use the small reflectivity of a transparent surface to work. In this case, [Frank] uses an LED strip placed on the dashboard to shine up into the windshield. A small amount of light is reflected back to the driver which is able to communicate vehicle statues without obscuring view of the road. [Frank]’s system is able to display information reported over the CAN bus, including voltage, engine RPM, and speed.

This display seems to account for all the issues we could think up. It automatically cycles through modes depending on driving style (revving the engine at a stoplight switches it to engine RPM mode, for example), the LEDs automatically dim at night to avoid blinding the driver, and it interfaces with the CAN bus which means the ability to display any other information in the future should be relatively straightforward. [Frank] does note some rough edges, though, namely with the power supply and the fact that there’s a large amount of data on the CAN bus that the Teensy microcontroller has a hard time sorting out.

That being said, the build is well polished and definitely adds a fighter jet quality to the car. And if [Frank] ever wants even more aviation cred for his ground transportation, he should be able to make use of a 747 controller for something on the dashboard, too.

Watch The ClearWalker Light Up And Dip Its Toes

[Jeremy Cook]’s latest take on the Strandbeest, the ClearWalker, is ready to roll! He’s been at work on this project for a while, and walks us through the electronics and control system as well as final assembly tweaks. The ClearWalker is fully controllable and includes a pan and tilt camera as well as programmable LED segments, and even a tail.

When we last saw [Jeremy] at work on this design, it wasn’t yet functional. He showed us all the important design and assembly details that went into creating a motorized polycarbonate version of [Theo Jansen’s] classic Strandbeest design; there’s far more to the process than simply scaling parts up or down. Happily, [Jeremy] is able to show off the crystal clear beauty in his photo gallery as well as a new video, embedded below.

Continue reading “Watch The ClearWalker Light Up And Dip Its Toes”