Simple 10 Watt LED Driver Is Hot Stuff

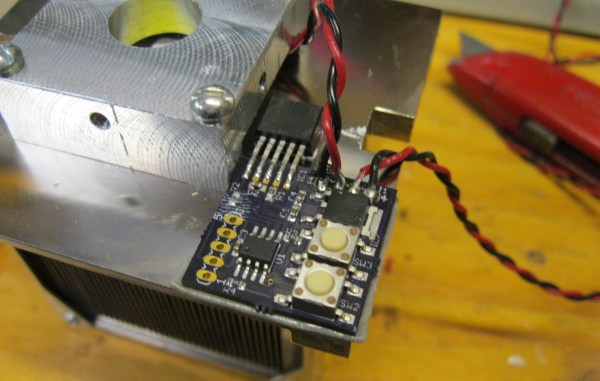
[Peter] needed to drive a high power LED for his microscope. Rather than pick up a commercial LED driver, he built a simple constant current LED driver and fan control. We’ve featured [Peter’s] pumpkin candle LED work here on Hackaday in the past. Today he’s moving on to higher power LEDs. A 10 watt LED would be a good replacement light source for an old halogen/fiber optic ring light setup. [Peter] started with his old standby – an 8 pin Microchip PIC. In this case, a PIC12F1501. A PIC alone won’t handle a 10 watt LED, so he utilized a CAT4101 constant current LED driver from ON Semi. The PIC performs three tasks in this circuit. It handles user input from two buttons, generates a PWM signal to the LED driver, and generates a PWM signal for a cooling fan.

Control is simple: Press both buttons and the LED comes on full bright. Press the “up” button, and the LED can be stepped up from 10% to 100% in 10 steps.  The “down” button drops the LED power back down. [Peter] even had a spare pin. He’s currently using it as an LED on/off confirmation, though we’d probably use it with a 1wire temperature sensor as a backup to thermal protection built into the CAT4101. It may be overkill, but we’d also move the buttons away from that 7805 linear regulator. Being that this circuit will be used with a microscope, it may eventually be operated by touch alone. It would be a bit surprising to try to press a button and end up with a burnt fingertip!

Continue reading “Simple 10 Watt LED Driver Is Hot Stuff”

Peltier Joule Thief Power Supply

[Steven] manages to power an LED for 15 minutes using hot and cold water as a battery. He does this using the thermoelectric effect also known as the Seebeck effect, Peltier effect or Thomson effect. This isn’t particularly new; in fact there are commercial products that you can use to charge a cell phone using a small campfire or internal burner that works on the same principle.

What is interesting about [Steven’s] device is that he uses a salvaged Peltier device not meant for generating electricity, coupled with a home built joule thief circuit. In the video he describes how the joule thief functions and powers the LED using the small voltage generated by the Peltier device. The energy for the thermoelectric effect is conducted from a hot water bath through aluminum plates, through the positive and negative sides of the Peltier device, through more aluminum plates and finally into a cold water bath. As the heat energy transfers through the Peltier device a small electric current is generated and flows in two small wires coming out the side of the device.  The energy generated by the Peltier device is stored in the joule thief and periodically dumped at a voltage high enough to forward bias the LED “on” for a brief moment. Technically the LED is flashing but at a frequency too high for our eyes to see. As the hot water bath cools, the LED goes from very bright, to dim, to off in about 15 minutes.

Not a very practical power supply but still quite the parlor trick. He wraps up the tutorial specifying that a TEG thermoelectric generator would be a much better choice for generating power and can handle much higher temperatures. You can watch the video after the break.

Continue reading “Peltier Joule Thief Power Supply”

LED Bulb Reviews, Evaluations And Teardowns

LED Bulb Reviews

[ElectronUpdate] has posted many great reviews of commercial LED bulbs that one can purchase to replace standard E26 incandescent light bulbs. In his reviews he evaluates the light emitting performance and does a thorough and detailed teardown, evaluating and understanding the circuit technologies used. For the light emission evaluation he uses a light meter and some homemade graph paper to plot the lumens at different angles. Flicker is easily evaluated using a solar panel from a discarded solar path light connected to his oscilloscope. Any flicker will show up quite nicely and can be measured. Of course a kill-a-watt meter makes an appearance in most reviews to read watts and power factor.

Recently [ElectronUpdate] wanted to understand the meaning of CRI which is advertised on many of these commercial LED packages. CRI stands for color rendering index and deals with how colors appear when compared to a natural light source. After doing some researching he found that a CRI over 80 is probably good for LED lighting. The next dilemma was how to measure CRI without expensive scientific equipment. He found a website that we have featured before with free software and instructions on how to build a spectrometer. The web instructions include building a meter box from paper but he found it was much more reliable if built out of wood. We’ll let you follow [ElectronUpdate’s] recommended build if you like, but you’ll need a few items which he does detail.

After a short calibration procedure the final rig will measure power spectral line densities of your light source. [ElectronUpdate] is promising more details on how the colorful measurement data can be related to CRI ratings, but you can get a jump on the details at Full Spectrum Solutions. We also recommend you browse through all of [ElectronUpdate’s] LED bulb reviews on YouTube if the progressing performance and innards of LED bulbs fascinates you as much as it does us.

Hackaday Logo Projector From A Single LED

Here’s another Trinket Contest entry that was interesting enough for its own feature. [Adam] made his own Hackaday version of the Bat signal. It’s not nearly as big, but the concept is the same. Using this single modified LED he’s able to project a 12″ image that seems quite well-defined (more pictures below).

The LED is one he pulled from an old flashlight. After sanding the dome flat he made a jig which positioned it inside of his laser cutter. From there he etched the 0.1″ logo and filled the negative space with some ink. The remaining surface was polished to help the light shine through, then positioned in front of a jeweler’s loupe to magnify the image.

There’s just a couple of hours left before the Trinket Contest draws to a close. Get your entry in for a chance to win!

Continue reading “Hackaday Logo Projector From A Single LED”

An Impressively Large LED Matrix

One of the more impressive projects a home-bound tinkerer can pull off is some sort of display. Not only does the final project result in a lot of blinky, glowey things, but driving hundreds of LEDs is an achievement in itself. [Fabien] decided he wanted to build his own LED display and ended up with something great (French, Google translation).

Instead of going off the deep end and making his own boards for this giant LED display, [Fabien] found a very cheap 16×32 LED display board on DealExtreme. Once these kits were pieced together, [Fabian] mounted them in a wooden frame and started connecting the displays together.

The original plan was to drive these with an Arduino, but with so many pixels he quickly ran out of RAM. Replacing the Arduino with a larger ATMega1284p, [Fabian] found the RAM he needed and started work on some interesting visualizations.

Of course, Conway’s Game of Life made a showing in the final build, but [Fabian] also managed to whip up a spectrograph using FFT. It’s a very nicely put together display that makes us want to buy a few of these displays ourselves.

Troll Physics: 3 LEDs Powered By Hand

[Henryk] just sent us his latest episode of simple LED circuit puzzles. In front of the camera he solders one pin of each of the 3 LEDs to a different switch. He then puts the three assemblies in his hand and flips each switch to make the corresponding LED come on. We look forward to your explanations in the comments.

You may remember two other videos that [Henryk] made (also embedded after the break). The first video was a simple circuit with a resistor, three switches, and three LEDs in series. When a battery was connected, the LEDs were somehow switched on one at a time.The second video featured the same resistor/switches/LEDs, this time in a parallel circuit. Turning on the first switch made the first LED light up, and the second switch made the second LED light up.

Here are the few other troll physics projects we featured: the original LED circuits post, the super deluxe edition and the amazing solution to the trickery.

Continue reading “Troll Physics: 3 LEDs Powered By Hand”

Four Meter Light Paintings

HaD

We’ve seen some light painting before – waving a microcontroller and LED strip in front of a camera is a very interesting project after all. [Saulius]’ light painting stick is unlike anything we’ve seen before, though. It’s huge – four meters high, and is also very flexible in the field, drawing images served up from a smart phone.

To get his pictures onto his light painting stick, [Saulius] used the very cool Carambola, an exceedingly small board that also runs Python. The images were converted to a 128xWhatever .BMP file served to the Carambola over WiFi with a smart phone, Since the Carambola runs Linux, sometimes a kernel interrupt would mistakenly restart the drawing process. [Saulius] found a way around that by writing the drawing code in C and wrapping that in a Python module. The speed of C and the flexibility of Python, who could ask for more.

On the project page, you can see [Saulius] pulling off some very cool light paintings. Even though the Hackaday logo is the best way to get on the front page here, this pic is probably the most impressive