Neodriver Ornament Brightens Up Christmas

Stores will sell you all kinds of gaudy holiday ornaments, but there’s nothing like the style and class achieved by building your own. [w3arycod3r] did just that, whipping up the fun and festive Neodriver Ornament.

It’s a battery-powered build, and runs off an rechargeable 18650 cell which provides several days of operation at a low duty cycle. An ATtiny85 is charged with sending out commands to various NeoPixel devices, from rings to rectangular arrays. [w3arycod3r] then designed various PCBs that could carry the hardware and battery in a well-balanced package that would hang nicely when suspended from a ribbon on a Christmas tree.

As is always the fun part with addressable LEDs, [w3arycod3r] whipped up some fun animations to suit. The 5×5 rectangular arrays of NeoPixels are able to deliver scrolling text, while another animation blips out the RNA sequence of everyone’s least favorite coronavirus, SARS-CoV-2. Getting everything to fit into a ATtiny85’s 8 KB of code space and 512 byte EEPROM was a challenge, but slimming down the Adafruit NeoPixel library and using direct AVR register manipulation in place of regular Arduino functions helped.

Overall, it’s a fun holiday build that looks great on the tree. Alternatively, consider making yourself some rheoscopic ornaments this holiday season. And, if you’ve whipped up your own fun holiday build, throw it on the tipsline!

Two shots of a Thriller jacket with LED strips being worn by Louise Katzovitz, one from the front and the other from the back.

Thrills With An LED “Thriller” Jacket

[Louise Katzovitz] has created a light-up jacket in the style of the jacket worn by Michael Jackson in the 1983 music video for “Thriller”. [Louise Katzovitz]’s Thriller jacket is the perfect example of combining sewing hacks and electronic hacks to make an awesome, wearable jacket.

A bomber jacket was used as the base form to layer on the sequins and LED strips. Instead of bands of metal studs, [Louise] used WS2812B 60 pixels/m LED strips. 3D-printed transparent PLA “gems” were placed on top of the LEDs to mimic the form of the metal studs in the original jacket and provide diffusion for the underlying LEDs.

Inside of the LED thriller jacket, with battery pack, arduino nano and wiring exposed

Each LED strip was laid out on a piece of vinyl strip. Then, a top layer of vinyl was cut to allow each of the LEDs to poke through, with the 3D printed gems super-glued on top. The assembled LED bands are attached to the jacket by Velcro with the wiring fed behind the lining material, which can be removed easily via small hooks. The whole thing is driven by an Arduino Nano and a 5 V power bank.

With the details and process worked out, [Louise] even made a tiny version of the jacket for her dog. We’ve featured LED wearables and fashion before and [Louise]’s jacket is a great addition. These projects are perfect for anyone who wants to wow their friends this upcoming Halloween season. Video after the break!

Continue reading “Thrills With An LED “Thriller” Jacket”

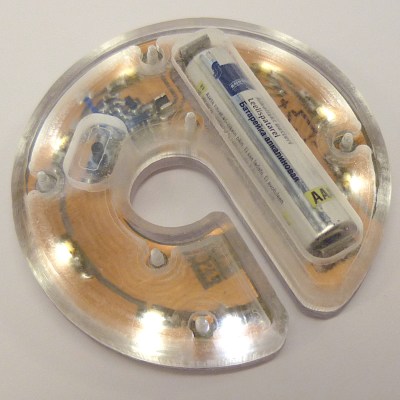
laser cut acrylic coaster with rgb leds inside

Your Mug Will Like This Glowy Coaster

[Charlyn] wanted to highlight their friends beautiful mug collection, so the Glowy Coaster was born.

The coaster is made up of six layers of laser cut acrylic. The top and bottom layer are cut out of clear acrylic, providing a flat surface for the coaster. A top pattern layer made of pearl acrylic has a thin piece of vellum put underneath it to provide diffusion for the LED strip sandwiched inside. The middle layers are made of peach acrylic and have their centers hollowed out to provide room for the electronics inside. The top pearl acrylic layer gives the coaster, as [Charlyn] writes, a “subtle touch of elegance”. The coaster itself is screwed together by an M3 screw at each point of the hexagon that feed through to heat-set inserts.

inside of glowy coaster with electronics exposed

The electronics consist of a short NeoPixel strip, cut to include 12 LEDs pointed in towards the center of the coaster. The LEDs are driven by a Trinket M0 microcontroller with a LiPo “backpack” to provide power, attachment points for the exposed power switch and recharging capability to the 110 mAh 3.7 V battery. The code is a slightly modified NeoPixel “rainbow” wheel loop (source available as a gist). The design files are available through Thingiverse.

Creations like these highlight how much care and work goes into a project with minimal beauty, where decisions, like the opacity and thickness of the acrylic or countersinking the M3 screws, can have huge consequences for the overall aesthetic. [Charlyn] has an attention to detail that brings an extra touch of professionalism and polish to the project.

Coasters are a favorite for laser cutting and we’ve covered many different types, including
coaster bots, coaster engravers and even a color changing, drink sensing coasters.

Continue reading “Your Mug Will Like This Glowy Coaster”

As Europe Goes To LEDs, Scientists Worry

There was a time when street lighting means someone had to go light the lamps. Electricity changed that, but street and outdoor lighting has been quietly going through a new revolution: LEDs. The problem, though, is that LEDs provide what scientists call “broad white” light and there are concerns about the impact the unnatural lighting will have on ecosystems, including people and animals.

Of course, the first step in worrying about something is to measure it. You would think that satellites would have a bird’s-eye view of the nighttime lighting landscape, and, of course, they do. But most of the imagery isn’t suitable for looking at the spectrum of wavelength data scientists need to quantify what they call ALAN — Artificial Light at Night.

The ISS imaging is, however, sufficient. Using special data techniques, they were able to track the adoption of LEDs over sodium lights and other technologies between 2012-2013 and 2014-2020 across Europe. For example, in the title image, you can see Belgium with an orange tint indicating low-pressure sodium lights. The Netherlands, France, and the UK have a more yellow hue, indicating high-pressure sodium lamps. Germany is more of a blue color due to fluorescent and mercury vapor bulbs.

Continue reading “As Europe Goes To LEDs, Scientists Worry”

Circuit-less PCB Featured As Faceplate For A Digital Clock

If there’s no circuitry on a printed circuit board, does it cease being a “PCB” and perhaps instead become just a “PB”?

Call them what you will, the fact that PCBs have become so cheap and easy to design and fabricate lends them to more creative uses than just acting as the wiring for a project. In this case, [Jeremy Cook] put one to work as the faceplate for his “742 Clock,” a name that plays on the fact that his seven-segment display is 42 mm tall, plus it’s “24/7” backward.

In addition to the actual circuit board that holds the Wemos ESP32 module and the LEDs, a circuit-less board was designed with gaps in the solder mask to act as light pipes. Sandwiched between the boards is a 3D printed mask, to control the light and direct it only through the light pipes. [Jeremy] went through a couple of iterations of diffuser and mask designs, finally coming up with a combination that works well and looks good. He mentions a possible redesign of the faceplate board to include a copper backplane for better opacity, which we think is a good idea. We’d also like to see how different substrates work; would boards of different thickness or using FR-4 with different glass transition temperatures work better? Check out the video below and see what you think.

We’re seeing more and more PCBs turn up as structural elements, from enclosures to control panels and even tools, and we approve of this trend. But what we really approve of is what [Jeremy] did here by making this clock just a dumb display that gets network time over NTP. Would that all three digital clocks in our kitchen did the same thing — maybe then they wouldn’t each be an infuriating minute out of sync with the others.

Continue reading “Circuit-less PCB Featured As Faceplate For A Digital Clock”

PERSEUS-9, The Dual-6502 Portable Machine That Should Have Been

A question: does anyone who was around in the early days of the 8-bit computer revolution remember a dual-CPU 6502 portable machine like this one? Or just a dual-CPU machine? Or even just a reasonably portable computer? We don’t, but that begs a further question: if [Mitsuru Yamada] can build such a machine today with parts that were available in the era, why weren’t these a thing back then?

We’re not sure we have an answer to that question, but it just may be that nobody thought of it. Or, if they did, the idea of putting two expensive CPUs into a single machine was perhaps too exorbitant to take seriously. Regardless, the homemade mobile is another in a growing line of beautifully crafted machines in the PERSEUS line, all of which have a wonderfully similar look and feel.

For the PERSEUS-9, [Yamada-san] chose a weatherproof aluminum enclosure with just the right form-factor for a mobile computer, as well as a sturdy industrial look. Under the hood, there are two gorgeous wire-wrap boards, one of which is home to the 48-key keyboard and the 40×7 alphanumeric LED matrix display, while the other is a densely packed work of art holding the two 6502s and a host of other DIPs.

The machine is a combination of his PERSEUS-8 computer, his 6802 serial terminal, and the CI-2 floating point interpreter he built for the PERSEUS-8. A brief video of the assembly of this delightful machine is below. One of the many things about these builds that impress us is the precision with which the case is machined, apparently all by hand. How he managed to drill out all those holes for the keyboard without having one even slightly out of alignment without the aid of CNC is beyond us.

Continue reading “PERSEUS-9, The Dual-6502 Portable Machine That Should Have Been”

Berlin Clock Takes Inspiration From Sci-Fi Sources, Looks Incredible

What would a HAL9000 look like if it eye were yellow and sat atop a front panel inspired by an Altair 8800? You’d have today’s feature, [Stephan]’s BerlinUhr, a gorgeous little take on a Berlin Clock.

At Hackaday, we have a soft spot for clock builds. They’ve graced our pages from early times. When we saw this ultra cool Berlin Clock, we couldn’t resist the urge to share it with all of our readers.  For those of you not familiar with a Berlin Clock, it’s a clock that consists of 24 lights, and was the first of its kind back in 1975.

[Stephan]’s build is notable because not only is it a beautiful design, but the work that went into the design and build. At several inches tall, the BerlinUhr is supported solely by a USB-C connection, although it can also be hung on a wall. The RTC is backed up by a CR1216, and an ATtiny167 provides the brains for the operation.

A neat part of the build comes with the KPS-3227 light sensor, used to adjust the LED brightness according to ambient lighting. Rather than being a straightforward part to insert into the PCB, KiCad’s footprint had some pins reversed, causing [Stephan] to learn how to correct it and contribute the fix to KiCad. Well done!

We weren’t kidding about clocks, by the way- check out the link to the Atomic Wrist Watch on this post from 2005, and this Russian VFD based clock from 2006- with video!

Do you have your own favorite clock build you’d love to see grace our pages? Be sure to submit a tip!