Machine Learning With Microcontrollers Hack Chat

Join us on Wednesday, September 11 at noon Pacific for the Machine Learning with Microcontrollers Hack Chat with Limor “Ladyada” Fried and Phillip Torrone from Adafruit!

We’ve gotten to the point where a $35 Raspberry Pi can be a reasonable alternative to a traditional desktop or laptop, and microcontrollers in the Arduino ecosystem are getting powerful enough to handle some remarkably demanding computational jobs. But there’s still one area where microcontrollers seem to be lagging a bit: machine learning. Sure, there are purpose-built edge-computing SBCs, but wouldn’t it be great to be able to run AI models on versatile and ubiquitous MCUs that you can pick up for a couple of bucks?

We’re moving in that direction, and our friends at Adafruit Industries want to stop by the Hack Chat and tell us all about what they’re working on. In addition to Ladyada and PT, we’ll be joined by Meghna NatrajDaniel Situnayake, and Pete Warden, all from the Google TensorFlow team. If you’ve got any interest in edge computing on small form-factor computers, you won’t want to miss this chat. Join us, ask your questions about TensorFlow Lite and TensorFlow Lite for Microcontrollers, and see what’s possible in machine learning way out on the edge.

join-hack-chatOur Hack Chats are live community events in the Hackaday.io Hack Chat group messaging. This week we’ll be sitting down on Wednesday, September 11 at 12:00 PM Pacific time. If time zones have got you down, we have a handy time zone converter.

Click that speech bubble to the right, and you’ll be taken directly to the Hack Chat group on Hackaday.io. You don’t have to wait until Wednesday; join whenever you want and you can see what the community is talking about.

Simulate Climate With An Arduino

Greenhouses create an artificial climate specifically suited to the plants you want to grow. It’s done by monitoring conditions like temperature and humidity, and making changes using things like vents, fans, irrigation, and lighting fixtures to boost temperature. But how do you know when it’s time to up the humidity, or vent some of the heat building up inside? The easy way is to use the Arduino-powered Norman climate simulator from [934Virginia] which leverages data from different locations or times of year based on NOAA weather data to mimic a particular growing environment.

Norman relies on a simple input of data about the target location, working from coordinates and specified date ranges to return minimum/maximum values for temperature and humidity weather conditions. It makes extensive use of the Dusk2Dawn library, and models other atmospheric conditions using mathematical modeling methods in order to make relatively accurate estimates of the target climate. There are some simulations on the project’s Plotly page which show what this data looks like.

This data is used by [934Virginia’s] Arduino library to compare the difference between your target climate and actual sensor readings in your greenhouse. From there you can make manual changes to the environment, or if you’re luck and already have an Arduino-based greenhouse automation system the climate adjustments can be done automatically. The project is named after Norman Borlaug, a famous soil scientist and someone worth reading about.

Editor’s Note: This article has been rewritten from the original to correct factual errors. The original article incorrectly focused on replicating a climate without the use of sensors. This project does require sensors to compare actual greenhouse conditions to historic climate conditions calculated by the library. We apologize to [934Virginia] for this and thank them for writing in to point out the errors.

Images courtesy of Wikimedia Commons.

Modeling The Classic 555 Timer On A Breadboard

Over the years, readers have often commented that microcontrollers (or more specifically, the Arduino) are overkill for many of the projects they get used in. The admonition that the creator “Should have used a 555” has become something of a rallying cry for those who think modern electronic hobbyists are taking the easy way out.

But what if you think even the lowly 555 timer is overkill? In that case, perhaps you’ll be interested in a recent blog post by [TheMagicSmoke], where the reader is walked through the process of creating an analog of the classic integrated circuit on a somewhat larger scale. Finally, we can replace that cheap and handy IC with a mass of wires and components.

Alright, so you’ve probably guessed that there’s no practical reason to do this. Outside of some theoretical MacGyver situation in which you needed to create a square wave using parts salvaged from devices laying around, anyway. Rather, the project is presented as a good way to become more confident with the low-level operation of electronic circuits, which is something we think everyone can agree is a good thing.

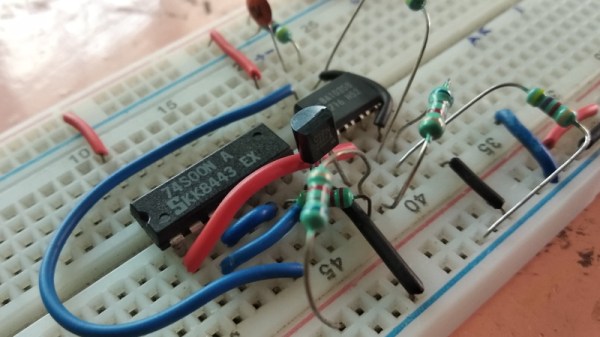
The components used include a 74S00 quad NAND gate, a LM358 dual operational amplifier, a 2N2222A transistor, and a handful of passive components. [TheMagicSmoke] not only explains how the circuit is constructed, but shows the math behind how it all works. Finally, an oscilloscope is used to verify it’s operating as expected.

We respect a hacker on a mission, just last month [TheMagicSmoke] put together a similar “back to basics” post on how to interface with an I2C EEPROM.

AI-Enabled Teletype Live Streams Nearly Coherent Conversations

If you’ve got a working Model 33 Teletype, every project starts to look like an excuse to use it. While the hammering, whirring symphony of a teleprinter going full tilt brings to mind a simpler time of room-sized computers and 300 baud connections, it turns out that a Teletype makes a decent AI conversationalist, within the limits of AI, of course.

The Teletype machine that [Hugh Pyle] used for this interesting project, a Model 33 ASR with the paper tape reader, is a nostalgia piece that figures prominently in many of his projects. As such, [Hugh] has access to tons of Teletype documentation, so when OpenAI released their GPT-2 text generation language model, he decided to use the docs as a training set for the model, and then use the Teletype to print out text generated by the model. Initial results were about as weird as you’d expect for something trained on technical docs from the 1960s. The next step was obvious: make a chat-bot out of it and stream the results live. The teletype can be seen clattering away in the recorded stream below, using the chat history as a prompt for generating text responses, sometimes coherent, sometimes disturbing, and sometimes just plain weird.

Alas, the chat-bot and stream are only active a couple of times a week, so you’ll have to wait a bit to try it out. But it looks like a fun project, and we appreciate the mash-up of retro tech and AI. We’ve seen teleprinters revived for modern use before, both for texting and Tweeting, but this one almost has a mind of its own.

Continue reading “AI-Enabled Teletype Live Streams Nearly Coherent Conversations”

But Can Your AI Recognize Slugs?

The common garden slug is a mystery. Observing these creatures as they slowly emerge from their slimy lairs each evening, it’s hard to imagine how much damage they can do. With paradoxical speed, they can mow down row after row of tender seedlings, leaving nothing but misery in their mucusy wake.

To combat this slug menace, [Tegwyn☠Twmffat] (the [☠] is silent) is developing this AI-powered slug busting system. The squeamish or those challenged by the ethics of slug eradication can relax: no slugs have been harmed yet. So far [Tegwyn] has concentrated on the detection of slugs, a considerably non-trivial problem since there are few AI models that are already trained for slugs.

So far, [Tegwyn] has acquired 5,712 images of slugs in their natural environment – no mean feat as they only come out at night, they blend into their background, and their slimy surface makes for challenging reflections. The video below shows moderate success of the trained model using a static image of a slug; it also gives a glimpse at the hardware used, which includes an Nvidia Jetson TX2. [Tegwyn] plans to capture even more images to refine the model and boost it up from the 50 to 60% confidence level to something that will allow for the remediation phase of the project, which apparently involves lasers. Although he’s willing to entertain other methods of disposal; perhaps a salt-shooting turret gun?

This isn’t the first garden-tending project [Tegwyn] has tackled. You may recall The Weedinator, his 2018 Hackaday Prize entry. This slug buster is one of his entries for the 2019 Hackaday Prize, which was just announced. We’re looking forward to seeing the onslaught of cool new projects everyone will be coming up with.

Continue reading “But Can Your AI Recognize Slugs?”

3D Printed Brushed Motor Is Easy To Visualize

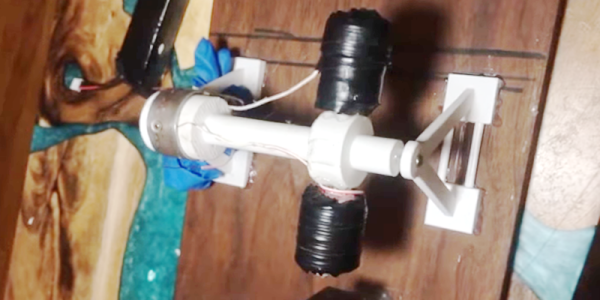
A motor — or a generator — requires some normal magnets and some electromagnets. The usual arrangement is to have a brushed commutator that both powers the electromagnets and switches their polarity as the motor spins. Permanent magnets don’t rotate and attract or repel the electromagnets as they swing by. That can be a little hard to visualize, but if you 3D Print [Miller’s Planet’s] working model — or just watch the video below — you can see how it all works.

We imagine the hardest part of this is winding the large electromagnets. Getting the axle — a nail — centered is hard too, but from the video, it looks like it isn’t that critical. There was a problem with the link to the 3D model files, but it looks like this one works.

Continue reading “3D Printed Brushed Motor Is Easy To Visualize”

This TARDIS Is Bigger On The Inside

A few months ago, YouTube user [Maladroit Modeller] uploaded a video of his model TARDIS from Doctor Who which shows an inside that’s bigger than the outside. Recently, [Maladroit Modeller] posted some pictures and has now uploaded a video showing how it’s done.

The TARDIS model itself is a 3:75 scale “Spin & Fly” model. The case to show everything off is built from foam core and the interior is built from foam core, silver paper, cardboard, styrene and other bits and pieces. There looks like there’s some EL wire being used, too, along with a lot of LEDs.

The build looks great and the illusion works very nicely in the video. Check out the video after the break, and then check out the “how it’s done” video for an explanation. Continue reading “This TARDIS Is Bigger On The Inside”