The Barcode Beast Likes Your CDs

Over the years we’ve featured many projects which attempt to replicate the feel of physical media when playing music. Usually this involves some kind of token representation of the media, but here’s [Bas] with a different twist (Dutch language, Google Translate link). He’s using the CDs themselves in their cases, identifying them by their barcodes.

At its heart is a Raspberry Pi Pico W and a barcode scanner — after reading the barcode, the Pi calls Discogs to find the tracks, and then uses the Spotify API to find the appropriate links. From there, Home Assistant forwards them along to a smart speaker for playback. As a nice touch, [Bas] designed a 3D printed holder for the electronics which makes the whole thing a bit neater to use.

We this approach for its relative simplicity, and because the real CDs ad the retro touch it’s a real winner. You can find all the resources in a GitHub repository, should you wish to make your own. Meanwhile, it’s certainly not the first barcode scanner we’ve seen.

A tricked-out kids' Jeep in black and silver.

Driven To Over-Engineer A Kids’ Car

You know, it feels as though it’s getting more and more difficult to compete for Father of the Year around here. And [Jon Petter Skagmo] just laid down a new gauntlet — the incredibly overly-engineered kids car.

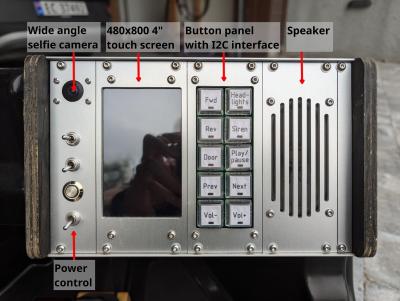
Close-up of the dash panel of an overly-engineered kids' car.While the original plan was to build the entire car from scratch, [Jon] eventually opted to use an off-the-shelf car that had a dead battery.

While the original architecture was quite simple, the new hardware has just about everything a kid could want in a tricked-out ride, most of which is accessible through the really cool dashboard.

We’re talking headlights, a music player, a siren, a selfie video cam that doubles as two-way communication with the driver, and even a garage door opener that uses an MQTT connection.

Under the cute little hood is where you’ll find most of the electronics. The car’s brain is a Raspberry Pi 3B, and there’s a custom daughter board that includes GPS/GNSS. This was originally meant to geofence [Baby Girl Skagmo] in, but Dad quickly realized that kids are gonna kid and disabled it pretty soon after.

This isn’t the first high-tech rebuild of a kiddie car that we’ve seen here at Hackaday. Makes us wish we were quite a bit smaller…

Continue reading “Driven To Over-Engineer A Kids’ Car”

ESP32 Brings New Features To Classic Geiger Circuit

There’s no shortage of Geiger counter projects based on the old Soviet SBM-20 tube, it’s a classic circuit that’s easy enough even for a beginner to implement — so long as they don’t get bitten by the 400 volts going into the tube, that is. Toss in a microcontroller, and not only does that circuit get even easier to put together and tweak, but now the features and capabilities of the device are only limited by how much code you want to write.

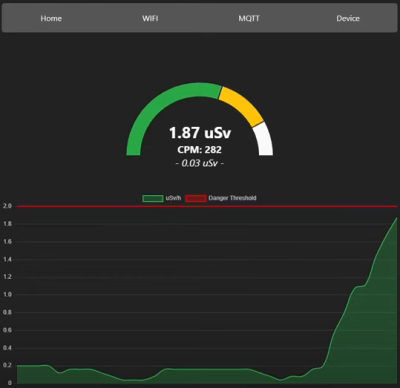
Luckily for us, [Omar Khorshid] isn’t afraid of wrangling some 0s and 1s, and the result is the OpenRad project. In terms of hardware, it’s the standard SBM-20 circuit augmented with a LILYGO ESP32 development board that includes a TFT display. But where this one really shines is the firmware.

With the addition of a few hardware buttons, [Omar] was able to put together a very capable interface that runs locally on the device itself. In addition, the ESP32 serves up a web page that provides some impressive real-time data visualizations. It will even publish its data via MQTT if you want to plug it into your home automation system or other platform.

Between the project’s Hackaday.io page and GitHub repository, [Omar] has done a fantastic job of documenting the project so that others can recreate it. That includes providing the schematics, KiCad files, and Gerbers necessary to not only get the boards produced and assembled, but modified should you want to adapt the base OpenRad design.

This project reminds us of the uRADMonitor, which [Radu Motisan] first introduced in 2014 to bring radiation measuring to the masses. This sort of hardware has become far more accessible over the last decade, bringing the dream of a globally distributed citizen-operated network of radiation and environmental monitors much closer to reality.

Continue reading “ESP32 Brings New Features To Classic Geiger Circuit”

A Smart Power Distribution Unit For Home Automation

Power distribution units, as the name implies, are indispensable tools to have available in a server rack. They can handle a huge amount of power for demands of intensive computing and do it in a way that the wiring is managed fairly well. Plenty of off-the-shelf solutions have remote control or automation capabilities as well, but finding none that fit [fmarzocca]’s needs or price range, he ended up building his own essentially from scratch that powers his home automation system.

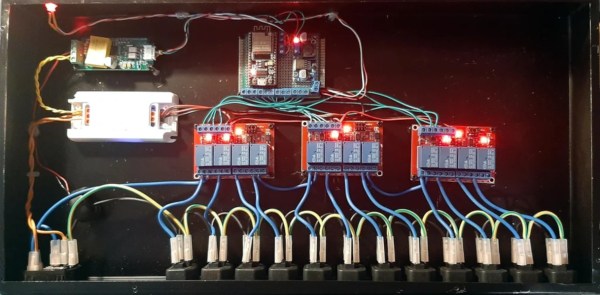
Because it is the power supply for a home automation system, each of the twelve outlets in this unit needed to be individually controllable. For that, three four-channel relay boards were used, each driven by an output on an ESP32. The ESP32 is running the Tasmota firmware to keep from having to reinvent the wheel, while MQTT was chosen as a protocol for controlling these outlets to allow for easy integration with the existing Node-RED-based home automation system. Not only is control built in to each channel, but the system can monitor the power consumption of each outlet individually as well. The entire system is housed in a custom-built sheet metal enclosure and painted to blend in well with any server rack.

Adding a system like this to a home automation system can simplify a lot of the design, and the scalable nature means that a system like this could easily be made much smaller or much larger without much additional effort. If you’d prefer to keep your hands away from mains voltage, though, we’ve seen similar builds based on USB power instead, with this one able to push around 2 kW.

A DIY DIN rail mounted rack of PLC components for home automation

2024 Home Sweet Home Automation: A DIY SCADA Smart Home

A SCADA-style display of icons and control buttons
Touch-screen control and monitoring

Supervisory control and data acquisition, or SCADA, systems sit in the background in industrial settings, performing all kinds of important jobs but in an ad-hoc setup, depending on the precise requirements of the installation. When we think about home automation systems, they’re pretty much the same deal: ad-hoc systems put together from off-the-shelf components and a few custom bits thrown in. [Stefan Schnitzer] clearly has significant knowledge of SCADA in an industrial setting and has carried this over into their home for their entry into the Hackaday 2024 Home Sweet Home Automation Contest. Continue reading “2024 Home Sweet Home Automation: A DIY SCADA Smart Home”

IoT Air Purifier Makes A Great Case Study In Reverse Engineering

Here at Hackaday, about the only thing we like more than writing up tales of reverse engineering heroics is writing up tales of reverse engineering heroics that succeed in jailbreaking expensive widgets from their needless IoT dependency. It’s got a real “stick it to the man” vibe that’s hard to resist.

The thing is, we rarely see a reverse engineering write-up as thorough as the one [James Warner] did while integrating an IoT air purifier into Home Assistant, so we just had to make sure we called this one out. Buckle up; it’s a long, detailed post that really gets down into the weeds, but not unnecessarily so. [James] doesn’t cloud-shame the appliance manufacturer, so we can’t be sure who built this, but it’s someone who thought it’d be a swell idea to make the thing completely dependent on their servers for remote control via smartphone. The reverse engineering effort started with a quick look at the phone app, but when that didn’t pay off in any useful way, [James] started snooping on what the device was talking about using Wireshark.

One thing led to another, wires were soldered to the serial pins on the ESP32 on the purifier’s main board, and with the help of a FlipperZero as a UART bridge, the firmware was soon in hand. This gave [James] clues about the filesystem, which led to a whole Ghidra side quest into learning how to flash the firmware. [James] then dug into the meat of the problem: figuring out the packet structure used to talk to the server, and getting the private key used to encrypt the packets. This allowed a classic man-in-the-middle attack to figure out the contents of each packet and eventually, an MQTT bridge to let Home Assistant control the purifier.

If it sounds like we glossed over a lot, we know — this article is like a master class on reverse engineering. [James] pulled a lot of tools out of his kit for this, and the write-up is clear and concise. You may not have the same mystery fan to work with, but this would be a great place to start reverse engineering just about anything.

Thanks to [ThoriumBR] for the tip.

FLOSS Weekly Episode 767: Owntracks, Are We There Yet?

This week Jonathan Bennett and Jeff Massie talk with JP Mens about Owntracks, the collection of programs that lets you take back control of your own location data. It’s built around the simple idea of taking position data from a mobile phone or other data source, sending it over MQTT to a central server, and logging that data to a simple data store.

From there, you can share it as trips, mark points of interest, play back your movement in a web browser, and more. And because it’s just JSON inside MQTT, it’s pretty trivial to make a connector to interface with other projects, like Home Assistant. We’ve even covered the process!

Continue reading “FLOSS Weekly Episode 767: Owntracks, Are We There Yet?”