tweet pinata

Tweet-Powered Bat Removes Effort Required To Obtain Pinata Contents

A child filled game-launch event was happening in London and [Roo] was asked to use his serious making skills to construct a machine that would hit a pinata with a baseball bat. This is a great idea, well, because giving bats to a bunch of kids at a populated event probably wouldn’t end well. One of the characters from the game Skylanders is named ‘Painyatta‘ and that is whom the pinata is modeled after. Tweeting #HitPainyatta initiates a bat swing. The swing tweeter gets to keep any treats that happen to fall out.

The physical machine is pretty simple. Most of it is made of MDF and wood. A large base supports a tall, skinny box. Mounted on top is a large stepper motor with a long wooden arm holding an aluminum bat. Once a tweet came in, a moderator would check for offensive content (hey, there are kids around) using a custom Twitter API app, and if acceptable, the tweet would be displayed on an LED matrix while an Arduino controlled a stepper driver to spin the motor and swing the bat.

…no children were harmed in the making of this project…

Continue reading “Tweet-Powered Bat Removes Effort Required To Obtain Pinata Contents”

Hacking Oklahoma State University’s Student ID Cards

[Sam] took an information security class at Oklahoma State University back in 2013. For his final project, he and a team of other students had to find a security vulnerability and then devise a theoretical plan to exploit it. [Sam’s] team decided to focus on the school’s ID cards. OSU’s ID cards are very similar to credit cards. They are the same size and shape, they have data encoded on a magnetic strip, and they have a 16 digit identification number. These cards were used for several different purposes. Examples include photo ID, physical access to some areas on campus, charges to an online account, and more.

[Sam] and his team analyzed over 100 different cards in order to get a good sample. They found that all cards started with same eight digits. This is similar to the issuer identification number found in the first six digits of a credit card number. Th analysis also showed that there were only three combinations used for the next two digits. Those were either 05, 06, or 11. With that in mind, the total possible number of combinations for card numbers was mathematically calculated to be three million.

OSU also had a URL printed on the back of each card. This website had a simple form with a single field. The user can enter in a 16 digit card number and the system would tell the user if that card was valid. The page would also tell you if the card holder was an employee, a student, or if there were any other special flags on the card. We’re not sure why every student would need access to this website, but the fact is that the URL was printed right on the back of the card. The website also had no limit to how many times a query could be made. The only hint that the university was aware of possible security implications was the disclaimer on the site. The disclaimer mentioned that usage of the tool was “logged and tracked”.

The next step was to purchase a magnetic card reader and writer. The team decoded all of the cards and analyzed the data. They found that each card held an expiration date, but the expiration date was identical for every single card.  The team used the reader/writer to copy the data from [Sam’s] card and modify the name. They then wrote the data back onto a new, blank magnetic card. This card had no printing or markings on it. [Sam] took the card and was able to use it to purchase items from a store on campus. He noticed that the register reached back to a server somewhere to verify his real name. It didn’t do any checks against the name written onto the magstripe. Even still, the cashier still accepted a card with no official markings.

The final step was to write a node.js script to scrape the number verification website. With just 15 lines of code, the script will run through all possible combinations of numbers in a random sequence and log the result. The website can handle between three and five requests per second, which means that brute forcing all possible combinations can be completed in roughly two days. These harvested numbers can then be written onto blank cards and potentially used to purchase goods on another student’s account.

[Sam’s] team offers several recommendations to improve the security of this system. One idea is to include a second form of authorization, such as a PIN. The PIN wouldn’t be stored on the card, and therefore can’t be copied in this manner. The primary recommendation was to take down the verification website. So far OSU has responded by taking the website offline, but no other changes have been made.

TweetHeart Shows You Some Love

[Stacey] wanted a more interesting way to monitor events related to her Twitter account. What she ended up with is a beautiful animated heart light.

TweetboxShe started out by designing the enclosure. Having access to a laser cutter, she opted to make it out of thin plywood. [Stacey] used an online tool called BoxMaker to design the actual box. The tool is very simple to use. You simply plug in the dimensions of the box and it will provide you with a two dimensional template you can use with your laser cutter. The resulting plywood pieces fit together like a puzzle. The heart piece is made from frosted acrylic and was also cut by the laser.

To light up the heart, [Stacey] opted to use NeoPixels. These are like many of the RGB LED strips we’ve seen in the past, though the pixel density is higher than most. She cut up the LED strip into the appropriate sizes and glued them to a piece of plywood in a rough heart shape. She tested the lights during each step so she would know exactly when any errors were made.

[Stacey] opted to use a SparkCore to control the LEDs. This had the advantage of including WiFi connectivity out of the box.  [Stacey] started with NeoPixel example programs, but quickly realized they all relied on the Delay function. This was a problem for her, because she needed to constantly watch for new Twitter events. She ended up having to write her own functions that relied on interrupts instead.

[Stacey] then wrote a Node.js script to monitor twitter and control the Spark. The script watches for specific events, such as one of [Stacey’s] tweets being re-tweeted, or a user unfollowing [Stacey]. The script then sends a message to the Spark to tell it which event just occurred. The Spark will then repeat the event until a new one occurs. Check out the demonstration video below. Continue reading “TweetHeart Shows You Some Love”

Web Interface For The FRAM LaunchPad

webUILaunchpad The Internet of Things is here in full force. The first step when adding to the Internet of Things is obvious, adding a web interface to your project. [Jaspreet] wrote in to tell us about his project that adds a web interface to his MSP430 based project, making it easy to add any project to the internet of things.
Creating a web interface can be a bit overwhelming if you have never done it before. This project makes it easy by using a dedicated computer running Linux to handle all of the web related tasks. The LaunchPad simply interfaces with the computer using USB and Python, and the computer hosts the webpage and updates it in real time using Node.js. The result is a very professional looking interface with an impressively responsive display that can control the on-board LEDs, read analog values from the integrated ADC, and stream accelerometer data. Be sure to see it in action after the break!

We could see this project being expanded to run on the Raspberry Pi with a multitude of sensors. What will you add a web interface to next? Home automation? A weather station? Let us know!

Continue reading “Web Interface For The FRAM LaunchPad”

Web Controlled Servo From A BeagleBone Black

bbb_servo

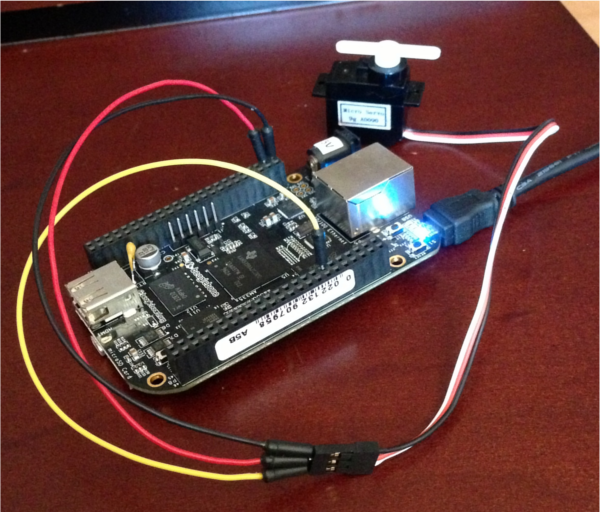
[Babak] created an in-depth tutorial on how he got his BeagleBone Black to control a servo from a web browser.

[Babak] configured a pin on his BeagleBone Black (BBB) as a PWM line and connected it to the control line on a micro hobby servo. The BBB is running a Node.js web server that displays a simple web page to control the servo. The browser sends a WebSocket request to a small WebSocket node server also running on the BBB that then writes the appropriate PWM value to the pin connected to the servo.

The code for node WebSocket server and web server can be found on his GitHub page. There is also a small node library to control PWM lines on the BBB. Though the end result is simple, controlling the servo can be done from any browser that can make a network connection to the BeagleBone Black. Check out the video after the jump for a description and demonstration.

Continue reading “Web Controlled Servo From A BeagleBone Black”

Your Mouse Is A Terrible Webcam

camera

It should come as no surprise your optical mouse contains a very tiny, very low resolution camera. [Franci] decided to take apart one of his old mice and turn that tiny optical sensor into a webcam.

Inside [Franci]’s Logitech RX 250 is an ADNS-5020 optical sensor. This three wire SPI device stuffed into an 8-pin package is a 15×15 pixel grayscale image sensor. [Franci] started this project by bringing out the Arduino and Ethernet shield. After soldering a pull-up resistor to the image sensor’s reset pin, connecting the rest of the circuit was as simple as soldering a few wires to the Arduino.

The Arduino sketch sends the image data for each pixel to a computer over a serial connection. A bit of javascript and a touch of HTML takes this pixel data and turns it into a webpage with a live view of whatever is directly under [Franci]’s mouse.

Video of the mousewebcam in action below.

Continue reading “Your Mouse Is A Terrible Webcam”

The JavaScript Of Things

Espruino

There are a ton of people out there that can program in JavaScript, but give them an embedded device, and they’re up the creek without a paddle. Not anymore, that is, thanks to [Gordon]’s wonderful Espruino, a JavaScript interpreter for ARM microcontrollers. Oh, it’s also a very capable dev board that has more than enough power to turn just about any project you can imagine into reality.

On board the Espruino is an ARM Cortex M3 in the form of an STM32 chip, 256kB Flash, 48kB of RAM, and a ton of PWM and ADC pins to go along with 2 SPI ports, 2 I2C ports, and 2 DACs. It’s a very capable piece of hardware, and if you’re looking to build anything, it would be hard to pick a better general purpose dev board.

[Gordon] has put his board up on Kickstarter, and since it’s already been successfully funded, he’ll be releasing the hardware and software sources under an Open Source license. If you’ve ever wanted to run JavaScript on an ARM board, it looks like Espruino is just the ticket.