Recreating The Amiga 1200 PCB From Pictures

In the past we’ve talked about one of the major downsides of working with vintage computer hardware, which of course is the fact you’re working with vintage computer hardware. The reality is that these machines were never designed to be up and running 20, 30, or even 40-odd years after they were manufactured. Components degrade and fail, and eventually you’re going to need to either find some way to keep your favorite classic computer up and running or relegate it to becoming a display piece on the shelf.

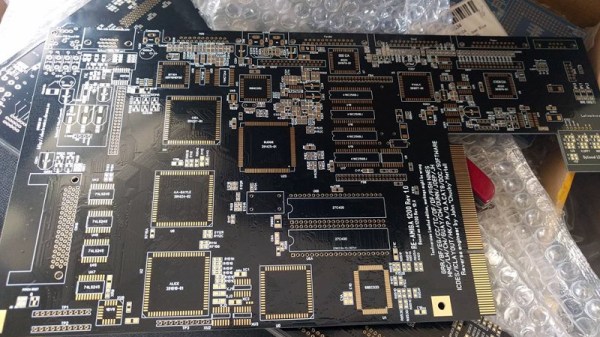
If you’re like [John Hertell], you take the former option. Knowing that many an Amiga 1200 has gone to that great retrocomputing museum in the sky due to corroded PCBs, he decided to recreate the design from scans of an unpopulated board. While he was at it, he tacked on a few modern fixes and enhancements, earning his new project the moniker: “Re-Amiga 1200”.

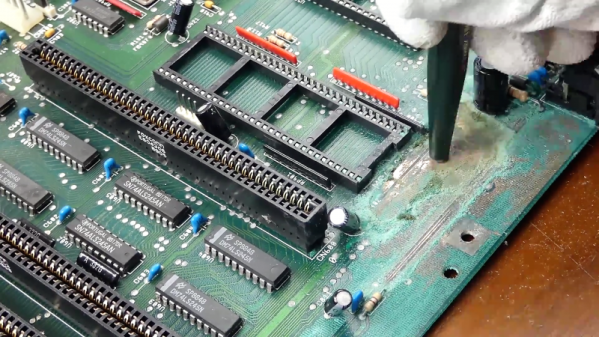
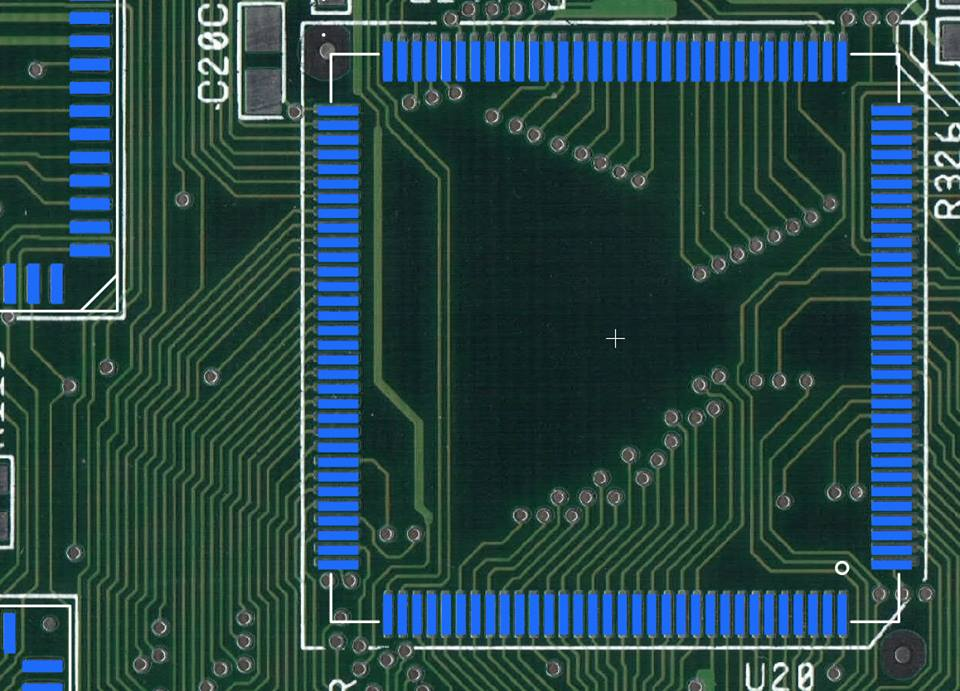
To create this updated PCB, [John] took high quality scans of an original board and loaded them up into Sprint Layout, which allows you to freely draw your PCB design over the top of an existing image. While he admits the software isn’t ideal for new designs, the fact that he could literally trace the scan of the original board made it the ideal choice for this particular task.

After the base board was recreated in digital form, the next step was to improve on it. Parts which are now EOL and hard to come by got deleted in place of modern alternatives, power traces were made thicker, extra fan connectors were added, and of course he couldn’t miss the opportunity to add some additional status blinkenlights. [John] has released his Gerber files as well as a complete BOM if you want to make your own Re-Amiga, and says he’ll also be selling PCBs if you don’t want to go through the trouble of getting them fabricated.

It seems as if Amiga fans never say never, as this isn’t the first time we’ve seen one brought back from the brink of extinction by way of a modernized motherboard. Whatever it takes to keep the vintage computing dream alive.

[Thanks to Anders for the tip.]

Continue reading “Recreating The Amiga 1200 PCB From Pictures”

PCB Junk Drawer Turned Into Blinky Mosaic

We’ve all got a box full of old PCBs, just waiting to be stripped of anything useful. [Dennis1a4] decided to do something with his, turning it into an attractive mosaic that he hung on the wall of his new workshop. But this isn’t just a pile of old PCBs: [Dennis1a4] decided to use the LEDs that were on many of the old boards, creating a blinky junk build. That’s kind of neat in itself, but he then decided to go further, building in an IR receiver so he could control the blinkiness, and a PIR sensor that detected when someone was near the mosaic.

This whole setup is controlled by an ATMega328p  that is driving a couple of PCF8575 port expanders that drive the LEDs. These blink in Morse code patterns. [Dennis1a4] also used an array of DIP switches on one of the boards to randomize the patterns, and wired in a pizeo buzzer on another board to make appropriate bleepy noises.

Continue reading “PCB Junk Drawer Turned Into Blinky Mosaic”

Tiny Solar Energy Module (TSEM) Brings Big Performance

The Tiny Solar Energy Module (TSEM) by [Jasper Sikken] is not only physically tiny at one-inch square, but it is all about gathering tiny amounts of solar energy — amounts too small to be useful in a conventional sense — and getting meaningful work done, like charging a battery for later use. Elements that make this board easy to integrate into other projects include castellated vias, 1.8 V and 3.3 V regulated outputs that are active when the connected battery has a useful charge, and a low battery warning that informs the user of impending shutdown when the battery runs low. The two surface-mount solar cells included on the tiny board are capable of harvesting even indoor light, but the board also has connection points for using larger external solar cells if needed.

The board shows excellent workmanship and thoughtful features; it was one of the twenty Power Harvesting Challenge finalists chosen to head to the final round of The Hackaday Prize. The Hackaday Prize is still underway, with the Human-Computer Interface Challenge running until August 27th. That will be followed by the Musical Instrument Challenge before the finals spin up. If you haven’t started yet, there’s still time to make your mark. All you need is a documented idea, so start your entry today.

IBM PCjr Revived By An ATX Power Supply And Many False Starts

The IBM PCjr was a computer only the marketing geniuses of a multi-billion dollar corporation could love. On the face of it, it seemed like a great idea – a machine for the home market, meant to complement the “big boy” IBM PC in the office and compete against the likes of Apple and Commodore. What it ended up as was a universally hated, only partially PC-compatible machine which sold a mere half-million units before being mercifully killed off.

That doesn’t mean retrocomputing fans don’t still snap up the remaining machines, of course. [AkBKukU] scored a PCjr from a thrift store, but without the original external brick power supply. An eBay replacement for the 18-VAC supply would have cost more than the computer, so [AkBKukU] adapted a standard ATX power supply to run the PCjr. It looked as if it would be an easy job, since the external brick plugs into a power supply card inside the case which slots into the motherboard with a card-edge connector. Just etch up a PCB, solder on an ATX Molex connector, and plug it in, right? Well, not quite. The comedy of errors that ensued, from the backward PCB to the mysteriously conductive flux, nearly landed this one in the “Fail of the Week” bin. But [AkBKukU] soldiered on, and his hand-scratched adapter eventually prevailed; the video below tells the whole sordid tale, which thankfully ended with the sound of the machine booting from the 5-1/4″-floppy drive.

In the end, we’ve got to applaud [AkBKukU] for taking on the care and feeding of a machine so unloved as to be mentioned only a handful of times even on these pages. One of those articles marks the 25th anniversary of the PCjr, and lays out some of the reasons for its rapid disappearance from the market.

Continue reading “IBM PCjr Revived By An ATX Power Supply And Many False Starts”

Amiga Repairs Put One Tough Little Machine Back In Service

Returning a piece of retro hardware to factory condition is generally a labor of love for the restorationist. A repair, on the other hand, is more about getting a piece of equipment back into service. But the line between repair and restoration is sometimes a fine one, with the goals of one bleeding over into the other, like in this effort to save an otherwise like-new Amiga 2000 with a leaky backup battery.

Having previously effected emergency repairs to staunch the flow of electrolyte from the old batteries and prevent further damage, [Retromat] entered the restoration phase of the project. The creeping ooze claimed several caps and the CPU socket as it spread across the PCB, but the main damage was to the solder resist film itself. In the video below you can clearly see flaky, bubbly areas in the mask where the schmoo did its damage.

Using a fiberglass eraser, some isopropyl alcohol, and far more patience than we have, [Retromat] was able to remove the damaged resist to reveal the true extent of the damage below. Thankfully, most of the traces were still intact; only a pair of lines under the CPU socket peeled off as he was removing it. After replacing them with fine pieces of wire, replacing the corroded caps and socket, and adding a coin-cell battery holder to replace the old battery, the exposed traces were coated with a varnish to protect them and the machine was almost as good as new.

Amigas were great machines in their day and launched more than one business. They’ve proved their staying power too, some even in mission-critical roles.

Continue reading “Amiga Repairs Put One Tough Little Machine Back In Service”

Save Some Steps With This Arduino Rapid Design Board

We’re all familiar with the wide variety of Arduino development boards available these days, and we see project after project wired up on a Nano or an Uno. Not that there’s anything wrong with that, of course, but there comes a point where some hobbyists want to move beyond plugging wires into header sockets and build the microcontroller right into their project. That’s when one generally learns that development boards do a lot more than break the microcontroller lines out to headers, and that rolling your own design means including all that supporting circuitry.

To make that transition easier, [Sean Hodgins] has come up with a simple Arduino-compatible module that can be soldered right to a PCB. Dubbed the “HCC Mod” for the plated half-circle castellations that allows for easy soldering, the module is based on the Atmel SAMD21 microcontroller. With 16 GPIO lines, six ADCs, an onboard 3.3 V regulator, and a reset button, the module has everything needed to get started — just design a PCB with the right pad layout, solder it on, and surround it with your circuitry. Programming is done in the familiar Arduino IDE so you can get up and running quickly. [Sean] has a Kickstarter going for the modules, but he’s also releasing it as open source so you’re free to solder up your own like he does in the video below.

It’s certainly not the first dev module that can be directly soldered to a PCB, but we like the design and can see how it would simplify designs. [Sean] as shown us a lot of builds before, like this army of neural net robots, so he’ll no doubt put these modules to good use.

Continue reading “Save Some Steps With This Arduino Rapid Design Board”

Monoprice Mini Converted To Pick And Place (Kinda)

Would you believe that you can take a cheap 3D printer and easily convert it into a full function pick and place machine to help assemble your PCBs? No? Well good, because you can’t. A real pick and place needs all kinds of sensors and logic to identify parts, rotate them, make sure everything is aligned, etc, etc. There’s no way you could just bolt all that onto a cheap 3D printer, and let’s not even talk about the lack of closed loop control.

But if you have a very specific use case, namely a PCB that only has a relatively large single part that doesn’t need to be rotated, [Connor Nishijima] might have a solution for you. He bought a $150 USD Monoprice Mini, and with the addition of a few printed parts, was able to build a machine that drastically cuts down the time it takes for him to build his LED boards. Best of all the modification doesn’t involve any permanent changes to the printer, he can just pop off the vacuum attachment when he wants to print something.

Beyond the 3D printed parts (which were made on the printer itself), the only thing you need to make the modification is the vacuum pump. [Connor] is using a hot air station that includes a vacuum pump for picking up SMD components, but he mentions that you’d probably better off just modifying an aquarium pump and using that. A printed holder snaps over the cooling fan of the Monoprice Mini to hold the vacuum pickup tool, and another printed piece holds the strip of LEDs and the PCB. It’s worth noting that the machine has no ability to control the vacuum pump, and doesn’t need to. The pickup tool is so weak that when the LED lands in the solder paste it sticks to the board well enough that the tool can’t lift it back off.

The real genius in this build comes from the manually written G-Code. You load it from the printer’s built in menu system as if it was a normal 3D print, and it instructs the printer to move the vacuum tool over the line of LEDs, pick one up, and drop it in place on the PCB. It then uses a small peg built into the vacuum tool holder to advance the line of LEDs before starting the cycle all over again. Incredibly, it does this whole complex dance 20 times for each PCB without ever having any kind of feedback or alignment check. It only works because [Connor] was willing to go through the trial and error of getting the calibration and G-Code down as close to perfect as can be expected for such a cheap machine.

This isn’t the first time we’ve seen the Monoprice Mini converted into something a bit more impressive than a cheapo 3D printer. Seems that for whatever the machine lacks in the printing department, it more than makes up for in hackability.

Continue reading “Monoprice Mini Converted To Pick And Place (Kinda)”