How-to: Prepare Your Eagle Designs For Manufacture

back

Cadsoft Eagle is a multi-platform freeware circuit layout program. Lots of open source hardware is designed in Eagle, and it’s become a hobbyist favorite. We use it for all of our hardware designs.

There are several ways to turn an Eagle design into an actual printed circuit board (PCB). We’ll show you how to save Eagle designs as industry-standard gerber files that are accepted by any PCB manufacturer. You can use the gerbers to order a single prototype, or a full panel.

Continue reading “How-to: Prepare Your Eagle Designs For Manufacture”

A History Of SparkFun Prototypes

sparkfuntoys

If you haven’t checked out SparkFun Electronics’ prototype collection yet, you’re missing out. They unearthed many of their old prototypes and published them to show what kind of mistakes could be made. You’ll see plenty of errors and get hints on what to look for while developing your own hardware. This pairs well with their Design for Manufacture post. Along with the pile of broken board iterations, they also walk through how the company developed. Finally, they specifically cover the individual iterations of the BlueSMiRF.

One of the interesting modules in the gallery that never saw full release was the SparkFun Toys line pictured above. The individual units used the standoffs as the power and data bus. The four posts were arranged so they could only be connected in one orientation: power, ground, TX, and RX. It’s an interesting idea that seems like it might be worth exploring further. SparkFun says that it worked fine, but didn’t feel they had the resources to market it to the intended audience.

Uv Oven From An IKEA Cabinet

This may not be an amazingly complicated project, but it is a very elegant and fairly cheap way of building a UV oven for exposing PCBs. [aris] started with an IKEA FIRA cabinet. He basically left the framework as an empty shell and made a make shift top hinged door to enclose it. Mounted in the top is an array of 35 UV LEDs powered by an HP printer transformer.  He did not have a timer circuit, instead he just watched the clock and unplugged it at the right time. You can see from his pictures that his results were quite good.

If you don’t want that piece of furniture taking up room, and don’t mind using a little more elbow grease, you could follow our directions on how to make your own single sided PCB. If money isn’t an issue either, you can always just get your PCBs laser etched.

Laser Etching Printed Circuit Boards


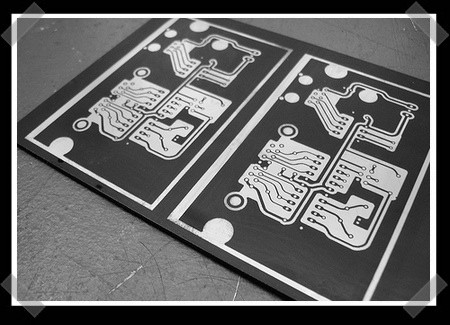
While we hope you enjoyed our How-To: Etch a printed circuit board, toner transfer certainly isn’t the only way to get the job done. [Garrett] from macetech has recently been playing around with using an Epilog laser to etch PCBs. He started by applying a thin even coat of flat black spray paint to the copper board. The laser is used to remove paint in areas that you want the copper removed. Once that’s done, you proceed with etching as usual. He eventually removed the paint mask using acetone. The result has very fine, sharp traces, but most people that have tried this agree that using spray paint is less than ideal.

StickDuino, USB Stick Arduino Clone


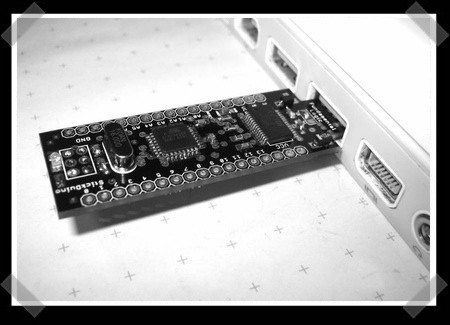
The Arduino hardware clones keep rolling in. This weeks entry into the modern dev board’s roster is the StickDuino. The board is designed to be fully hardware compatible and plugs directly into your USB port. The StickDuino uses all SMD components. The creators know that this can make assembly more difficult so they’ve space the components out, opted for larger pads, and collected some links to SMD tutorials. The board feature two more analog inputs than the Diecimila and it has a jumper so you can switch it to 3.3V. All around it looks like a great product; frankly we love anything with full board layouts.

How-To: Etch A Single Sided PCB

Making a PCB is very simple; it does not consume a lot of time and the results look professional. After reading this How-To and watching the step by step video, you will be able to make your own PCB in your workshop using just a few inexpensive materials.

Many people use protoboard and point-to-point wire everything, but needing multiple copies of the same circuit is the reason that forces many away from using protoboard. After making your first circuit board, you might not point-to-point wire anything again!

Continue reading “How-To: Etch A Single Sided PCB”

Home Made PCB Drill Press


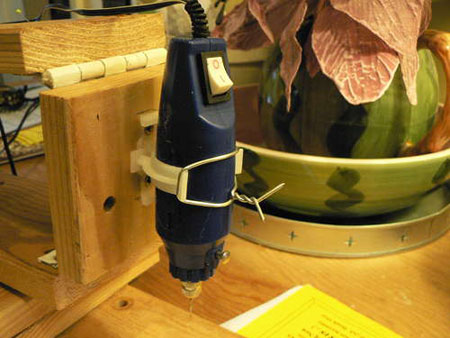
[yellowduck] took some fantastic initiative with this home made PCB drill press. Many people have a rotary tool already. Just add some scrap wood and four hinges. The drill press isn’t perfect; it pivots a little as it lowers. This shouldn’t be a problem for drilling printed circuit boards though. The PCB should be thin enough for the pivot to have little effect. After some test runs, he added a lamp for better lighting and intends to add a return spring and foot switch. It’s definitely a better solution than drilling multiple holes with a hand drill.