World’s Smallest Wii Is Also World’s Worst

As far as game consoles go, the Nintendo Wii was relatively small. Probably owing at least somewhat to the fact that it wasn’t a whole lot more than a slightly improved GameCube in a new case, but that’s another story entirely. So it’s not much of a surprise that people have modded Nintendo’s infamous money printing machine into handheld versions. But this…this is just something else.

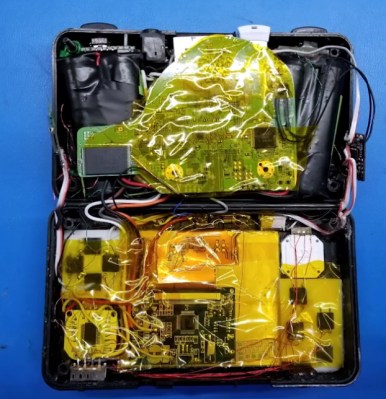
We’re going to go out on a limb and say that this absolutely preposterous build by [Shank] which puts a fully functional Nintendo Wii into an Altoids tin wins the title of “World’s Smallest Wii”. We’re also going to put money on the fact that this record doesn’t get beaten because…well, come on. There’s a reason he’s named his diminutive creation the “Kill Mii”.

You’re probably wondering how this is possible. That’s an excellent question. As it turns out, hackers have discovered that you can cut off the majority of the Wii’s motherboard and still have a functioning system, albeit missing non-essential functions like the GameCube controller ports and SD card slot. From there, you just need to install a new firmware on the now heavily trimmed down Wii that tells it to ignore the fact it has no disc drive and load games as ISOs from an attached USB flash drive. That’s the high level summary anyway, the reality is that this a mod of crushing difficulty and should only be attempted by true masochists.

As for this particular build, [Shank] went all in and even relocated the Wii’s NAND chip to make everything fit inside the tin. There’s also custom PCBs which interface the Wii’s motherboard with the Nintendo 3DS sliders he’s using for control sticks. Underneath everything there’s a battery that can run the whole device for a grand total of about 10 minutes, but given the general shape of the “Kill Mii” and the fact that most of the buttons are tactile switches, that’s probably about as long as you’d want to play the thing anyway.

Yes, this is the worst Wii ever made. But that was also the point. In the words of the creator himself “This portable is not logical, comfortable, or practical. But it must be done… for the memes.” Truly an inspiration to us all.

Incidentally, this isn’t the first “trimmed” Wii portable we’ve seen; though that one was considerably more forgiving internally, and just a bit more practical.

Continue reading “World’s Smallest Wii Is Also World’s Worst”

PiPod: A Raspberry Pi Zero Portable Music Player

[Bram] wasn’t satisfied with the portable music playback devices that were currently available. He craved an offline music player that had a large storage capacity but found that this was only available in high-end, off-the-shelf options, which were far too expensive. [Bram] decided to make his own, powered by a Raspberry Pi zero. After building an initial prototype, the design was iterated a few times, with the latest version featuring a BOM cost of roughly €80.

The whole project is open source, with hardware and software files available on the project GitHub. A 2.2″ TFT displays the UI, which is of course completely customisable. Everything is squashed into a 3D printed case, which has the smallest form factor possible whilst retaining a decent amount of battery life. The electronics are what you’d expect: a boost converter to produce 5 V for the Pi from the 3.7V battery, a charge controller and a battery protection circuit. As a bonus, the battery voltage is monitored with a 12-bit ADC which reports to the Pi, enabling it to do a safe shutdown at low voltage, and display battery level on the UI.

Since the whole purpose of the device is to play audio, onboard filtered PWM wasn’t going to cut it, so instead a 24-bit DAC talks to the Pi via I2S. The audio player backend is VLC, so there’s support for plenty of different file types. A disc image of the whole system is available with everything pre-configured, and you can even buy the assembled PCB from Tindie.

Want to keep the look and feel of your old iPod? We covered an impressive restoration of a 6th gen model, upgrading the storage and battery significantly.

Open Source DIY Printers Are Alive And Well: What We Saw At ERRF 18

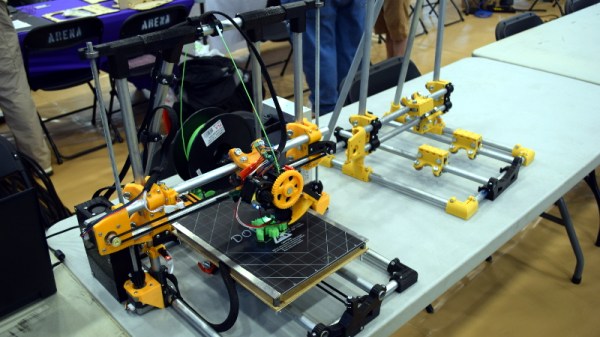
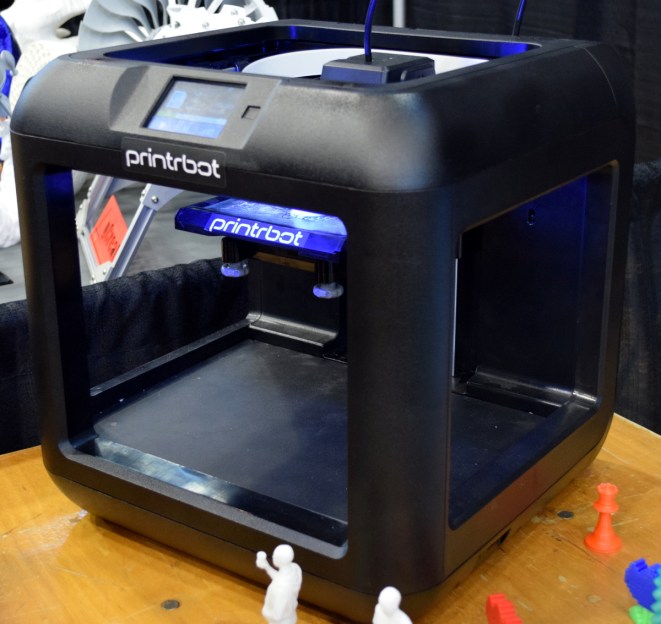
If you follow the desktop 3D printer market, it probably won’t surprise you to hear that nearly every 3D printer on display at the inaugural East Coast RepRap Festival (ERRF) was made in China. Even Printrbot CEO Brook Drumm had to admit that this was the year his company may finally bite the bullet and begin selling a branded and customized printer built overseas.

When you can get a decent (but let’s be clear, not great) 3D printer for $200 USD, it’s no surprise that American and European manufacturers are having a hard time staying competitive. But not everyone is seduced by low-cost printers. They know they could buy a decent printer for a couple hundred bucks, but for them that’s not the point. Some hackers are just as (if not more) interested in designing and building the machines than they are churning out little plastic boats with the finished product.

Luckily for us, these are also the type of folks who document their builds and make all their collected information and design files available for others under an open source license. Such builders exemplify the true spirit of the RepRap movement, and we’re happy to report that in a sea of imported printers, there were several interesting home built open source printers.

Whether you want to build your own copy of one of these machines, or simply get inspired by some of the ideas their creators had, these machines are physical proof that just because you can order a cheap 3D printer on eBay right now doesn’t mean you have to.

Continue reading “Open Source DIY Printers Are Alive And Well: What We Saw At ERRF 18”

Beats An Extension Cord

What does your benchtop power supply have that [Pete Marchetto]’s does not? Answer: an extension cord draped across the floor. How often have you said to yourself, “I just need to energize this doodad for a couple seconds,” then you start daisy chaining every battery in the junk drawer to reach the necessary voltage? It is not uncommon to see battery packs with a single voltage output, but [Pete] could not find an adjustable one, so he built his own and put it on Tindie.

Presumably, the internals are not going to surprise anyone: an 18650 battery, charging circuit, a voltage converter, display, adjustment knob, and a dedicated USB charging port. The complexity is not what intrigues us, it is the fact that we do not see more of them and still wind up taping nine-volt batteries together. [Editor’s note: we use one made from an old laptop battery.]

This should not replace your benchtop power supply, it does not have the bells and whistles, like current regulation, but a mobile source of arbitrary voltage does most of the job most of the time. And it’s what this build hasn’t got (a cord) that makes it most useful.

Laser Projector Ditches Galvanometer For Spinning Drum

Laser projectors like those popular in clubs or laser shows often use mirror galvanometers to reflect the laser and draw in 2D. Without galvos, and on a tight budget, [Vitaliy Mosesov] decided that instead of downgrading the quality, he would seek an entirely different solution: a spinning mirror drum.

He fires a laser at a rotating drum with twelve mirror faces, each at a different adjustable vertical angle. The laser will hit a higher or lower point on the projection surface depending on which mirror it’s reflecting off – this creates resolution in the Y direction.

Timing the pulsing of the laser so that it reflects off the mirror at a certain horizontal angle provides the X resolution.

As you can already tell, speed and timing is critical for this to work. So much so that [Vitaliy] decided he wanted to overclock his Arduino – from 16 MHz to 24.576 MHz. Since this changes the baud rate, an AVR ISP II was used for programming after the modification, and the ‘duino’s hardware serial initialization had to be hacked too.

For the laser itself, [Vitaliy] designed some nifty driver circuitry, which can respond quickly to the required >50 kHz modulation, supply high current, and filter out voltage transients on the power supply (semiconductor lasers have no protection from current spikes).

On the motor side of things, closed loop control is essential. A photo-interrupter was added to the drum for exact speed detection, as well as a differentiator to clean up the signal. Oh, and did we mention the motor is from a floppy disk drive?

We’ve actually seen builds like this before, including a dot-matrix version with multiple lasers and one made apparently out of Meccano and hot-glue that can project a Jolly Wrencher. But this build, with its multiple, adjustable mirrors, is a beauty.  Check it out in action below.

Continue reading “Laser Projector Ditches Galvanometer For Spinning Drum”

Business On The Outside, Electronics Workstation On The Inside

As an electrical engineering student, [Brandon Rice] had the full suite of electronics tools you’d expect. Cramming them all into a dorm room was doable — but cramped — a labour to square everything away from his desk’s top when he had to work on something else. To make it easier on himself, he built himself a portable electronics workstation inside the dimensions of a briefcase.

Built from scratch, the workstation includes a list of features that should have you salivating by the end. Instead of messing with a bunch of cables, on-board power is supplied by a dismantled 24V, 6A power brick, using a buck converter and ATmega to regulate and display the voltage, with power running directly to  12V and 5V lines of a breadboard in the middle of the workstation. A wealth of components are stored in two dozen 3d printed 1″ capsules setting them in loops pinned to the lid.

If all this was not already enough, there’s more!

Continue reading “Business On The Outside, Electronics Workstation On The Inside”

Solar Power In A Can!

When spending time camping, people often bring lanterns, flashlights, and the like — you might even bring along a solar charger. Instructables user [bennelson] is combining all your electrical powered needs by cramming solar power into a can.

Already designed to resist the elements, [bennelson] is using a 50cal. ammo can for a portable enclosure. Inside, he’s siliconed a 15AH, 12V lead-acid battery in the centre to maintain balance and to leave room for the wiring and storage. One cardboard mockup later, he laser-cut the top panel from 1/8″ plywood and secured a 20A solar charge controller, a four-in-one socket panel, and two banana plugs on its top face.

[bennelson] is using 12 AWG wire to match the 20A rating of the solar charge controller — including a fuse for safety — and lever lock-nut connectors to resolve some wiring complications. Industrial velcro keeps the top panel in place and easily removed should the need arise. When he’s out camping, he uses an 18V, 1A solar panel to charge, but can still use a DC power adapter to charge from the grid. Check out the full build video after the break!

Continue reading “Solar Power In A Can!”