Overengineered Freezer Monitor Fills Market Void

A lot of projects we see around here are built not just because they can be built, but because there’s no other option available. Necessity is the mother of invention, as they say. And for [Jeff] who has many thousands of dollars of food stowed in a chest freezer, his need for something to keep track of his freezer’s status was greater than any commercial offering available. Not only are freezers hard on batteries, they’re hard on WiFi signals as well, so [Jeff] built his own temperature monitor to solve both of these issues.

The obvious solution here is to have a temperature probe that can be fished through the freezer in some way, allowing the microcontroller, battery, and wireless module to operate outside of the harsh environment. [Jeff] is using K-type thermocouples here, wired through the back of the freezer. This one also is built into a block of material which allows him to get more diffuse temperature readings than a standard probe would provide. He’s also solving some other problems with commercially available probes here as well, as many of them require an Internet connection or store data in a cloud. To make sure everything stays local, he’s tying this in to a Home Assistant setup which also allows him to easily make temperature calibrations as well as notify him if anything happens to the freezer.

Although the build is very robust (or, as [Jeff] himself argues, overengineered) he does note that since he built it there have been some additional products offered for sale that fit this niche application. But even so, we always appreciate the customized DIY solution that avoids things like proprietary software, subscriptions, or cloud services. We also appreciate freezers themselves; one of our favorites was this restoration of a freezer with a $700,000 price tag.

Hacker Tactic: Pimp Your Probes

Is your multimeter one of your trusty friends when building up boards, repairing broken gadgets, and reverse-engineering proprietary ones? Is it accompanied by a logic analyzer or an oscilloscope at times?

Having a proper probing setup is crucial for many a task, and the standard multimeter probes just won’t do. As a PCB is slipping under your grip as you’re trying to hold the standard multimeter probes on two points at once, inevitably you will ponder whether you could be doing things differently. Here’s an assortment of probing advice I have accumulated.

Beyond The Norm

There’s the standard advice – keep your board attached firmly to a desk, we’ve seen gadgets like the Stickvise help us in this regard, and a regular lightweight benchtop vise does wonders. Same goes for using fancy needle probes that use gravity to press against testpoints – they might be expensive, but they are seriously cool, within limits, and you can even 3D-print them!

Continue reading “Hacker Tactic: Pimp Your Probes”

This Open Source Active Probe Won’t Break The Bank

If you’re like us, the oscilloscope on your bench is nothing special. The lower end of the market is filled with cheap but capable scopes that get the job done, as long as the job doesn’t get too far up the spectrum. That’s where fancier scopes with active probes might be required, and such things are budget-busters for mere mortals.

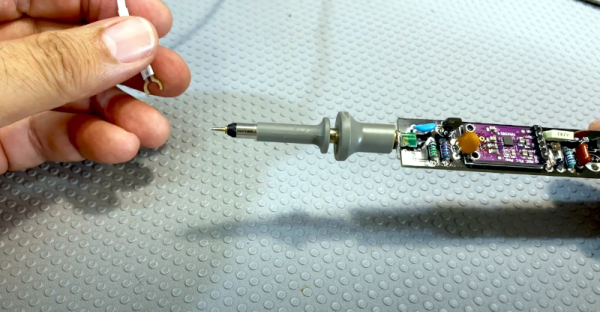
Then again, something like this open source 2 GHz active probe might be able to change the dynamics a bit. It comes to us from [James Wilson], who began tinkering with the design back in 2022. That’s when he learned about the chip at the center of this build: the BUF802. It’s a wide-bandwidth, high-input-impedance JFET buffer that seemed perfect for the job, and designed a high-impedance, low-capacitance probe covering DC to 2 GHz probe with 10:1 attenuation around it.

[James]’ blog post on the design and build reads like a lesson in high-frequency design. The specifics are a little above our pay grade, but the overall design uses both the BUF802 and an OPA140 precision op-amp. The low-offset op-amp buffers DC and lower frequencies, leaving higher frequencies to the BUF802. A lot of care was put into the four-layer PCB design, as well as ample use of simulation to make sure everything would work. Particularly interesting was the use of openEMS to tweak the width of the output trace to hit the desired 50 ohm impedance.

Hackaday Prize 2023: Circuit Scout Lends A Hand (Or Two) For Troubleshooting

Troubleshooting a circuit is easy, right? All you need is a couple of hands to hold the probes, another hand to twiddle the knobs, a pair of eyes to look at the schematic, another pair to look at the circuit board, and, for fancy work, X-ray vision to see through the board so you know what pads to probe. It’s child’s play!

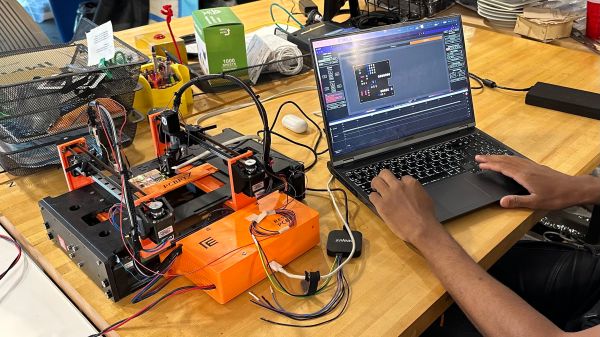
In the real world, most of us don’t have all the extra parts needed to do the job right, which is where something like CircuitScout would come in mighty handy. [Fangzheng Liu] and [Thomas Juldo]’s design is a little like a small pick-and-place machine, except that instead of placing components, the dual gantries place probes on whatever test points you need to look at. The stepper-controlled gantries move independently over a fixture to hold the PCB in a known position so that the servo-controlled Z-axes can drive the probes down to the right place on the board.

As cool as the hardware is, the real treat is the software. A web-based GUI parses the PCB’s KiCAD files, allowing you to pick a test point on the schematic and have the machine move a probe to the right spot on the board. The video below shows CircuitScout moving probes from a Saleae logic analyzer around, which lets you both control the test setup and see the results without ever looking away from the screen.

CircuitScout seems like a brilliant idea that has a lot of potential both for ad hoc troubleshooting and for more formal production testing. It’s just exactly what we’re looking for in an entry for the Gearing Up round of the 2023 Hackaday Prize.

Continue reading “Hackaday Prize 2023: Circuit Scout Lends A Hand (Or Two) For Troubleshooting”

ESA’s Jupiter-bound Probe Hits Antenna Snag

While the few minutes it takes for a spacecraft’s booster rocket to claw its way out of Earth’s gravity well might be the most obviously hazardous period of the mission, an incredible number of things still need to go right before anyone on the ground can truly relax. Space is about as unforgiving an environment as you can imagine, and once your carefully designed vehicle is on its way out to the black, there’s not a whole lot you can do to help it along if things don’t go according to plan.

That’s precisely where the European Space Agency (ESA) currently finds themselves with their Jupiter Icy Moons Explorer (Juice) spacecraft. The April 14th launch from the Guiana Space Centre went off without a hitch, but when the probe’s 16 meter (52 foot) radar antenna was commanded to unfurl, something got jammed up. Judging by the images taken from onboard cameras, the antenna has only extended to roughly 1/3rd its total length.

An onboard view of the antenna.

The going theory is that one of the release pins has gotten stuck somewhere, preventing the antenna from moving any further. If that’s the case, it could mean jiggling the pin a few millimeters would get them back in the game. Unfortunately, there’s no gremlins with little hammers stowed away in the craft, so engineers on the ground will have to get a little more creative. Continue reading “ESA’s Jupiter-bound Probe Hits Antenna Snag”

Active Signal Tracer Probe Has AGC

[Electronics Old and New] has a new version of one of his old projects. The original project was an active probe. He took what he learned building that probe and put it into a new probe design. He also added automatic gain control or AGC. You can see a video explanation of the design below. The probe is essentially a high-impedance input using a JFET that can amplify audio or demodulated RF signals, which is a handy device to have when troubleshooting radios.

The audio amplifier is a simple LM386 circuit. The real work is in the input stage and the new AGC circuit. Honestly, we’ve used the amplifier by itself for a similar function, although the raw input impedance of the chip is only about 50K and is less in many circuits that use a pot on the input. Having a JFET buffer and an RF demodulating diode is certainly handy. You’d think the AGC block would be in the audio stage. However, the design uses it ahead of the detector which is great as long as the amplifier can handle the RF frequency you are interested in. In this case, we think he’s mostly working on old tube AM radios, so the max signal is probably in the neighborhood of 1 MHz.

A similar device was a Radio Shack staple for many years

The module is made to amplify an electret microphone using a MAX9814 which has AGC. The module had a microphone that came off for this project. The datasheet doesn’t mention an upper frequency limit, but a similar Maxim part mentions its gain is greater than 5 at 600 kHz, so for the kind of signals this is probably used for, it should work well. We wondered if you could use the module and dispense with the JFET input. The chip probably has a pretty high input impedance, but the datasheet doesn’t give a great indication.

For years we used a signal tracer from Radio Shack which — if we could still find it — now has an LM386 inside of it after the original electronics failed decades ago. In those days, fixing an AM radio involved either using a device like this to find where you did and didn’t have a signal or injecting signals at different points in the radio. Two sides of the same coin. For example, if you could hear a signal at the volume control — that indicated the RF stages were good and you had a problem on the audio side. Conversely, if you injected a signal at the volume control, not hearing would mean the same thing. Once you knew if the problem was in the RF or AF side, you’d split that part roughly in half and repeat the operation until you were down to one bad stage. Of course, you could use signal generators and scopes, but in those days you weren’t as likely to have those.

Heathkit, of course, had their own version. It even had on of those amazing magic eye tubes.

Continue reading “Active Signal Tracer Probe Has AGC”

Ion Thrusters: Not Just For TIE Fighters Anymore

Spacecraft rocket engines come in a variety of forms and use a variety of fuels, but most rely on chemical reactions to blast propellants out of a nozzle, with the reaction force driving the spacecraft in the opposite direction. These rockets offer high thrust, but they are relatively fuel inefficient and thus, if you want a large change in velocity, you need to carry a lot of heavy fuel. Getting that fuel into orbit is costly, too!

Ion thrusters, in their various forms, offer an alternative solution – miniscule thrust, but high fuel efficiency. This tiny push won’t get you off the ground on Earth. However, when applied over a great deal of time in the vacuum of space, it can lead to a huge change in velocity, or delta V.

This manner of operation means that an ion thruster and a small mass of fuel can theoretically create a much larger delta-V than chemical rockets, perfect for long-range space missions to Mars and other applications, too. Let’s take a look at how ion thrusters work, and some of their interesting applications in the world of spacecraft!

Continue reading “Ion Thrusters: Not Just For TIE Fighters Anymore”