Building A Pocket Sized Python Playground

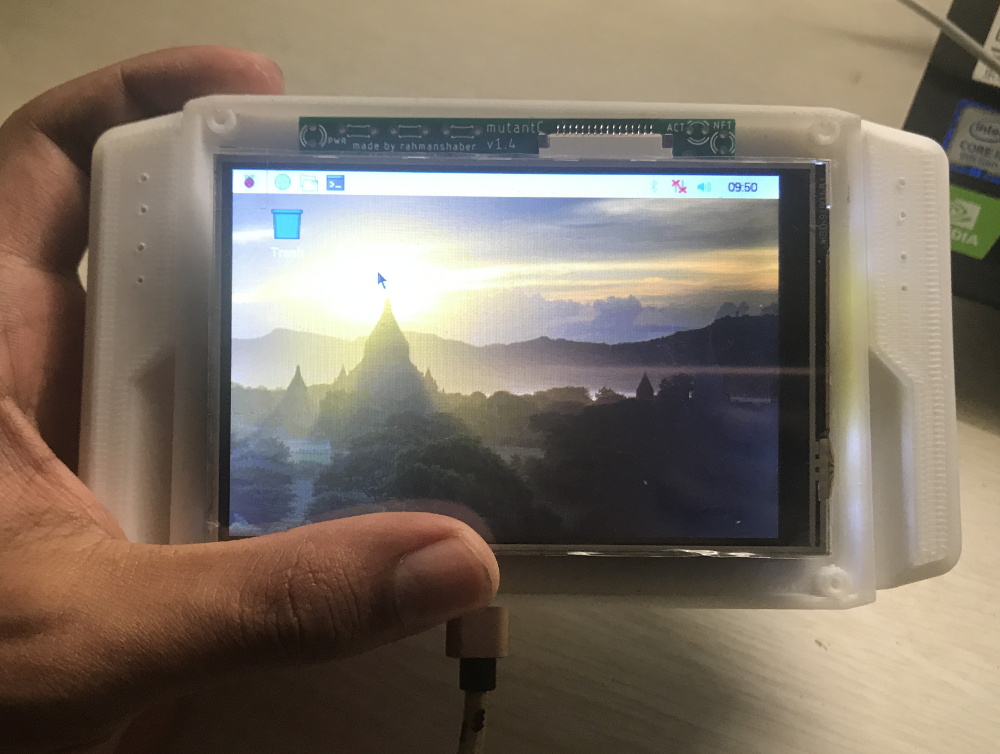
Like many of us, [Ramin Assadollahi] has a certain fondness for the computers of yesteryear. Finding his itch for nearly instant boot times and bare metal programming weren’t being adequately scratched by any of his modern devices, he decided to build the PortablePy: a pocket-sized device that can drop him directly into a Python prompt wherever and whenever the urge hits him.

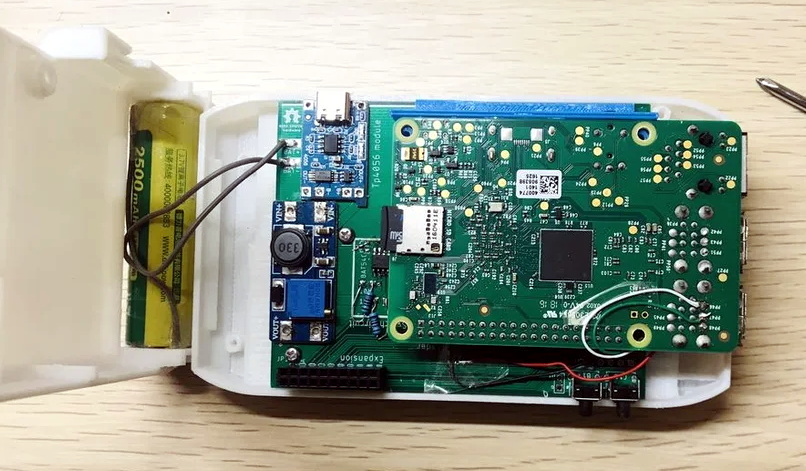
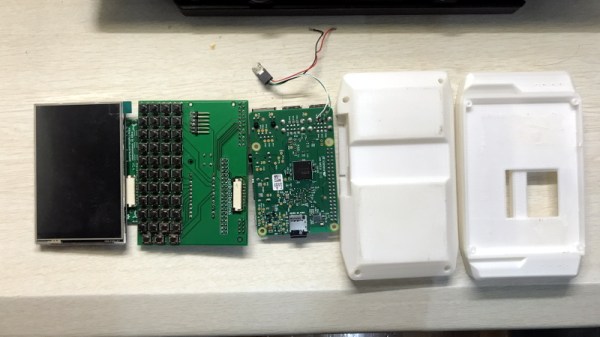
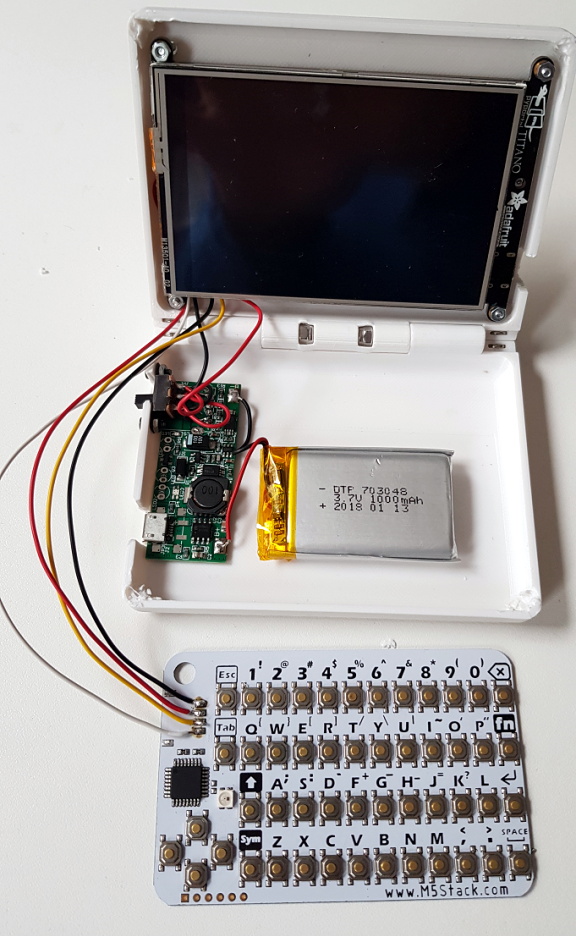
The device is powered by the Adafruit PyPortal Titano, which combines a ATSAMD51J20, ESP32, an array of sensors, and a 3.5″ diagonal 320 x 480 color TFT into one turn-key unit. The PyPortal is designed to run CircuitPython, but the scripts are usually dropped on the device over USB. That’s fine for most applications, but [Ramin] wanted his portable to be usable without the need for a host computer.

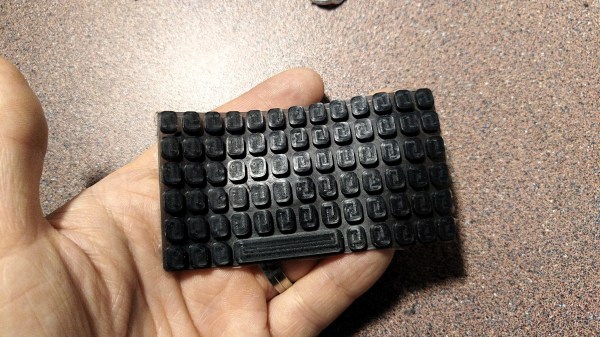
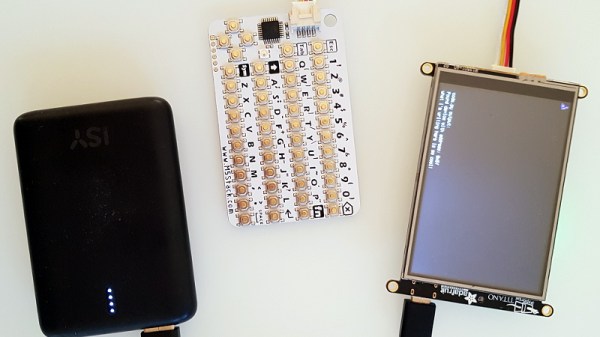
For a truly mobile experience, he had to figure out a way to bang out some Python code on the device itself. The answer ended up being the M5Stack CardKB, a tiny QWERTY board that communicates over I2C. Once he verified the concept was sound, he wrote a simple file management application and minimal Python editor that could run right on the PyPortal.

The final step was packaging the whole thing up into something he could actually take off the bench. He designed a 3D printed clamshell case inspired by the classic Game Boy Advance SP, making sure to leave enough room in the bottom half to pack in a charging board and LiPo pouch battery. He did have to remove some of the connectors from the back of the PyPortal to get everything to fit inside the case, but the compact final result seems worth the effort.

While an overall success, [Ramin] notes there are a few lingering issues. For one thing, the keyboard is literally a pain to type on. He’s considering building a custom keyboard with softer buttons, but it’s a long-term goal. More immediately he’s focusing on improving the software side of things so its easier to write code and manage multiple files.

It sounds like [Ramin] isn’t looking to compromise on his goal of making the PortablePy completely standalone, but if your convictions aren’t as strong, you could always connect a device like this up to your mobile to make things a bit easier.

Continue reading “Building A Pocket Sized Python Playground”

A Pocket Retro Computer Anyone Can Build

Not satisfied with any of the DIY retro computer kits on the market, [Leonardo Leoni] decided to make his own. Built using only the finest through-hole technology and powered by the ATmega328 microcontroller, his diminutive 8-bit computer is easy to build and even easier to develop for. Whether you’re looking to hone your BASIC skills or play some Zork on the bus, this little computer looks like a great project for anyone who has a soft spot for computing’s simpler days.

All things considered, using this tiny machine looks like it would be relatively pleasant. [Leonardo] is using a common SH1106 OLED display, and there’s a full QWERTY keyboard (with number row) done up with tactile momentary buttons. There’s very few passive components involved in the build, which is sure to be appealing to new players; especially after they’ve finished soldering all those switches to the board.

On the software side, [Leonardo] says he leaned heavily on open source projects to get his machine up and running. Beyond the hardware drivers for things like the display, he specifically calls out the Tiny Basic and Tiny Lisp Computer projects for their code. If small-scale programming isn’t your style, the machine is compatible with the Arduino IDE so you can easily throw something else on it. If you’ve ever dreamed of a QWERTY Arduboy, this might be your chance.

From the way [Leonardo] describes the computer, which he calls the Cobalt 3, we get the impression a commercial kit might be in the cards. We hope the community shows enough interest to make it happen. After all, not everyone was able to make it to Hackaday Belgrade 2018 to get their own pocket retro computer.

A Fantastic Raspberry Pi Handheld Just Got Better

Last year, we brought you word of the MutantC by [rahmanshaber]. The Raspberry Pi handheld was more than a little inspired by the classic T-Mobile Sidekick, with a sliding display and physical QWERTY keyboard. The design was a little rough around the edges and missing a few key features, but it was clear the project had a lot of potential.

Today, we’re happy to report that [rahmanshaber] has officially released MutantC_v2. It looks like the new version of this handheld, perhaps more properly categorized as a ultra-mobile PC (UMPC), successfully addresses a number of the shortcomings found in the original; so if you held off on building one last year, you might want to start warming up the 3D printer now.

The major improvement over the original is the inclusion of a battery, which makes the device truly mobile. This was something that we mentioned [rahmanshaber] was working on back when he released the first version, as it was easily the most requested feature from the community. We certainly wouldn’t say a miniature handheld computer is completely useless if it has to stay tethered, but there’s no arguing that being able to take it on the go is ideal.

This upgraded version of the design now officially supports the Raspberry Pi 4 as well, which previously [rahmanshaber] was advising against due to overheating concerns. Slotting in the latest-and-greatest edition of every hacker’s favorite Linux single board computer will definitely kick things up a notch, though we imagine the older and less power hungry iterations of the Pi will be plenty for the sort of tasks you’re likely to be doing on a gadget like this.

If you like the idea of having a diminutive Linux computer within arm’s reach of your bench but aren’t necessarily committed enough to build something like the MutantC, there are certainly simpler designs you can get started with.

Continue reading “A Fantastic Raspberry Pi Handheld Just Got Better”

Perhaps August Dvorak Is More Your Type

One of the strangest things about human nature is our tendency toward inertia. We take so much uncontrollable change in stride, but when our man-made constructs stop making sense, we’re suddenly stuck in our ways — for instance, the way we measure things in the US, or define daytime throughout the year. Inertia seems to be the only explanation for continuing to do things the old way, even when new and scientifically superior ways come along. But this isn’t about the metric system — it’s about something much more personal. If you use a keyboard with any degree of regularity, this affects you physically.

Many, many people are content to live their entire lives typing on QWERTY keyboards. They never give a thought to the unfortunate layout choices of common letters, nor do they pick up even a whisper of the heated debates about the effectiveness of QWERTY vs. other layouts. We would bet that most of our readers have at least heard of the Dvorak layout, and assume that a decent percentage of you have converted to it.

Hardly anyone in the history of typewriting has cared so much about subverting QWERTY as August Dvorak. Once he began to study the the QWERTY layout and all its associated problems, he devoted the rest of his life to the plight of the typist. Although the Dvorak keyboard layout never gained widespread adoption, plenty of people swear by it, and it continues to inspire more finger-friendly layouts to this day.

Continue reading “Perhaps August Dvorak Is More Your Type”

Acrylic Mold Makes For Professional-Looking Silicone Keyboards

The border between consumer electronics and DIY projects is getting harder and harder to define. First it was PCBs, which quickly went from homemade to professional with quick-turn services. Then low-cost CAD/CAM packages and high-end fabrication services gave us access to enclosures that were more than black plastic boxes with aluminum covers. Where will it end?

That’s a question [arturo182] begins to answer with this custom-molded silicone keyboard for a handheld device. There’s no formal writeup, but the Twitter thread goes into some detail about the process he used to make the tiny qwerty keypad. The build started by milling a two-part mold from acrylic. Silicone rubber was tinted and degassed before injecting into the mold with a baster. The keys are connected by a thin membrane of silicone, and each has a small nub on the back for actuating a switch.

There’s clearly room for improvement in this proof of concept – tool marks from the milling process mar the finish of the keys slightly, for instance. There may be tips to be had from this article on silicone keyboard refurbishment to improve the process, but overall, we’d say [arturo182] is well on his way here.

Meet MutantC: Raspberry Pi Sidekick Complete With Sliding Screen, QWERTY

Over the years we’ve seen the Raspberry Pi crammed into almost any piece of hardware you can think of. Frankly, seeing what kind of unusual consumer gadget you can shoehorn a Pi into has become something of a meme in our circles. But the thing we see considerably less of are custom designed practical enclosures which actually play to the Pi’s strengths. Which is a shame, because as the MutantC created by [rahmanshaber] shows, there’s some incredible untapped potential there.

The MutantC features a QWERTY keyboard and sliding display, and seems more than a little inspired by early smartphone designs. You know, how they were before Apple came in and managed to convince every other manufacturer that there was no future for mobile devices with hardware keyboards. Unfortunately, hacking sessions will need to remain tethered as there’s currently no battery in the device. Though this is something [rahmanshaber] says he’s actively working on.

The custom PCB in the MutantC will work with either the Pi Zero or the full size variant, but [rahmanshaber] warns that the latest and greatest Pi 4 isn’t supported due to concerns about overheating. Beyond the Pi the parts list is pretty short, and mainly boils down to the 3D printed enclosure and the components required for the QWERTY board: 43 tactile switches and a SparkFun Pro Micro. Everything is open source, so you can have your own boards run off, print your case, and you’ll be well on the way to reliving those two-way pager glory days.

We’re excited to see where such a well documented open source project like MutantC goes from here. While the lack of an internal battery might be a show stopper for some applications, we think the overall form factor here is fantastic. Combined with the knowledge [Brian Benchoff] collected in his quest to perfect the small-scale keyboard, you’d have something very close to the mythical mobile Linux device that hackers have been dreaming of.

Continue reading “Meet MutantC: Raspberry Pi Sidekick Complete With Sliding Screen, QWERTY”

A Pocket QWERTY For Arduino And More

If you want to add a keypad to your Arduino project, the options are pretty limited. There’s that red and blue 4×4 membrane we’ve all seen in password-protected door lock projects, and the phone layout version that does pretty much all the same tricks. Isn’t it time for a full Arduino-compatible keyboard? [ELECTRONOOBS] thinks so.

This 41-button Arduino keyboard PCB is a stepping stone to his next project, a pair of two-way texting machines. (Which is nice, because we were totally going to suggest that). It’s based on that ubiquitous red/blue keypad, but it has a full QWERTY layout. There’s also a shift button that opens up special characters and uppercase, and the addition of return, ok, and send keys puts it over the top. The best part of this keyboard, hands down, is the soft, soundless buttons. Though you trade clicky feedback for comfort, it will be well worth it after a few dozen presses.

The keypad uses an onboard ATMega328P to scan the matrix for button presses, decode them, and send them via UART or I²C to an Arduino. [ELECTRONOOBS] has the PCB files available via Patreon for now, though they will be open in the future. The code is already available for download on his website.

Future plans include an LED to indicate when shift is pressed, and adding the special characters next to the numbers on the silkscreen (whoops!). Be sure to check out the build video after the break.

Want an Arduino-driven keyboard for longer hauls across the alphabet? Saddle up and ride this candy-colored mechanical unicorn.

Continue reading “A Pocket QWERTY For Arduino And More”