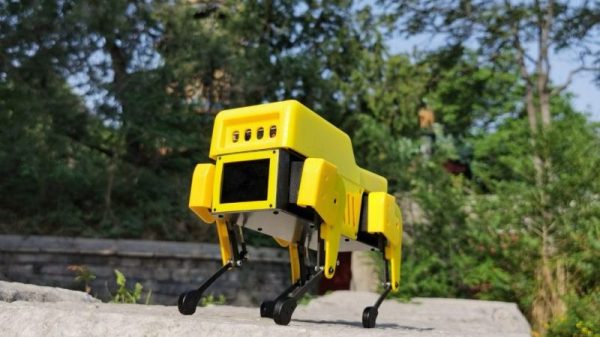
Amiga Now Includes HDMI By Way Of A Raspberry Pi Daughterboard

If you had an Amiga during the 16-bit home computer era it’s possible that alongside the games and a bit of audio sampling you had selected it because of its impressive video capabilities. In its heyday the Amiga produced broadcast-quality graphics that could even be seen on more than a few TV shows from the late 1980s and early 1990s. It’s fair to say though that the world of TV has moved on since the era of Guru Meditation, and an SD video signal just won’t cut it anymore. With HDMI as today’s connectivity standard, [c0pperdragon] is here to help by way of a handy HDMI upgrade that taps into the digital signals direct from the Amiga’s Denise chip.

At first thought one might imagine that an FPGA would be involved, however instead the signals are brought out via a daughterboard to the expansion header of a Raspberry Pi Zero. Just remove the DENISE display encoder chip and pop in the board with uses a long-pinned machined DIP socket to make the connections. The Pi runs software from the RGBtoHDMI project originally created with the BBC Micro in mind, to render pixel-perfect representations of the Amiga graphics on the Pi’s HDMI output. The caveat is that it runs on the original chipset Amigas and only some models with the enhanced chipset, so it seems Amiga 600 owners are left in the cold. A very low latency is claimed, which should compare favourably with some other solutions to the same problem.

This isn’t the first time we’ve seen an HDMI Amiga conversion, but it’s one that’s usable on more than simply the big-box machines.

Continue reading “Amiga Now Includes HDMI By Way Of A Raspberry Pi Daughterboard”

3D Printed Server Case Holds 14 Raspberry Pis

If you ever need to cluster up to 14 Raspberry Pis and an equal number of 2.5 inch hard drives, you might want to look at the Raspberry Pi Server Mark III case from [Ivan Kuleshov]. The original Mark I design came from Thingiverse, but the Mark III is a complete redesign.

The redesign allows for more boards along with a reduction in the number of parts. That takes less plastic and less time to print. The design is also modular, so there should be new components in the future.

Continue reading “3D Printed Server Case Holds 14 Raspberry Pis”

Fox Hunting With Software-Defined Radio

Fox hunting, or direction finding, is a favorite pastime in the ham radio community where radio operators attempt to triangulate the position of a radio transmission. While it may have required a large amount of expensive equipment in the past, like most ham radio operations the advent of software-defined radio (SDR) has helped revolutionize this aspect of the hobby as well. [Aaron] shows us how to make use of SDR for direction finding using his custom SDR-based Linux distribution called DragonOS.

We have mentioned DragonOS before, but every iteration seems to add new features. This time it includes implementation of a software package called DF-Aggregator. The software (from [ckoval7]), along with the rest of DragonOS, is loaded onto a set of (typically at least three) networked Raspberry Pis. The networked computers can communicate information about the radio waves they receive, and make direction finding another capable feature found in this distribution.

[Aaron] has a few videos showing the process of setting this up and using it, and all of the software is available for attempting something like this on your own. While the future of ham radio as a hobby does remain in doubt, projects like this which bring classic ham activities to the SDR realm really go a long way to reviving it.

Continue reading “Fox Hunting With Software-Defined Radio”

Making Smart Bulbs Smarter With The Power Of MQTT

What’s the point of smart home automation? To make every day tasks easier, of course! According to [Tomasz Cybulski], that wasn’t the case when he installed IKEA smart lights in his closet. It’s handy to have them in a common switch, in this case a remote control, but having to look for it every time he needed the lights could use some improvement. Enter his project to make smart bulbs smarter, through the use of a simple ESP8266.

While hooking a door switch to the lights’ power supply could provide a quick solution, [Tomasz]’s wife wanted to keep the functionality of the remote control, so he had to look elsewhere. These light bulbs use the simple Zigbee protocol, so arranging for other devices was rather trivial. A USB dongle to interface with the protocol was configured for his existing Raspberry Pi automation controller, while an ESP8266 served as the real-world sensor by connecting it to reed switches installed in the closet doors.

With all the hardware sorted out, it’s a simple matter of making it all talk to each other. The ESP8266, using the Tasmota firmware, sends a signal to an MQTT server running on the Raspberry Pi, which in turn translates it to a remote trigger on the Zigbee frequency with the dongle. The lights turn on when the door opens, and off again once it closes. And since there were no further modifications to the lights themselves, the original IKEA controller still works as expected, which we’re sure [Tomasz]’s wife appreciates!

MQTT can be an interesting piece of software that goes beyond just home automation though, and if you already have a server in your home you can use it to transfer your clipboard’s contents to another device. If you are using it for home automation though, here’s an inspiration for a rather unusual dashboard to keep things interesting. Check out this hack in action after the break.

Continue reading “Making Smart Bulbs Smarter With The Power Of MQTT”

Implementing SENT Sensors On The Raspberry Pi

The SENT protocol, standing for Single Edge Nibble Transmission, is used for sensors that need to send high-resolution data while keeping system costs low. It’s most typically used in the automotive world, where it can be found in such parts as throttle-by-wire pedals and temperature sensors. [Mark Smith] set out to see if he could get the Pi Zero to read such sensors without the use of an intermediate microcontroller.

[Mark]’s initial attempts relied on Python and the RPI.GPIO library. Unfortunately, the overheads introduced made decoding SENT traffic impossible. Undeterred, [Mark] pressed on, leveraging the pigpio library and its callback function which allowed sampling at up to one microsecond. This was fast enough to read the messages from a LX3302A inductive position sensor that uses the protocol.

It’s a project that could prove useful for those trying to work with certain sensors who want to avoid adding complexity to a Raspberry Pi project. Files are available on Github for the curious. We’ve seen other direct sensor builds with the Pi, before too – like this power monitoring system. Video after the break.

Continue reading “Implementing SENT Sensors On The Raspberry Pi”

Old Thermostat Gets Smarts

A smart thermostat is nothing new. But making one built a decade or more ago takes a few tricks. If you want to upgrade your thermostat without replacing it, [geektechniquestudios] shares their solution using a Raspberry Pi Zero to smarten up that dumb controller.

The hardware is decidedly simple: just a Pi Zero and a pair of relays. The relays act as button presses to the old thermostat. The software, though, is decidedly complex. There’s a React server and a Redis database along with some other bits and pieces.

Continue reading “Old Thermostat Gets Smarts”

Pi Compute Module Is Love-child Of Raspberry And Arduino

The Raspberry Pi compute module is a powerful piece of hardware, especially for the price. With it, you get more IO than a normal Pi, plus the ability to design hardware around it that’s specifically tailored to your needs rather than simply to general-purpose consumers. However, this comes at the cost of needing a way to interface with it since the compute module doesn’t have the normal IO pins or ports, but [Timon] has come up with a handy development board for this module called the Piunora which solves a lot of these prototyping issues.

The development board expands the compute module to the familiar Arduino-like form factor, complete with IO headers, USB ports, and HDMI output. It doesn’t stop there, though. It has an M.2 connector, some built-in LEDs, a camera connector, and a few other features. It also opens up some other possibilities that would be difficult or impossible with a standard Pi 4, such as the ability to run the Pi as a USB gadget rather than as a host device which simplifies certain types of development, which is [Timon]’s intended function.

As a development board, this project has a lot of potential for the niche uses of the compute module when compared to the standard Raspberry Pi. For embedded applications it’s much easier to deploy, with the increased development costs as a tradeoff. If you’re still unsure what to do with the compute module 4, we have some reading for you. And Timon’s previous project is a great springboard.