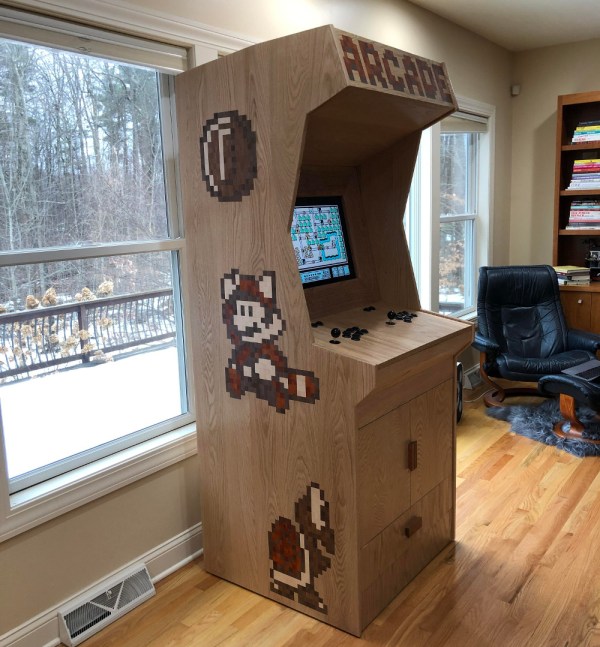
Rack ’em Stack ’em Raspberry Pi Controller Board

It isn’t that hard to assemble an array of Raspberry Pi boards and there are several reasons you might want to do so. The real trick is getting power to all of them and cooling all of them without having a mess of wires and keeping them all separated. The ClusterCTRL stack lets you stack up to five Raspberry Pi boards together. The PCB aligns vertically along the side of the stack of Pis with sockets for each pin header. Using a single 12 to 24V supply, it provides power for each board, a USB power connection, and provisions for two fans. There is also a USB port to control the fans and power.

There’s also a software component to deliver more granular control. Without using the software, the PI’s power on in one second and monitor a GPIO pin to control the fans. With the software, you can turn on or off individual nodes, gang the two fans to turn on together, and even add more stacks.

There is a case that you can print from STL files, although you can buy them preprinted on the Tindie listing where the bulk of information on ClusterCTRL is found. You could also have a 3D printing vendor run off a copy for you if you’d rather.

The power supply is a 10A 5.1V DC to DC converter. That works out to 2A per Pi and 51W total. The power supply for the input, then, needs to be enough to cover 51W, the power for the fans, and some overhead for regulator inefficiency and other small overhead.

We’ve seen a lot of Pi clusters over the years including one that is a good learning tool for cluster management. Of course, there’s always the Oracle cluster with 1,060 boards, which is going to take a bigger power supply.

Folding Raspberry Pi Enclosure Prints In One Piece, No Screws In Sight

[jcprintnplay] has challenged himself to making Raspberry Pi cases in different ways, and his Fold-a-Pi enclosure tries for a “less is more” approach while also leveraging the strong points of 3D printing. The enclosure prints as a single piece in about 3 hours, and requires no additional hardware whatsoever.

The design requires no screws or other fasteners, and provides a mounting hole for a fan as well as some holes for mounting the enclosure itself to something. All the ports and headers are accessible, and the folding one-piece design is not just a gimmick; in a workshop situation where the Pi needs to be switched out or handled a lot, it takes no time at all to pop the Raspberry Pi in and out of the enclosure.

Microsoft’s 3D Builder has a pretty useful measurement tool for STLs.

[James] points out that the trick with a print-in-place hinge like this is leaving enough space between the parts so that the two pieces aren’t fused together, but not so much space that the print fails. He doesn’t go into detail about how much space worked or didn’t work, but an examination of the downloadable model shows that the clearance used looks like 0.30 mm, intended to be printed with a 0.4 mm nozzle.

[James] also demonstrates the value of being able to do quick iterations on a design when prototyping. In a video (embedded below) The first prototype had the hinge not quite right. In the second prototype there was a lack of clearance when closing. The third one solved both and shows the final design.

Continue reading “Folding Raspberry Pi Enclosure Prints In One Piece, No Screws In Sight”

Raspberry Pi Gets PATA/IDE Drive Via GPIO Header

By and large, the Raspberry Pi is a computer that eschews legacy interfaces. Primarily relying on SD cards for storage and USB ports for further expansion, magnetic hard drives are a rare sight. However, [Manawyrm] decided that some 40-pin goodness was in order, and set to making a PATA IDE adapter for the platform.

To achieve the task of interfacing now-vintage IDE devices with the Raspberry Pi, [Manawyrm] elected to use the single board computer’s GPIO pins to get the job done. 23 pins are required, with 16 used for the data bus, with the rest dedicated to address lines, strobes, and other features.

The adapter is no speed demon, netting 800 KiB/s on reads and 500 KiB/s on writes with a Raspberry Pi 4. The main bottleneck comes from relying on libgpiod, which [Manawyrm] readily admits is designed for general IO tasks, not data transfers. Despite this, it’s still fast enough to play an audio CD from an IDE CD-ROM drive without skipping. A kernel build is required, however, as Raspberry Pis are unsurprisingly not configured to use ATA disks by default.

Obviously, more serious applications would substitute a dedicated USB hard disk adapter or give the Raspberry Pi a PCI-express (PCIe) card for sata drives instead, but that doesn’t discount the fun inherent in the build. While it may be slow, it shows that talking to PATA hard disks is actually quite straightforward when you understand the basics. Of course, if you want to do the opposite, and have your Raspberry Pi emulate a PATA disk, that’s possible too. Video after the break.

Continue reading “Raspberry Pi Gets PATA/IDE Drive Via GPIO Header”

Generate Positivity With Machine Learning

Gesture recognition and machine learning are getting a lot of air time these days, as people understand them more and begin to develop methods to implement them on many different platforms. Of course this allows easier access to people who can make use of the new tools beyond strictly academic or business environments. For example, rollerblading down the streets of Atlanta with a gesture-recognizing, streaming TV that [nate.damen] wears over his head.

He’s known as [atltvhead] and the TV he wears has a functional LED screen on the front. The whole setup reminds us a little of Deep Thought. The screen can display various animations which are controlled through Twitch chat as he streams his journeys around town. He wanted to add a little more interaction to the animations though and simplify his user interface, so he set up a gesture-sensing sleeve which can augment the animations based on how he’s moving his arm. He uses an Arduino in the arm sensor as well as a Raspberry Pi in the backpack to tie it all together, and he goes deep in the weeds explaining how to use Tensorflow to recognize the gestures. The video linked below shows a lot of his training runs for the machine learning system he used as well.

[nate.damen] didn’t stop at the cheerful TV head either. He also wears a backpack that displays uplifting messages to people as he passes them by on his rollerblades, not wanting to leave out those who don’t get to see him coming. We think this is a great uplifting project, and the amount of work that went into getting the gesture recognition machine learning algorithm right is impressive on its own. If you’re new to Tensorflow, though, we have featured some projects that can do reliable object recognition using little more than a Raspberry Pi and a camera.

Continue reading “Generate Positivity With Machine Learning”

IOT Pinball Puts Oktoberfest Fun On Tap

We don’t really miss going out to bars all that much, unless you’re talking about the one downtown with all the pinball machines. Don’t get us wrong — pinball emulators have gotten crazy good, and you can find exact digital replicas of most machines to play on your phone or whatever. But it just doesn’t compare to the thrill of playing a real cabinet.

Don’t despair, because for the next couple of weeks, you can queue up to play on a real Oktoberfest pinball machine that’s sitting in Espoo, Finland. The controls are hooked up to a Raspberry Pi 4 through a custom HAT, along with a camera pointed at the playfield and another focused on the backglass screen. The game development/video streaming company Surrogate is hosting a tournament over the internet, and will be giving prizes to the top ten high rollers.

We usually have to wait until the holiday season to come across these remote-reality gaming opportunities. Having played it several times now, we recommend spamming the flippers until you get a feel for the lag. Also, just holding the flippers up while the ball is in the upper half of the playfield will catch a lot of balls that you might otherwise lose due to flipper lag, and sometimes they end up back in front of the launcher to shoot again. After the break, check out a brief but amusing video of setting up the cameras and Pi that includes a taste of the Oktoberfest music.

The tournament runs until the end of August, which should be enough time for somebody to set up CV and a keyboard to play this automatically. Need inspiration? Here’s an open-source pinball machine that can play itself.

Continue reading “IOT Pinball Puts Oktoberfest Fun On Tap”

Do You Know Where Your Children Are? Check The Weasley Clock

What’s the coolest thing you could build for a Harry Potter fan, aside from a working magic wand or Quidditch broomstick? We would have to say a Weasley clock that shows the whereabouts of everyone in the family is pretty high on the list, especially if that fan is a wife and mother.

Here’s how it works: they’ve set up geofences to define the boundaries of home, each person’s school or workplace, and so on. The family’s locations are tracked through their phones’ GPS using Home Assistant, which is hosted on a Raspberry Pi. Whenever someone’s location changes, the Pi alerts the clock over MQTT, and it moves the 3D-printed hands with servos.

The clock has some interesting granularity to it as well. As someone gets closer to home, their pointer’s distance reflects that in its proximity to the Home slice. And Home itself is divided into the main house and the shop and reflected by the pointer’s position.

We particularly like the attention to detail here, like the art poster used for the clock’s face that includes all the Weasley’s whereabouts in the background. It’s built into a thrift store grandmother clock, which is smaller than a grandfather clock but no less majestic. In the future there are plans to implement the clock’s chimes to announce that someone is back home.

No matter what you’re into, the whereabouts clock idea can probably fit that universe. For instance, here’s one that uses LEGO mini-fig heads to locate roommates.

TinyPilot Provides KVM-over-IP, With Low Cost And Even Lower Latency

Remote access is great, but if the machine stops booting, ceases to connect to the network, or needs low-level interaction like BIOS settings or boot management, remote access is worthless because it’s only available once the host computer is up and running. The usual solution is to drag a keyboard and monitor to the machine in question for physical access.

Ubuntu laptop (right) being accessed over IP, via web browser on the left.

For most people, swapping cables in this way is an infrequent task at best. But for those who work more closely with managing hardware or developing software, the need to plug and unplug a keyboard and monitor into machines that otherwise run headless can get tiresome. The modern solution is KVM (keyboard, video, mouse) over IP, but commercial options are expensive. [Michael Lynch]’s TinyPilot on the other hand clocks in at roughly $100 of parts, including a Raspberry Pi and USB HDMI capture device. It does have to drop the ‘M’ from KVM (meaning it does not support a mouse yet) but the rest of it hits all the bases, and does it all from a web browser.

What exactly does TinyPilot do? It provides remote access via web browser, but the device is an independent piece of hardware that — from the host computer’s point of view — is no different from a physical keyboard and monitor. That means keyboard and video access works before the host machine even boots, so even changing something like BIOS settings is no problem.

[Michael] demonstrates his design in the video embedded below, but we encourage you to check out the project page for a fascinating exploration of all the challenges that were part of TinyPilot’s development.

Continue reading “TinyPilot Provides KVM-over-IP, With Low Cost And Even Lower Latency”