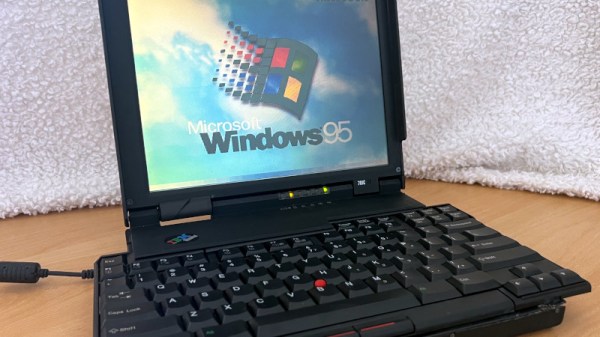
TRS-80 Luggable Gets Fresh Face, New Gear

It’s true that this TRS-80 Model 4P “luggable” was in better shape than many of the vintage machines that pass through the hands of [Drygol], but that doesn’t make the end result of its refurbishment and upgrade process any less impressive. After all, not every rebuild has to be a once-in-a-lifetime achievement.

No, the case didn’t have to get pieced back together by hand, and the board didn’t need to have half of its traces recreated. But the outer plastic was certainly in need of a good retrobright treatment, the keyboard was overdue for a cleaning, and the capacitors in the PSU were predictably due for retirement. After [Drygol] got through with it, the machine was back in like-new condition. But then, we can do a little better than that…

Installation of the new Grafyx board.

So into the refreshed computer went several community-developed modifications, including a M3SE expander that adds Compact Flash and Ethernet support to the TRS-80 and a high-resolution Grafyx video board. In classic [Drygol] style, every effort was made to integrate these upgrades as seamlessly as possible. After struggling for a bit to find a 5.25″ drive that would write a disk the TRS-80 would actually read, all the necessary files to get the upgrades working were transferred over, and the system was booting into TRSDOS.

We’ve covered a lot of [Drygol]’s restorations, and never get tired of seeing how these old and broken machines get a new lease on life once they come out the other end. Whether it’s a relatively easy task of swapping out some dud chips, or using every trick in the book to piece together what’s left of a computer’s case, they always show an incredible level of dedication and attention to detail that you can’t help but admire.

The hairclip-embedded tool being used on a Tiger 99x game console, clipped onto a spot where the plastic ribbon meets the LCD panel itself, heating it up

World’s Smallest Hair Straightener For Fixing Old LCD Ribbons

[Stephen] writes to us about an LCD repair tool he has created. We’ve all seen old devices with monochrome LCDs connected by thin film, where connections between the PCB and the LCD have deteriorated and the LCD would no longer show parts of the picture. This is a connection heating gadget, that [Stephen] affectionately dubs as World’s Smallest Hair Straightener, made specifically to bring cool old tech back to life.

A resin-printed mold houses a coil of Kanthal wire, easy to source and simple to make. He reuses a hair clip as a housing for the heating element, which also provides pressure needed to squish the film-printed conductive traces into the LCD as the adhesive melts. High-temperature epoxy brings the two together, and with a variable power supply, this tool successfully brought an old Tiger 99x handheld back to life.

This hack was made possible, in part, because of [JohnDevin Duncan] in Hackaday comment section sharing his experience on repairing LCD ribbons back in 2015, giving valuable insights on the problem that we initially thought would be solve-able with a soldering iron. The knowledge shared was distilled by [Stephen] into a tool that we all can now use when we encounter a device we really, really want to revive.

Last time we covered this topic, quite a few hackers popped up with their stories and suggestions. Old game console fix stories are a staple here on Hackaday, a few pop to mind – this high-effort trace repair of a water-damaged GameBoy cartridge, a badly designed NES cartridge socket reinvention, and this GameBoy LCD sunburn damage restoration guide.

Illustrated Kristina with an IBM Model M keyboard floating between her hands.

Keebin’ With Kristina: The One With The Really Tall Keycaps

About a month ago, [Unexpected Maker] finished their TinyS3, an ESP32-S3 development board. Since the chip supports both true USB and Bluetooth, [deʃhipu] wondered how well it would work in a keyboard.

Thus, the Vegemite Sandwich was made, perhaps while [deʃhipu] was dreaming of traveling in a fried-out Kombi. But really, it was named so because [Unexpected Maker] hails from Australia.

This is [deʃhipu]’s first time using switch sockets, which is (as far as we know) the only choice when it comes to hot-swappable Kailh chocs. We’ll be watching this one with hungry eyes.

Continue reading “Keebin’ With Kristina: The One With The Really Tall Keycaps”

Commodore Promotional Film From 1984 Enhanced

Over on Retro Recipe’s YouTube channel, [Perifractic] has been busy restoring an old promotional video of how Commodore computers were made back in 1984 (video below the break). He cleaned up the old VHS-quality version that’s been around for years, translated the German to English, and trimmed some bits here and there. The result is a fascinating look into the MOS factory, Commodore’s German factory, and a few other facilities around the globe. The film shows the chip design engineers in action, wafer manufacturing, chip dicing, and some serious micro-probing of bare die. We also see PCB production, and final assembly, test and burn-in of Commodore PET and C64s in Germany.

Check out the video description, where [Perifractic] goes over the processes he used to clean up video and audio using machine learning. If restoration interests you, check out the piece we wrote about these techniques to restore old photographs last year. Are there any similar factory tour films, restored or not, lurking around the web? Let us know in the comments below.

Continue reading “Commodore Promotional Film From 1984 Enhanced”

Apollo Comms Flight Hardware Deep Dive

You no doubt recall the incredible Apollo Guidance Computer (AGC) reverse engineering and restoration project featured on the CuriousMarc YouTube channel a few years ago. Well, [Marc] and the team are at it again, this time restoring the Apollo Unified S-Band tracking and communication system flight hardware. As always, the project is well documented, carefully explained, full of problems, and is proceeding slowly despite the lack of documentation.

Like the guidance computer, the Unified S-Band system was pretty innovative for its day — able to track, provide voice communications, receive television signals, and send commands to and monitor the health of the spacecraft via telemetry. The system operates on three frequencies, an uplink containing ranging code, voice and data. There are two downlinks, one providing ranging, voice, and telemetry, the other used for television and the playback of recorded data. All crammed into two hefty boxes totaling 29 kg.

So far, [Marc] has released part 9 of the series (for reference, the Apollo Guidance Computer took 27 parts plus 8 auxiliary videos). There seems to be even less documentation for this equipment than the AGC, although miraculously the guys keep uncovering more and more as things progress. Also random pieces of essential ground test hardware keep coming out of the woodwork. It’s a fascinating dive into not only the system itself, but the design and construction techniques of the era. Be sure to check out the series (part 1 is below the break) and follow along as they bring this system back to life. [Marc] is posting various documents related to the project on his website. And if you missed the AGC project, here’s the playlist of videos, and the team joined us for a Hackaday Chat back in 2020.

Continue reading “Apollo Comms Flight Hardware Deep Dive”

Acid-Damaged Game Boy Restored

The original Game Boy was the greatest selling handheld video game system of all time, only to be surpassed by one of its successors. It still retains the #2 position by a wide margin, but even so, they’re getting along in years now and finding one in perfect working condition might be harder than you think. What’s more likely is you find one that’s missing components, has a malfunctioning screen, or has had its electronics corroded by the battery acid from a decades-old set of AAs.

That latter situation is where [Taylor] found himself and decided on performing a full restoration on this classic. To get started, he removed all of the components from the damaged area so he could see the paths of the traces. After doing some cleaning of the damage and removing the solder mask, he used 30 gauge wire to bridge the damaged parts of the PCB before repopulating all of the parts back to their rightful locations. A few needed to be replaced, but in the end the Game Boy was restored to its former 90s glory.

This build is an excellent example of what can be done with a finely tipped soldering iron while also being a reminder not to leave AA batteries in any devices for extended periods of time. The AA battery was always a weak point for the original Game Boys, so if you decide you want to get rid of batteries of any kind you can build one that does just that.

Continue reading “Acid-Damaged Game Boy Restored”

Game Boy Becomes Super Game Boy With A Pair Of Pis

For the Nintendo aficionados of the 90s, the Super Game Boy was a must-have cartridge for the Super Nintendo which allowed gamers to play Game Boy games on your TV. Not only did it allow four-color dot-matrix gaming on the big screen, but it let you play those favorite Game Boy titles without spending a fortune on AA batteries. While later handhelds like the PSP or even Nintendo Switch are able to output video directly to TVs without issue, the original Game Boy needed processing help from an SNES or, as [Andy West] shows us, it can also get that help from a modern microcontroller.

Testing the design before installing it in the NES case.

The extra processing power in this case comes from a Raspberry Pi Pico which is small enough to easily fit inside of a donor NES case and also powerful enough to handle the VGA directly. For video data input, the Pico is connected to the video pins on the Game Boy’s main board through a level shifter. The main board is also connected to a second Pico which handles the controller input from an NES controller. Some fancy conversion needed to be done at this point because although the controller layouts are very similar, they are handles by the respective consoles completely differently.

With all of the technical work largely out of the way, [Andy] was able to put the finishing touches on the build. These included making sure the power buttons, status LEDs, and reset button all functioned, and restoring the NES case complete with some custom “Game Guy” graphics to match the original design of the Game Boy. We commend the use of original Game Boy hardware in this build as well, which even made it possible for [Andy] and his wife to play a head-to-head game of Dr. Mario through a link cable with another Game Boy. If you’re looking for a simpler way of playing on original hardware without burning a hole in your wallet buying AA batteries, take a look at this Game Boy restoration which uses a Lithium battery instead.

Continue reading “Game Boy Becomes Super Game Boy With A Pair Of Pis”