Retro Calculator Build Proves The Space Age Isn’t What It Used To Be

The common wisdom these days is that even if we wanted to get back to the Moon the way we did in the 1960s, we’d never be able to do it. Most of the blame for that usually falls on the loss of institutional knowledge thanks to skilled minds and hands that have been stilled by the passage of time, but the real kicker would be finding replacements for all the parts that we used back then that just aren’t made anymore. A similar problem exists for those seeking to recreate the circuits that graced the pages of the many magazines that catered to electronics hobbyists back in the day.

Take this “Space Age Decimal Computer” reproduction that [Bob Alexander] undertook. Smitten with the circuit after seeing our story about a 1966 article detailing its construction, he decided to roll one of his own. That proved to be far harder than he thought it would be. The original circuit, really little more than an adding machine using a rotary telephone dial as an input device, used neon lamp ring buffers for counting, The trouble is, while NE-2 neon lamps are still made, they aren’t made very precisely. That makes it difficult to build a working ring buffer, which relies on precise on and off voltages. That was even a problem back then; the author suggested buying 100 lamps and carefully characterizing them after aging them in to get the 60 lamps needed.

In the end, [Bob] settled for modifying the circuit while making the build look as close as possible to the original. He managed to track down the exact model of enclosure used in the original. The front panel is populated with a rotary dial just like the original, and the same neon lamps are used too, but as indicators rather than in ring buffers. Behind the scenes, [Bob] relied on 7400-series counters and decoders to make it all work — kudos for sticking with 1970s tech and not taking the easy way out with an Arduino.

The video below goes into more detail on the build and the somewhat kludgy operation of the machine, with a few excellent [Tom Lehrer] references and a nice Cybertruck dunk to boot.

Continue reading “Retro Calculator Build Proves The Space Age Isn’t What It Used To Be”

Pimp My Pot Redux, Now Cheaper And Even Better

If there’s one thing we like around here more than seeing an improved version of a project we’ve already covered, it’s when the improvements make the original project cheaper. In the case of this LED ring light for pots and encoders, not only is it cheaper than its predecessors, it’s better looking and easier to integrate into your projects.

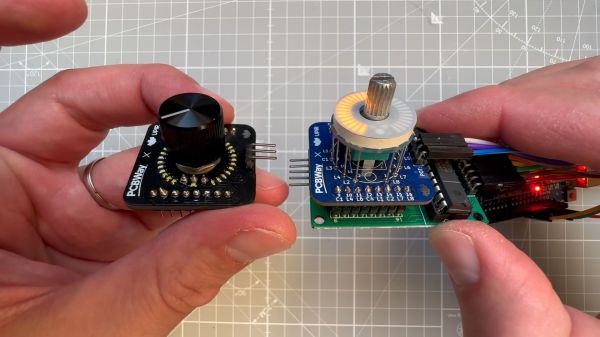
Right from its start, [upir]’s “Pimp My Pot” project has been all about bringing some zazzle to rotary controls. Knobs with a pointer and a scale on the panel are okay — especially when they go to eleven — but more lights mean more fun. The fun comes at a price, though; the previous version of “PMP” used an off-the-shelf LED ring light with a unit cost of about $10. Not the end of the world, perhaps, but prohibitive, and besides, where’s the fun in just buying a component specifically made for rotary control indication?

The new version shown in the video below is pin-compatible with the driver board [upir] used for the previous version, which is based on the MAX7219 display driver. Modifying the previous board to accommodate 32 white 0402 LEDs over a 270° arc was no mean feat. [upir] covers both creating the schematic and the PCB layout in some detail, providing his usual trove of tool-chain tips for minimizing the amount of manual work needed.

Wisely, [upir] chose to get his boards assembled by the vendor; getting all those LEDs to line up perfectly is a job best left to the robots. While the board is designed for use with pots that mount on either side, we much prefer mounting the pot’s shaft through the board, as it keeps the LEDs closer to the knob. The final price per board works out to about $6.30 in quantities of ten and falls to a trivial $1.70 each for lots of 1,000. Pretty sweet savings on a pretty sweet-looking build.

This is a cool use of a ring of LEDs, but if you prefer the finger kind, you can make that, too. You can do it the easy way or the hard way.

Continue reading “Pimp My Pot Redux, Now Cheaper And Even Better”

Rotary Dial Number Pad Is The Perfect Prank For Retro-Phone Enthusiast

We’re not sure about the rest of you, but to us, a keyboard without a number pad all the way over to the right just seems kind of — naked? We might not be accountants, but there’s something comforting about having the keypad right there, ready for those few occasions when you need to enter numbers more rapidly than would be possible with the row of number keys along the top of the keyboard.

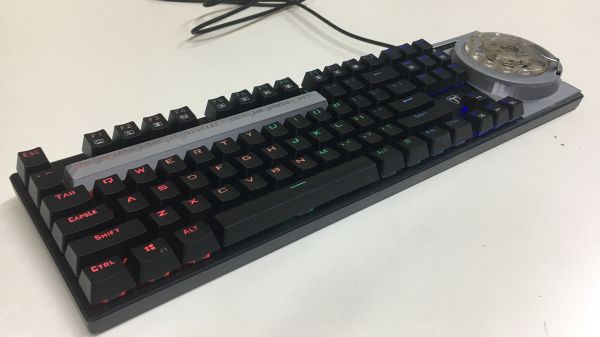
What we are sure about, though, is that rapid numeric keying is not what this rotary dial numpad keyboard is all about. In fact, it’s actually an April Fool’s prank [Squidgeefish] played on a retro-phone-obsessed coworker, and it worked out pretty well. Starting with an old telephone dial from what must be an exceptionally well-stocked parts bin, [Squidgeefish] first worked out the electrical aspects of interfacing the dial with a cheapo mechanical keyboard. It turns out that there’s a lot of contact bounce in those old dials, leading to some software hacks to keep the Arduino happy.

There was also a little hackery needed to stuff a USB hub into the keyboard, as well as literal hacking of the keyboard’s PCB. A 3D printed enclosure allows the rotary dial to nestle into the place where the regular numpad would be, and it looks pretty good. We also like forcing the issue by replacing the entire row of number keys with a single massive prank key.

While this was all for fun, there are a couple of cool tips here, like chucking a bit of printer filament in a Dremel tool to stir-weld parts together. And even though we’ve seen that parametric keycap generator before, it is pretty cool to see it in action.

Rŏ̽ta: Counting, With Style

Rǒta counts things. That’s it, really — what a cheap little mechanical counter does with a thumb press, or what you can do by counting on your fingers and toes, that’s pretty much all that Rǒta does. But it does it with style.

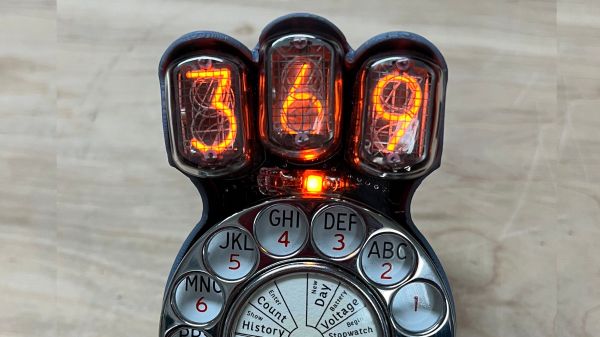
OK, that’s being a bit unfair to [Kevin Santo Cappuccio] — Rǒta has a few more tricks up its sleeve than simple counting. But really, those functions are just icing on the cake of how this little gadget looks. Rǒta was built around the unbeatable combination of a rotary telephone dial mechanism and a trio of Nixie tubes. The dial looks like it might have come from an old pay phone, all shiny and chrome and super robust looking. The Nixies sit atop the dial on a custom PCB, and everything, including the high-voltage supply for the tubes, is enclosed in a 3D printed case with a little bit of a Fallout vibe.

But what does this thing do? Actually, quite a lot. It’ll count up and down, using whatever number you dial into it. You can either increment from zero, or enter any three-digit number as the starting count. It keeps track of the score of your golf game, if that’s your thing, and it’s also got a stopwatch function. You can even dial up a display of the current battery voltage. It takes some ingenuity to use just the dial for all these functions, but that’s as easy as dialing the operator used to be — dialing 0 puts it in menu mode, allowing you to access any of the functions printed on the card in the center of the dial. It’s pretty clever — check out the video below.

Is it particularly useful? Perhaps not. But when has that ever been a measure of the worth of a project? Something like this rotary cellphone might be more useful, but sometimes looking great is good enough.

Continue reading “Rŏ̽ta: Counting, With Style”

Reverse-Engineering A Smoker

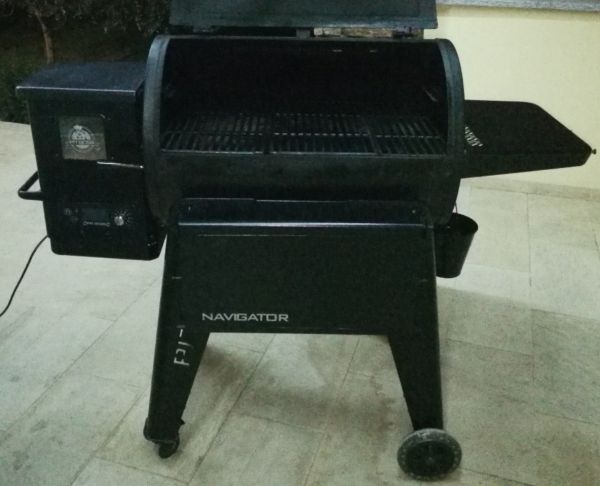
In certain parts of the world, cooking meat in a regionally-specific way is a critical part of the local culture. From barbeque in the American south to boerewors and braaivleis in South Africa to Montréal smoked meat in French Canada, almost every location has its cookout specialty. So much so that various manufacturers of the tools used for these foods include all kinds of gadgets to monitor the sometimes days-long process of cooking various cuts of meat. [megamarco833]’s smoker, though, includes some tools of his own design.

The smoker is made by a company called Pitboss and includes a rotary switch and control board for maintaining a precise temperature in the smoker. The switch works by changing the voltage value sent to a small microcontroller. By interfacing an ESP32 to this switch, [megamarco833] can remotely change the smoke level and temperature of the smoker. On the software side, it uses a combination of Node-RED and Domoticz to handle the automation and control.

For a cookout that can last hours (if not days) a remotely accessible smoker like this is an invaluable tool if you want to do something other than manually monitor the temperature of your meat for that much time. And, if your barbeque grill or smoker of choice doesn’t already have an embedded control board of some type, we’ve seen analog cooking tools adapted to much the same purpose as this one.

Thanks to [Peter] who sent in the tip and also helped [megamarco833] with the reverse-engineering of the control board!

Simplify Your Life With This Pocket Rotary Cellphone

With its constant siren song of distraction and endless opportunity for dopamine hits, a smartphone can cause more problems than it solves. The simple solution would be a no-nonsense flip phone, but that offers zero points for style. So why not build your own rotary dial pocket cellphone?

Of course, what style points accrue to [Justine Haupt] take a hit in terms of practicality, but that was never really the point of this build. And even then, the phone appears to be surprisingly useful. It’s based on the rotary dial from a Trimline phone, which itself was an epic hack back in 1965 when it was introduced. The 3D-printed case contains an ATmega2560V microcontroller and an Adafruit FONA 3G cell module, while a flexible mono eInk display adorns the outside. Some buttons, a folding SMA antenna, and some LEDs for signal strength and battery level complete the build, which easily slips into a pocket. The dial can be used not only to dial the phone but to control the speaker volume; in practice, [Justine] mainly uses the speed dial buttons to make calls, though.

We’ve seen rotary phones converted to cell before, but this one is a next-level integration of the retro and the modern. It’s simple, intuitive, and distraction-free, and best of all, it’s a great excuse not to return a text.

Thanks to [J. Peterson] for the tip.

Finely Machined Valve Controls Miniature RC Hydraulics

Hydraulic components are the industrial power transmission version of LEGO. Pumps, cylinders, valves – pretty much everything is standardized, and fitting out a working system is a matter of picking the right parts and just plumbing everything together. That’s fine if you want to build an excavator or a dump truck, but what if you want to scale things down?

Miniature hydraulic systems need miniature components, of which this homebrew hydraulic valve made by [TinC33] is a great example. (Video embedded below.) If you’re curious about why anyone would need these, check out the tiny hydraulic cylinders he built a while back, wherein you’ll learn that miniature RC snowplows are a thing. The video below starts with a brief but clear explanation about how hydraulic circuits work, as well as an explanation of the rotary dual-action proportional valve he designed. All the parts are machined by hand in the lathe from aluminum and brass stock. The machining operations are worth watching, but if you’re not into such things, skip to final assembly and testing at 13:44. The valve works well, providing very fine control of the cylinder and excellent load holding, and there’s not a leak to be seen. Impressive.

[TinC33] finishes the video with a tease of a design for multiple valves in a single body. That one looks like it might be an interesting machining challenge, and one we’d love to see.

Thanks to [mgsouth] for the tip.