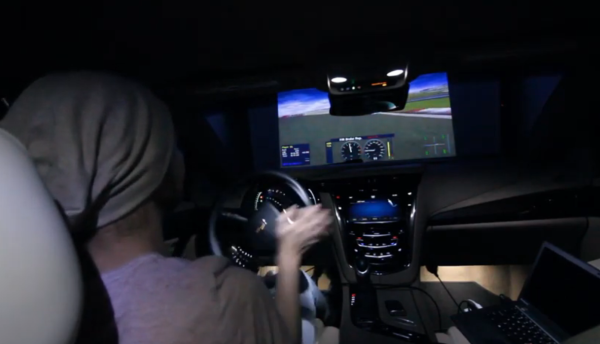
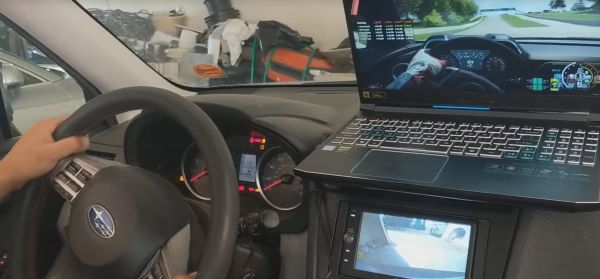
Simple RC To USB Interface

With the radio control hobby arguably larger now than it ever has been in the past, there’s a growing demand for high-fidelity PC simulators. Whether you want to be able to “fly” when it’s raining out or you just want to practice your moves before taking that expensive quadcopter up for real, a good simulator on your computer is the next best thing. But the simulator won’t do you much good if it doesn’t feel the same; you really need to hook your normal RC transmitter up to the computer for the best experience.

[Patricio] writes in to share with us his simple hack for interfacing his RC hardware to his computer over USB. Rather than plugging the transmitter into the computer, his approach allows the receiver to mimic a USB joystick. Not only is this more convenient since you can use the simulator without wires, but it will make sure that the minutiae of your radio hardware (such as response lag) is represented in the simulation.

The setup is actually very simple. [Patricio] used the ATtiny85 based Digispark development board because it’s what he had on hand, but the principle would be the same on other microcontrollers. Simply connect the various channels from the RC receiver to the digital input pins. RC receivers are 5 VDC and draw very little current, so it’s even possible to power the whole arrangement from the USB port.

On the software side, the Arduino sketch does about what you expect. It loops through listening for PWM signals on the input pins, and maps that to USB joystick position information. The current code only supports three channels for a simple airplane setup (X and Y for joystick, plus throttle), but it should be easy enough to follow along and add more channels if you needed them for more complex aircraft.

For more information on the intricacies of RC transmitter and receiver interaction, check out this fascinating research on receiver latency.

Forth System-On-Chip Takes Us Back To The 80s

For anyone who has dealt with the programming language Forth, odds are good that you picked it up back in the 80s. Since the language is still in use for many applications, though, you might not have this sort of nostalgic feeling for the language that some might have. For that, though, you might want to try out [Richard]’s implementation which simulates the microcomputers of the 80s using this unique language.

The system has an FPGA-based CPU written in Verilog. It runs on a Nexys-3 board and features PS/2 Keyboard input, a VGA output with a VHDL VT100 terminal emulation module, access to the Flash and onboard SRAM, and a UART. With all of that put together it’s virtually a Forth-based time machine. It’s also extremely well documented even if you’re just curious how it works and aren’t planning on building your own.

The project also includes a CPU simulator written in C which can model the entire computer if you don’t have the hardware for building the actual computer. [Richard] also released everything that you’d need to roll out your own Forth computer on the GitHub page. There are other ways of heading way back to the 1980s, though, like using the quirky Parralax Propeller.

Quantum Weirdness In Your Browser

I’ll be brutally honest. When I set out to write this post, I was going to talk about IBM’s Q Experience — the website where you can run real code on some older IBM quantum computing hardware. I am going to get to that — I promise — but that’s going to have to wait for another time. It turns out that quantum computing is mindbending and — to make matters worse — there are a lot of oversimplifications floating around that make it even harder to understand than it ought to be. Because the IBM system matches up with real hardware, it is has a lot more limitations than a simulator — think of programming a microcontroller with on debugging versus using a software emulator. You can zoom into any level of detail with the emulator but with the bare micro you can toggle a line, use a scope, and hope things don’t go too far wrong.

So before we get to the real quantum hardware, I am going to show you a simulator written by [Craig Gidney]. He wrote it and promptly got a job with Google, who took over the project. Sort of. Even if you don’t like working in a browser, [Craig’s] simulator is easy enough, you don’t need an account, and a bookmark will save your work.

It isn’t the only available simulator, but as [Craig] immodestly (but correctly) points out, his simulator is much better than IBM’s. Starting with the simulator avoids tripping on the hardware limitations. For example, IBM’s devices are not fully connected, like a CPU where only some registers can get to other registers. In addition, real devices have to deal with noise and the quantum states not lasting very long. If your algorithm is too slow, your program will collapse and invalidate your results. These aren’t issues on a simulator. You can find a list of other simulators, but I’m focusing on Quirk.

What Quantum Computing Is

As I mentioned, there is a lot of misinformation about quantum computing (QC) floating around. I think part of it revolves around the word computing. If you are old enough to remember analog computers, QC is much more like that. You build “circuits” to create results. There’s also a lot of difficult math — mostly linear algebra — that I’m going to try to avoid as much as possible. However, if you can dig into the math, it is worth your time to do so. However, just like you can design a resonant circuit without solving differential equations about inductors, I think you can do QC without some of the bigger math by just using results. We’ll see how well that holds up in practice.

Continue reading “Quantum Weirdness In Your Browser”

Design And 3D Print Robots With Interactive Robogami

Internals of 3D printed “print and fold” robot. [Image source: MIT CSAIL]
Robot design traditionally separates the body geometry from the mechanics of the gait, but they both have a profound effect upon one another. What if you could play with both at once, and crank out useful prototypes cheaply using just about any old 3D printer? That’s where Interactive Robogami comes in. It’s a tool from MIT’s Computer Science and Artificial Intelligence Laboratory (CSAIL) that aims to let people design, simulate, and then build simple robots with a “3D print, then fold” approach. The idea behind the system is partly to take advantage of the rapid prototyping afforded by 3D printers, but mainly it’s to change how the design work is done.

To make a robot, the body geometry and limb design are all done and simulated in the Robogami tool, where different combinations can have a wild effect on locomotion. Once a design is chosen, the end result is a 3D printable flat pack which is then assembled into the final form with a power supply, Arduino, and servo motors.

A white paper is available online and a demonstration video is embedded below. It’s debatable whether these devices on their own qualify as “robots” since they have no sensors, but as a tool to quickly prototype robot body geometries and gaits it’s an excitingly clever idea.

Continue reading “Design And 3D Print Robots With Interactive Robogami”

Tinkercad Does Arduino

If you’ve done 3D printing, you’ve probably at least heard of Tinkercad. This popular CAD package runs in your browser and was rescued from oblivion by Autodesk a few years ago. [Chuck] recently did a video about a new Tinkercad feature: building and simulating virtual Arduino circuits. You can watch it below.

There are a variety of components you can add to your design. You’ll find an integrated code editor and a debugger. You can even get to the serial monitor, all in your browser with no actual Arduino hardware. You can also build simple circuits that don’t use an Arduino, although the component selection is somewhat limited.

Continue reading “Tinkercad Does Arduino”

VR Mech’s Missing Link: The Phone In Your Pocket

In the process of making a homemade Mech Combat game that features robot-like piloted tanks capable of turning the cockpit independent of the direction of movement, [Florian] realized that while the concept was intuitive to humans, implementing it in a VR game had challenges. In short, when the body perceives movement but doesn’t feel the expected acceleration and momentum, motion sickness can result. A cockpit view that changes independently of forward motion exacerbates the issue.

To address this, [Florian] wanted to use a swivel chair to represent turning the Mech’s “hips”. This would control direction of travel and help provide important physical feedback. He was considering a hardware encoder for the chair when he realized he already had one in his pocket: his iPhone.

By making an HTML page that accesses the smartphone’s Orientation API, no app install was needed to send the phone’s orientation to his game via a WebSocket in Unity. He physically swivels his chair to steer and is free to look around using the VR headset, separate from the direction of travel. Want to try it for yourself? Get it from [Florian]’s GitHub repository.

A video is embedded below, but if you’re interested in details be sure to also check out [Florian]’s summary of insights and methods for avoiding motion sickness in a VR Mech cockpit.

Continue reading “VR Mech’s Missing Link: The Phone In Your Pocket”

Quasimotor? A Robot Bell Ringer

In large churches that still use real bells in their bell towers, a large number of them ring bells using a method called full circle ringing. In order to get the bells to sound at exactly the right time, the bells are rung by swinging the entire bell in an almost complete 360-degree arc. This helps to mitigate the fact that often times, the bells weigh more than the person ringing the bells. However, if you don’t have access to a belfry, you can practice ringing bells using this method with your own full circle bell simulator.

The frame for the bell was built from some leftover aluminum extrusion and allows the bell to easily swing on some old skateboard bearings. The mechanism is electrically controlled, too, using a hall effect sensor and a USB adapter so that it can be interfaced with a computer running a virtual bell ringing suite. Once some timing issues are worked out, the bell is all set up and ready to practice ringing changes.

If you’re as fascinated as we are to find that there are entire software suites available to simulate bell ringing, and an entire culture built around something that most of us, perhaps, wouldn’t have given a second thought to outside of walking past a church on a Sunday, there have been a surprising number of other bell-related projects over the years. Bells have been given MIDI interfaces and robotified, and other church instruments like a pipe organ have been created almost from scratch.