Printed It: Print-in-Place PCB Gripper

The goal of Printed It is to showcase creations that truly embrace the possibilities offered by desktop 3D printing. The most obvious examples are designs that can be printed quickly and cheaply enough that they’re a valid alternative to commercially available products. But as previous entries into the series have shown, there are also technical considerations. Is it simply a duplicate of something that could be produced via traditional means, or does the design really benefit from the unique nature of 3D printing?

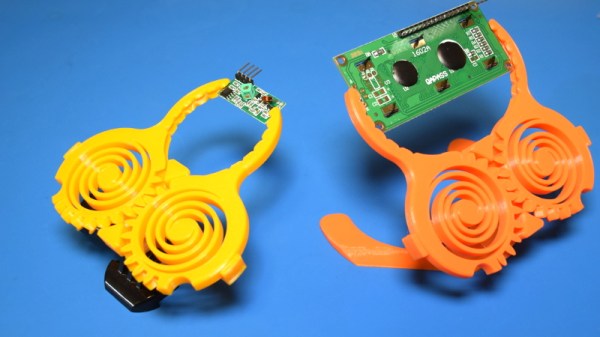
A perfect example is the Print-in-Place PCB Holder/Gripper created by SunShine. This design is able to hold onto PCBs (or really, whatever you wish) without any additional components. Just pull it off the bed, and put it to work. While having to add a rubber band or generic spring would hardly be an inconvenience, there’s always something to be said for a design that’s truly 100% printable.

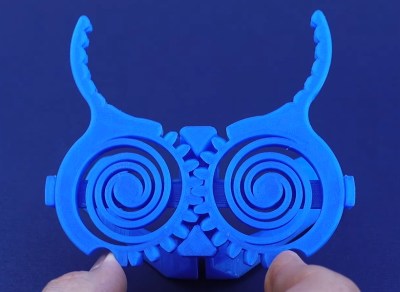
The secret is the dual flat spiral springs integrated into the device’s jaws. While most of the common thermoplastics used in desktop 3D printing are relatively stiff, the springs have been designed in such a way that they can be printed in standard PLA. The backside of the jaws have teeth that mesh together, so the energy of the springs is combined to provide a clamping force. Serrations have been added to the jaws to catch the edge of the PCB and help stabilize it.

Visually, it’s certainly striking. The design largely eschews right angles, giving it an almost biological appearance. Many have compared it to the head of a mantis, or perhaps some piece of alien technology.

There’s no question that the design leverages the strengths of 3D printing either; there’s no other way to produce its intricate interlocking components, especially without the use of any sort of fasteners. In short, this design is an ideal candidate for Printed It. But there’s still one question to answer: does it actually work?

Continue reading “Printed It: Print-in-Place PCB Gripper”

3D Printing A Macro Pad, Switches And All

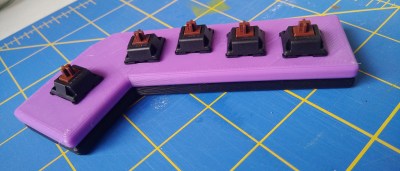
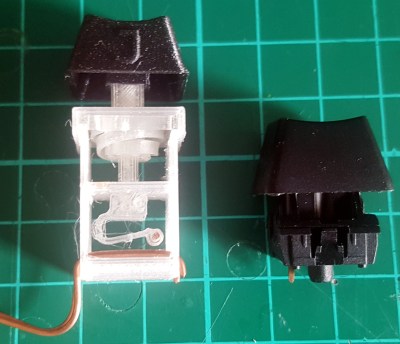
Building a macro pad inside of a 3D printed enclosure is hardly news these days. Neither is adding 3D printed keycaps to the mix. But if you go as far as [James Stanley] has, and actually print the switches themselves, we’ve got to admit that’s another story entirely.

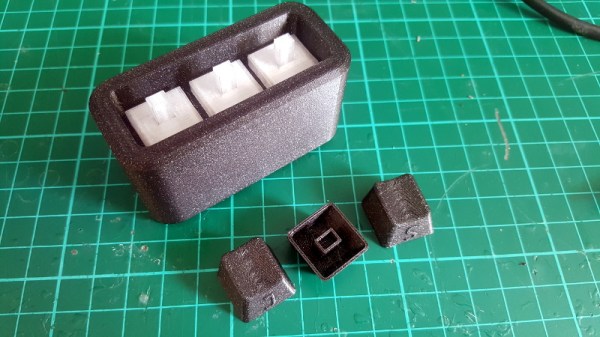
Now you might be wondering how [James] managed to print a mechanical keyboard switch that’s the size of your garden variety Cherry. Well, the simple answer is that he didn’t. While his printed switches have the same footprint as traditional switches, they are twice as tall.

The switches could probably made much smaller if it wasn’t for the printed spring, but using a “real” one would defeat the purpose. Though we do wonder if the mechanical design could be simplified by making it an optical switch.

But can printed switches really stand up to daily use? [James] wondered the same thing, so he built a testing rig that would hit the switches and count how many iterations before they stopped working. This testing seems to indicate that the keys will either fail quickly due to some mechanical defect, or last for hundreds of thousands of presses. So assuming you weed out the duds early, you should be in pretty good shape.

Naturally, there are a few bits of copper inside each printed switch to act as the actual contacts. But beyond that, all you need to build one of these printable pads yourself is a USB-HID capable microcontroller like the Arduino Pro Micro. If you used the ESP32, you could even make it Bluetooth.

Continue reading “3D Printing A Macro Pad, Switches And All”

Arduino Wire Bender Probably Won’t Kill All Humans

Do you want to make your own springs? Yeah, that’s what we thought. Well, blow the dust off of that spare Arduino and keep reading. A few months ago, we let you know that renowned circuit sculptor [Jiří Praus] was working on a precision wire-bending machine to help him hone his craft. Now it’s real, it’s spectacular, and it’s completely open source.

Along with that ‘duino you’ll need a CNC shield and a couple of NEMA 17 steppers — one to feed the wire and one to help bend it. Before being bent or coiled into springs, the wire must be super straight, so the wire coming off the spool holder runs through two sets of rollers before being fed into the bender.

[Jiří]’s main goal for this build was precision, which we can totally get behind. If you’re going to build a machine to do something for you, ideally, it should also do a better job than you alone. It’s his secondary goal that makes this build so extraordinary. [Jiří] wanted it to be easy to build with commonly-available hardware and a 3D printer. Every part is designed to be printed without supports. Bounce past the break to watch the build video.

You can also make your own springs on a lathe, or print them with hacked g-code.

Continue reading “Arduino Wire Bender Probably Won’t Kill All Humans”

Door Springs And Neopixels Demonstrate Quantum Computing Principles

They may be out of style now, and something of a choking hazard for toddlers, but there’s no denying that spring doorstops make a great sound when they’re “plucked” by a foot as you walk by. Sure, maybe not on a 2:00 AM bathroom break when the rest of the house is sleeping, but certainly when used as sensors in this interactive light show.

The idea behind [Robin Baumgarten]’s “Quantum Garden” is clear from the first video below: engaging people through touch, sound, and light. Each of the 228 springs, surrounded by a Neopixel ring, is connected to one of the 12 inputs on an MPR121 capacitive touch sensor. The touch sensors and an accelerometer in the base detect which spring is sproinging and send that information to a pair of Teensies. A PC then runs the simulations that determine how the lights will react. The display is actually capable of some pretty complex responses, including full-on games. But the most interesting modes demonstrate principles of quantum computing, specifically stimulated Raman adiabatic passage (STIRAP), which describes transfers between quantum states. While the kids in the first video were a great stress test, the second video shows the display under less stimulation and gives a better idea of how it works.

We like this because it uses a simple mechanism of springs to demonstrate difficult quantum concepts in an engaging way. If you need more background on quantum computing, [Al Williams] has been covering the field for a while. Need the basics? Check out [Will Sweatman]’s primer.

Continue reading “Door Springs And Neopixels Demonstrate Quantum Computing Principles”

3D-Printed Tourbillon Demo Keeps The Time With Style

It may only run for a brief time, and it’s too big for use in an actual wristwatch, but this 3D-printed tourbillon is a great demonstration of the lengths watchmakers will go to to keep mechanical timepieces accurate.

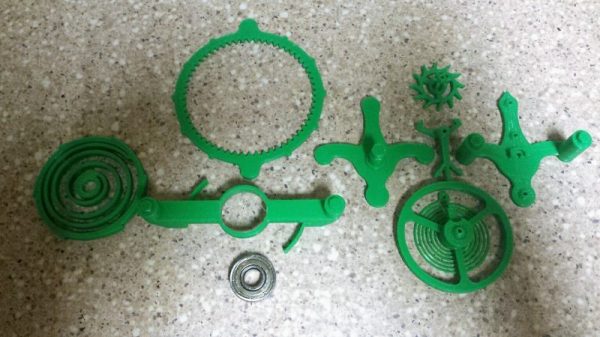
For those not familiar with tourbillons, [Kristina Panos] did a great overview of these mechanical marvels. Briefly, a tourbillon is a movement for a timepiece that aims to eliminate inaccuracy caused by gravity pulling on the mechanism unevenly. By spinning the entire escapement, the tourbillon averages out the effect of gravity and increases the movement’s accuracy. For [EB], the point of a 3D-printed tourbillon is mainly to demonstrate how they work, and to show off some pretty decent mechanical chops. Almost the entire mechanism is printed, with just a bearing being necessary to keep things moving; a pair of shafts can either be metal or fragments of filament. Even the mainspring is printed, which we always find to be a neat trick. And the video below shows it to be satisfyingly clicky.

[EB] has entered this tourbillon in the 3D Printed Gears, Pulleys, and Cams Contest that’s running now through February 19th. You’ve still got plenty of time to get your entries in. We can’t wait to see what everyone comes up with!

Continue reading “3D-Printed Tourbillon Demo Keeps The Time With Style”

Blacksmith Elevates The Craft With This Fabulous Strongbox

For most of human industrial history, the blacksmith was the indispensable artisan. He could fashion almost anything needed, from a simple hand tool to a mechanism as complex as a rifle. Starting with the most basic materials, a hot forge, and a few tools that he invariably made himself, the blacksmith was a marvel of fabrication.

If you have any doubt how refined the blacksmith’s craft can be, feast your eyes on [Seth Gould]’s masterpiece of metalwork. Simply called “Coffer”, [Seth] spent two years crafting the strongbox from iron, steel, and brass. The beautifully filmed video below shows snippets of the making, but we could easily watch a feature-length film detailing every aspect of the build. The box is modeled after the strongboxes built for the rich between the 17th and 19th centuries, which tended to favor complex locking mechanisms that provided a measure of security by obfuscation. At the end of the video below, [Seth] goes through the steps needed to unlock the chest, each of which is filled with satisfying clicks and clunks as the mechanism progresses toward unlocking. The final reveal is stunning, and shows how much can be accomplished with a forge, some files, and a whole lot of talent.

If you’ve never explored the blacksmith’s art before, now’s the time. You can even get started easily at home; [Bil Herd] will show you how.

Continue reading “Blacksmith Elevates The Craft With This Fabulous Strongbox”

Can Magnets Replace The Spring In A Pogo Stick?

Betteridge’s law of headlines states that any headline that ends in a question mark can be answered by the word ‘no’. It’s the case with articles asking if Millennials are responsible for all of the world’s ills, or if some technology is the future. So we come to this fascinating case of native content (amusing, veiled advertising) from a store that sells really, really powerful magnets. The title of the article asks if magnets can replace the spring in a pogo stick. The answer, of course, is no, but it does provide a fascinating look at linear versus exponential growth.

A pogo stick is simply a spring with a set of handles and footholds that is the subject of a great number of hilarious YouTube videos, at least one of which is impressive. The physics of a pogo stick is determined entirely by Hooke’s Law, and is a linear equation, not counting the strength of a spring and the yield point of steel, but this is a pogo stick we’re talking about. Magnets, on the other hand, obey the inverse square law. Is it possible to fit an exponential function to fit a linear function? No. No, it is not.

I refuse to believe this is the first use of the phrase, ‘immensely disappointing pogo stick’

But a lack of understanding of the basic forces of nature never stopped anyone, so the folks at K & J Magnetics made a really neat test. They printed out a 1/8th scale pogo stick, complete with a spring. It worked like any pogo stick would. Then they took out the spring and put a few magnets where the spring should go. How did that work? Well, it bottomed out and was an immensely disappointing pogo stick.

If a problem is worth solving, it’s worth solving wrongly, so more magnets were added. Mounting three magnets onto a pogo stick gave the same exponential force, but still not enough. Four, five, and six magnets were added to the model pogo stick, and while six magnets gave this model pogo enough force to be ‘bouncy’, there simply wasn’t enough space for the pogo stick to compress.

The takeaway from this experiment is extremely obvious in retrospect, but probably too subtle for a lot of people. There’s a difference between a linear relationship and and exponential relationship. There’s also a video, you can check that out below.

Continue reading “Can Magnets Replace The Spring In A Pogo Stick?”