Railroad Rail Transformed Into Blacksmith’s Anvil With The Simplest Of Tools

One of the biggest challenges facing the aspiring blacksmith is procuring the tools of the trade. And that means tackling the unenviable task of finding a decent anvil. Sure, one can buy an ASO — anvil-shaped object — at Harbor Freight, but a real anvil is much harder to come by. So perhaps the beginner smith’s first build should be this railroad rail to anvil conversion.

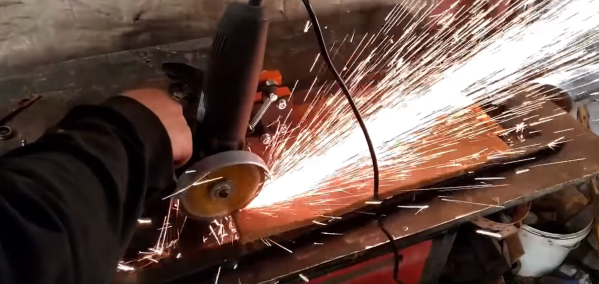
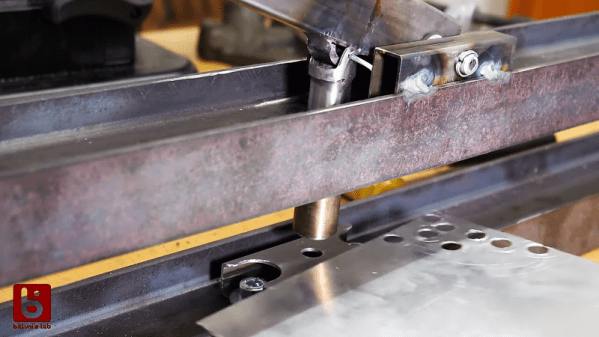
Repurposing sections of rail into anvils is hardly a new game, but [The Other Finnish Guy]’s build shows us just how little is needed in terms of specialized tooling to pull this off. Other than a file, the bulk of the work is done by angle grinders, which are used to cut off the curved crown of the rail section, cut the shape of the heel, and rough out the horn. Removing that much metal will not be a walk in the park, so patience — and a steady supply of cutting wheels and sanding discs — is surely required. But with time and skill, the anvil hidden inside the rail can be revealed and put to use.

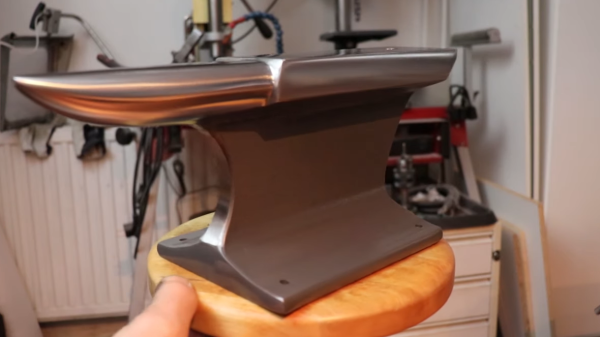
We have questions about the final result, like its lack of a hardy hole and the fact that the face isn’t hardened. We wonder if some kind of induction heating could be used to solve the latter problem, or if perhaps a hardened plate could be welded into the top to make a composite anvil. Still, any anvil is better than no anvil. More on the anatomy and physiology of these tools can be had in [Jenny List]’s article on anvils, and her whole excellent series on blacksmithing is highly recommended. [Jenny]’s not the only smith we have on staff, though — [Bil Herd] has been known to smite a bit too.

Continue reading “Railroad Rail Transformed Into Blacksmith’s Anvil With The Simplest Of Tools”

A Good, Hard Look At Pre-Stressed Concrete

From the looks of the average driveway or sidewalk, it may seem as though concrete is just destined to crack. But if concrete is so prone to cracking, how are we able to use it in so many high-stress applications like bridges and skyscrapers? This question came about while I was researching 3D-printed thermite for an article. Thermite is often used in welding railroad tracks, and I linked a video of fresh tracks being welded that had concrete ties. I knew I had to find out how concrete could be made to withstand the pressure of freight trains.

On its own, concrete is brittle and has no give to it at all. But that doesn’t mean it isn’t strong. Although concrete has good compression strength, the tensile strength is quite poor. Around the late 1800s, someone thought to fortify spans of concrete with steel reinforcing bars, better known as rebar. Steel can stretch, adding steel bars gives the concrete some tensile strength to go along with its compressive strength. Rebar also allows for thinner slabs and other members.

Rebar Only Goes So Far

Parking blocks are meant to be replaced occasionally. Image via Checkers Safety

Rebar or mesh-enforced concrete is good for things like parking lot blocks and roads, but it still fails before it ought to. In fact, it usually has to crack before the rebar can chip in any of its tensile strength.

In high-stress concrete applications like bridges and skyscrapers, it’s terrifically important to avoid deflection — that’s when a concrete member flexes and bends under load. Deflection can cause the modern glass skins to pop off of skyscrapers, among other problems.

A solid, rigid bridge is much nicer to walk, drive, and bicycle on than a bridge that sways in the breeze. But how do you do make a rigid bridge? One solution is to apply stresses to the concrete before it ever bears the load of cars and trucks or a steady schedule of freight trains.

Pre-stressed concrete is like rebar-enforced concrete, but with the added power of tension baked in. By adding stress to the concrete before it goes into service, deflection will be reduced or perhaps eliminated altogether. With the addition of tensile strength, more of the concrete’s own strength is able to come into play.

Continue reading “A Good, Hard Look At Pre-Stressed Concrete”

3D Printing Damascus-like Steel

Recreating Damascus steel remains a holy grail of materials science. The exact process and alloys used are long ago lost to time. At best, modern steelworking methods are able to produce a rough visual simulacra of sorts that many still consider to be pretty cool looking. Taking a more serious bent at materials science than your average knifemaker, a group of scientists at the Max Planck institute have been working to create a material with similar properties through 3D printing.

The technology used is based on the laser sintering of metal powders. In this case, the powder consists of a mixture of iron, nickel and titanium. The team found that by varying the exact settings of the laser sintering process on a layer-by-layer basis, they could create different microstructures throughout a single part. This allows the creation of parts that are ductile, while remaining hard enough to be sharpened – a property which is useful in edged weapons like swords.

While the process is nothing like that used by smiths in Damascus working with Wootz steel, the general idea of a metal material with varying properties throughout remains the same. For those eager to get into old-school metalwork, consider our articles on blacksmithing. For those interested in materials research, head to a good university. Or, better yet – do both!

[Thanks to Itay for the tip, via New Atlas]

Can Lego Break Steel?

Betteridge’s Law of Headlines holds that any headline ending in a question mark can be answered with a resounding “No”. But as the video below shows, a Lego machine that twists steel asunder is not only possible, it’s an object lesson in metal fatigue. Touché, [Betteridge].

In pitting plastic against metal, the [Brick Experiment Channel] relied on earlier work with a machine that was able to twist a stock plastic axle from the Technics line of parts like a limp noodle. The steel axle in the current work, an aftermarket part that’s apparently no longer available, would not prove such an easy target.

Even after beefing up the test stand with extra Technics struts placed to be loaded in tension, and with gears doubled up and reinforced with extra pins, the single motor was unable to overcome the strength of the axle. It took a second motor and a complicated gear train to begin to deform the axle, but the steel eventually proved too much for the plastic to withstand. Round Two was a bit of a cheat: the same rig with a fresh axle, but this time the motor rotation was constantly switched. The accumulated metal fatigue started as a small crack which grew until the axle was twisted in two.

The [Brick Experiment Channel] is a fun one to check out, and we’ve featured them before. Along with destructive projects like this one, they’ve also got fun builds like this Lego playing card launcher, a Technic drone, and a Lego submarine.

Continue reading “Can Lego Break Steel?”

Retrotechtacular: The Art Of The Foundry

Mention the term “heavy industry” and the first thing to come to mind might well be the metal foundry. With immense machines and cauldrons of molten metal being shuttled about by crane and rail, the image of the foundry is like a scene from Dante’s Inferno, with fumes filling a vast impersonal factory, and sparks flying through the air. It looks like a dangerous place, as much to the soul as to the body, as workers file in each day to suffer mindlessly at the hearths and ladles, consumed in dirty, exhausting work even as it consumes them.

Things are not always as they appear, of course. While there’s no doubting the risks associated with working in a foundry such as the sprawling Renfrew works of Babcock and Wilcox Ltd. in the middle of the previous century, as the video below shows the work there was anything but mindless, and the products churned out by the millions from this factory and places like it throughout the world were critical to today’s technology.

Continue reading “Retrotechtacular: The Art Of The Foundry”

Solve Your Precision Woes With A Sliding Angle Grinder

Angle grinders are among the most useful tools for anyone who’s ever had to cut metal. They’re ergonomic, compact, and get the job done. Unfortunately, one of the tradeoffs you usually make when using them is precision.

But thankfully, there’s a DIY solution. YouTuber [workshop from scratch] demonstrated the build process for a sliding angle grinder in a recent video, welding steel beams into a flat frame and attaching fitted beams on top to slide across the rows. Where necessary, spacers are used to ensure that the slider is perfectly fitted to the beam. The contraption holding the angle grinder – a welded piece of steel bolted to the sliding mechanism – has a grip for the user to seamlessly slide the tool across the table.

The operation is like a more versatile and robust chop saw, not to mention the customized angle references you can make to cut virtually anything you like. The build video shows the entire process, from drill pressing and turning holes to welding pieces of the frame together to artfully spray painting the surface a classy black, with familiarity enough to make the project look like a piece of cake.

As the name implies, [workshop from scratch] is all about building your own shop tools, and we’ve previously taken a look at their impressive hydraulic vise and mobile crane builds. These tools, largely hacked together from scraps, prove that setting up your own shop doesn’t necessarily mean you need to break the bank.

Continue reading “Solve Your Precision Woes With A Sliding Angle Grinder”

Punch Those Hole-Drilling Blues Away With A Homebrew Punching Tool

Four times the holes, four times the trouble. With the fate of repetitive motion injury looming due to the need to drill 1,200 holes, [bitluni] took matters into his own hands and built this nifty DIY hole punch for light-gauge sheet metal.

A little backstory will probably help understand why [bitluni] needs so many holes. Back in May, he built a ping pong ball LED video wall for Maker Faire Berlin. That had 300 LEDs and came out great, but at the cost of manually drilling 300 holes in sheet steel with a hand drill. Looking to expand his wall of balls to four times the original size, [bitluni] chose to spend a few days building a punch to make the job more appealing. The business end, with solid bar stock nested inside pieces of tubing, is a great example of how much you can get done without a lathe. The tool is quite complex, with a spring-loaded pilot to help guide the punching operation. When that proved impractical, [bitluni] changed the tool design and added an internal LED to project crosshairs from inside the tool.

The tool itself is mounted into a sturdy welded steel frame that allows him to cover the whole aluminum sheet that will form the panel of his LED wall. It’s pretty impressive metalwork, especially considering this isn’t exactly in his wheelhouse. And best of all, it works – nice, clean holes with no deformation, and it’s fast, too. We’re looking forward to seeing the mega-LED wall when it’s done.

Continue reading “Punch Those Hole-Drilling Blues Away With A Homebrew Punching Tool”