A Simple Liquid Level Indicator With A Single IC

Often, the only liquid level indicator you need is your eyes, such as when looking at your cold beverage on a summer’s day. Other times, though, it’s useful to have some kind of indicator light that can tell you the same. [Hulk] shows us how to build one for a water tank using a single IC and some cheap supporting components.
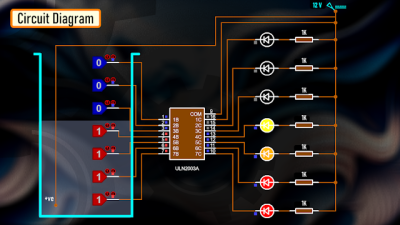
If you’re unfamiliar with the ULN2003, it’s a simple Darlington transistor array with seven transistors inside. It can thus be used to switch seven LEDs without a lot of trouble. In this case, green, yellow, and red LEDs were hooked up to the outputs of the transistors in the ULN2003. Meanwhile, the base of each transistor is connected to an electrode placed at a different height in the water tank. A further positive electrode is placed in the tank connected to 12 volts. As the water raises to the height of each electrode, current flow from the base to the positive electrode switches the corresponding transistor on, and the LED in turn. Thus, you have a useful liquid level indicator with seven distinct output levels.

It’s a neat build that might prove useful if you need to check levels in a big opaque tank at a glance. Just note that it might need some maintenance over time, as the electrodes are unlikely to remain completely corrosion free if left in water. We’ve seen some other great uses of the ULN2003 before, too. Video after the break.

Continue reading “A Simple Liquid Level Indicator With A Single IC”

Everything You Ever Wanted To Know About The ULN2003

The ULN2003 IC is an extremely versatile part, and with the help of [Hulk]’s deep dive, you might just get some new ideas about how to use this part in your own projects.

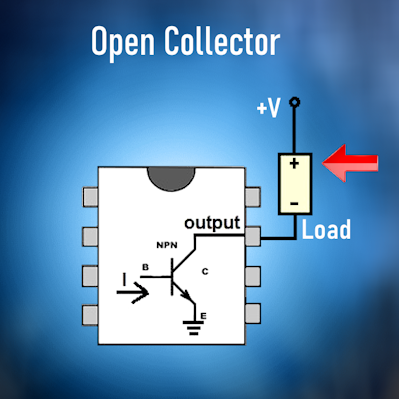
Each of the seven outputs works like this simplified diagram.

Inside the ULN2003 you’ll find seven high-voltage and high-current NPN Darlington pairs capable of switching inductive loads. But like most such devices there are a variety of roles it can fill. The part can be used to drive relays or motors (either brushed or stepper), it can drive LED lighting, or simply act as a signal buffer. [Hulk] provides some great examples, so be sure to check it out if you’re curious.

Each of the Darlington pairs (which act as single NPN transistors) is configured as open collector, and the usual way this is used is to switch some kind of load to ground. Since the inputs can be driven directly from 5 V digital logic, this part allows something like a microcontroller to drive a high current (or high voltage, or both) device it wouldn’t normally be able to interface with.

While the circuitry to implement each of the transistor arrays isn’t particularly complex and can be easily built by hand, a part like this is a real space saver due to how it packs everything needed in a handy package. Each output can handle 500 mA, but this can be increased by connecting in parallel.

There’s a video (embedded below) which steps through everything you’d like to know about the ULN2003. Should you find yourself wanting a much, much closer look at the inner secrets of this chip, how about a gander at the decapped die?

Continue reading “Everything You Ever Wanted To Know About The ULN2003”

Quick And Dirty Microscope Motion Control For Focus Stacking

If you’ve spent much time looking through a microscope, you know that their narrow depth of field can be a bit challenging to deal with. Most microscopes are designed to only have a very thin slice of the specimen in focus, so looking at anything above or below that plane requires a focus adjustment. It’s tedious and fussy, and that makes it a perfect target for automation.

The goal behind [ItMightBeWorse]’s microscope mods is “focus stacking,” a technique where multiple images of the same sample taken at different focal planes can be stitched together so that everything appears to be in focus. Rather than twist knobs and take pictures manually, he built a simpler Arduino-based rig to do the job for him. Focus control is through a small stepper motor connected to the fine focus knob of the scope, while the DSLR camera shutter is triggered through a simple relay board. There’s also lighting control, with an RGB LED ring light that can change both the light level on the sample as well as the tint.

The code is very simple, and the setup is quite temporary looking, but the results are pretty impressive. We could do without the extreme closeup of that tick — nasty little arachnids — but the ant at the end of the video below has some interesting details. [ItMightBeWorse] doesn’t mention how the actual stacking is being done, but this CNC-based focus stacking project mentions a few utilities that take help with the post-processing.

Continue reading “Quick And Dirty Microscope Motion Control For Focus Stacking”

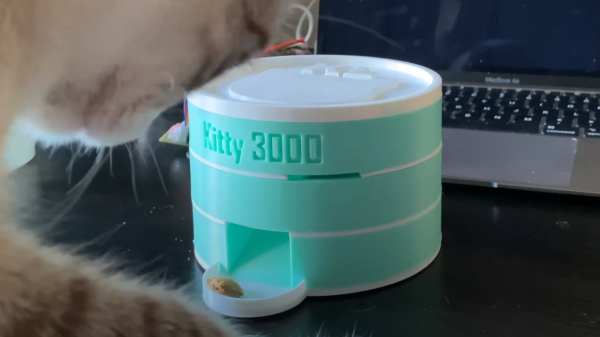
A 3D printed cat treat dispenser on a table with a laptop in the background and with a treat in it's tray and a cat on the left about to eat the treat.

Local IOT Cat Treat Dispenser

[MostElectronics], like many of us, loves cats, and so wanted to make an internet connected treat dispenser for their most beloved. The result is an ingenious 3D printed mechanism connected to a Raspberry Pi that’s able to serve treats through a locally run web application.

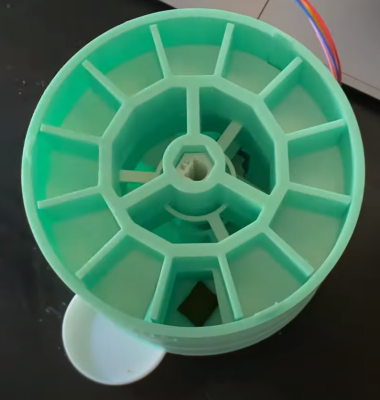
The inside of a 3d printed cat treat dispenser, showing the different compartments, shaft and wires running out the back.

From the software side, the Raspberry Pi uses a RESTful API that one can connect to through a static IP. The API is implemented as a Python Flask application running under a stand alone web server Python script. The web application itself keeps track of the number of treats left and provides a simple interface to dispense treats at the operators leisure. The RpiMotorLib Python library is used to control a 28BYJ-48 stepper motor through its ULN2003 controller module, which is used to rotate the inside shaft of the treat dispenser.

The mechanism to dispense treats is a stacked, compartmentalized drum, with two drum layers for food compartments that turn to drop treats. The bottom drum dispenses treats through a chute connected to the tray for the cat, leaving an empty compartment that the top drum can replenish by dropping its treats into through a staggered opening. Each compartmentalized treat drum layer provides 11 treats, allowing for a total of 22 treats with two layers stacked on top of each other. One could imagine extending the treat dispenser to include more drum layers by adding even more layers.

Source code is available on GitHub and the STL files for the dispenser are available on Thingiverse. We’ve seen cat electronic feeders before, sometimes with escalating consequences that shake us to our core and leave us questioning our superiority.

Video after the break!

Continue reading “Local IOT Cat Treat Dispenser”

HDD-Driven Chime Clock Is Quite Striking

It seems that the more hectic life gets, the harder it is to consciously slow down and enjoy the experience. There’s always another bill to worry about, and a new deadline around the corner. The last thing we need are ultra-precise digital clocks everywhere we look. When it’s time to relax, there’s more than enough room for a passive type of clock that gives the time on time’s terms.

[Scoops]’ beautiful chime-only clock seems perfect for its location — an intimate event space inside an old house in Taiwan. Having only a vague sense of passing time helps us relax responsibly at social events. There’s no need to pull out your phone or glance at your watch when notifications about the passage of time softly permeate the air.

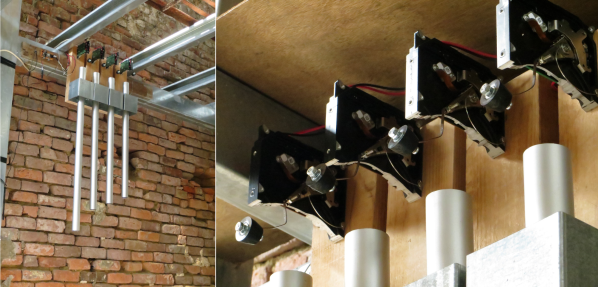
Here’s how it works: a NodeMCU controls four hard drive actuators through a ULN2003. The actuators each have a small extension and a clapper fitted on the end, which strikes the aluminium tubes that make up the chimes. There’s a web interface where [Scoops] can set the chimes to sound as frequently or infrequently as desired, or schedule a quiet period during the overnight hours. In emergencies, the clock can also be muted directly with the push of a button.

Take a little time to check out the short videos after the break, because this thing does a mean Westminster Chimes. But don’t stay too long, because time is running out! You have until Friday, January 24th to enter our Tell Time Contest over on IO.

Time can be relaxing or suffocating, depending on the way you look at it. If it’s visual relaxation you need, watch this bubble clock and float away from reality for a while.

Continue reading “HDD-Driven Chime Clock Is Quite Striking”

No Need To Watch Your Tea, This Robot Does It For You

For anyone who’s ever had to make their own tea, steeping it for the right amount of time can be a pain. That’s precisely the problem that the automatic tea brewing robot solves with its painless approach to brewing tea, built by Slovenian electrical engineering student [Kristjan Berce].

You can use the robot by setting a timer on the knob, at which point the robot raises it arm for the tea bag then dips in the water every 30 seconds until the time has passed. At the end of the timer, the bag is raised clear of the cup to end the brewing. It’s a remarkably simple design that almost evokes chindogu (the Japanese art of useless inventions) if not for the fact that the robot actually serves a useful purpose.

The components for 3D printing the robot are available online, consisting of a case, a container for the Arduino-powered electronics, the lever for holding the tea, and the gear that raises the lever up and down. The device also uses an integrated Li-Ion battery with an accessible charging port and integrated BMS. A 35BYJ46 stepper motor and ULN2003 driver are used to move the 3D printed mechanism. The device uses a potentiometer for setting the steeping time between 1 and 9 minutes, and there’s even a buzzer for indicating once the tea is done brewing.

The Gerber and Arduino code files are open-source for any hackers looking to make their own tea brewers; just take care they operate with “deadly punctuality”.

Continue reading “No Need To Watch Your Tea, This Robot Does It For You”

Arduino Star Tracker Raises The Bar

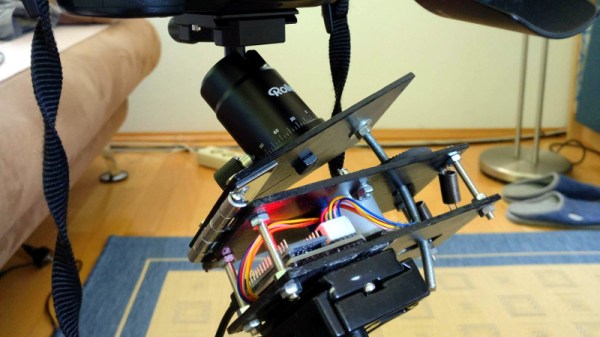
Proving that astrophotography doesn’t have to break the bank, [Gerald Gattringer] has recently documented his DIY “barn door” style star tracker which is built almost entirely from scratch. Short of the Arduino and stepper motor, all the components were either made by hand or are standard hardware store finds.

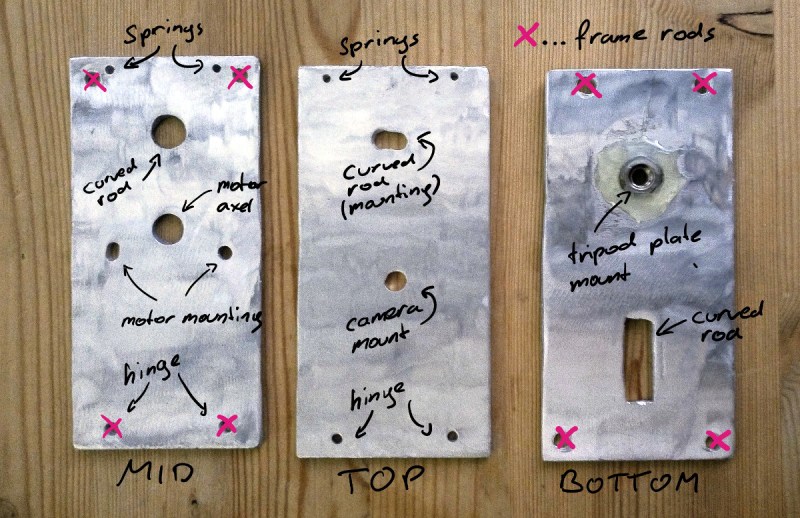
The build starts with three aluminum plates which [Gerald] cut by hand with an angle grinder. He then drilled all the necessary screw holes and a rectangular opening for the threaded rod to pass through. He even used epoxy to mount a nut to the bottom plate which would eventually attach it to the tripod.

The plates were then roughed up and spray painted black so they wouldn’t reflect light. The addition of a couple of screws, nuts, and a standard hinge.

Motion is provided by a 28BYJ-48 stepper which is connected to the drive nut by way of a belt. The spinning nut is used to raise and lower the threaded rod which opens and closes the “door”. To control the motor, [Gerald] is using an Arduino Nano coupled with a ULN2003 Darlington array which live on a routed PCB he made with his school’s Qbot MINImill. While some might say the Arduino is unnecessary for this project, it does make the final calibration of the device much easier.

We’ve covered a number of similar star trackers here on Hackaday, including one that you crank by hand. But the professional looking final result really makes this build stand out.