Arduino VGA, The Old Fashioned Way

Making a microcontroller speak to a VGA monitor has been a consistent project in our sphere for years, doing the job for which an IBM PC of yore required a plug-in ISA card. Couldn’t a microcontroller talk to a VGA card too? Of course it can, and [0xmarcin] is here to show how it can be done with an Arduino Mega.

The project builds on the work of another similar one which couldn’t be made to work, and the Trident card used couldn’t be driven in 8-bit ISA mode. The web of PC backwards compatibility saves the day though, because many 16-bit ISA cards also supported the original 8-bit slots from the earliest PCs. The Arduino is fast enough to support the ISA bus speed, but the card also needs the PC’s clock line to operate, and it only supports three modes:  80 x 25, 16 colour text, 320 x 200, 256 colour graphics, and 640 x 480, 16 colour graphics.

Looking at this project, it serves as a reminder of the march of technology. Perhaps fifteen years or more ago we’d have been able to lay our hands on any number of ISA cards to try it for ourselves, but now eight years after we called the end of the standard, we’d be hard placed to find one even at our hackerspace. Perhaps your best bet if you want one is a piece of over-the-top emulation.

The Most Inexpensive Apple Computer Possible

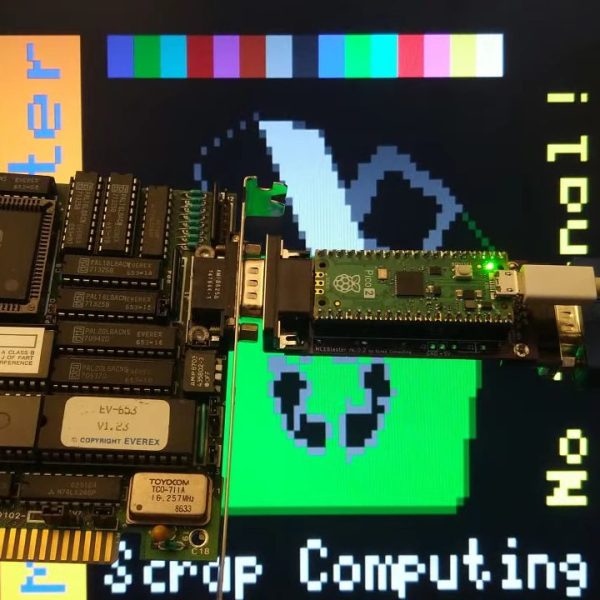
If Apple has a reputation for anything other than decent hardware and excellent industrial design, it’s for selling its products at extremely inflated prices. But there are some alternatives if you want the Apple experience on the cheap. Buying their hardware a few years out of date of course is one way to avoid the bulk of the depreciation, but at the extreme end is this working Mac clone that cost just $14.

This build relies on the fact that modern microcontrollers absolutely blow away the computing power available to the average consumer in the 1980s. To emulate the Macintosh 128K, this build uses nothing more powerful than a Raspberry Pi Pico. There’s a little bit more to it than that, though, since this build also replicates the feel of the screen of the era as well. Using a “hat” for the Pi Pico from [Ron’s Computer Videos] lets the Pico’s remaining system resources send the video signal from the emulated Mac out over VGA, meaning that monitors from the late 80s and on can be used with ease. There’s an option for micro SD card storage as well, allowing the retro Mac to have an incredible amount of storage compared to the original.

The emulation of the 80s-era Mac is available on a separate GitHub page for anyone wanting to take a look at that. A VGA monitor is not strictly required, but we do feel that displaying retro computer graphics on 4K OLEDs leaves a little something out of the experience of older machines like this, even if they are emulated. Although this Macintosh replica with a modern e-ink display does an excellent job of recreating the original monochrome displays of early Macs as well.

Continue reading “The Most Inexpensive Apple Computer Possible”

Doing 1080p Video, Sort Of, On The STM32 Microcontroller

When you think 1080p video, you probably don’t think STM32 microcontroller. And yet! [Gabriel Cséfalvay] has pulled off just that through the creative use of on-chip peripherals. Sort of.

The build is based around the STM32L4P5—far from the hottest chip in the world. Depending on the exact part you pick, it offers 512 KB or 1 Mbyte of flash memory, 320 KB of SRAM, and runs at 120 MHz. Not bad, but not stellar.

Still, [Gabriel] was able to push 1080p at a sort of half resolution. Basically, the chip is generating a 1080p widescreen RGB VGA signal. However, to get around the limited RAM of the chip, [Gabriel] had to implement a hack—basically, every pixel is RAM rendered as 2×2 pixels to make up the full-sized display. At this stage, true 1080p looks achievable, but it’ll be a further challenge to properly fit it into memory.

Output hardware is minimal. One pin puts out the HSYNC signal, another handles VSYNC. The same pixel data is clocked out over R, G, and B signals, making all the pixels either white or black. Clocking out the data is handled by a nifty combination of the onboard DMA functionality and the OCTOSPI hardware. This enables the chip to hit the necessary data rate to generate such a high-resolution display.

There’s more work to be done, but it’s neat to see [Gabriel] get even this far with such limited hardware. We’ve seen others theorize similar feats on chips like the RP2040 in the Pi Pico, too. Video after the break.

Continue reading “Doing 1080p Video, Sort Of, On The STM32 Microcontroller”

Dual-Port RAM For A Simple VGA Card

Making microcontrollers produce video has long been a staple of hardware hacking, but as the resolution goes up, it becomes a struggle for less capable silicon. To get higher resolution VGA from an Arduino, [Marcin Chwedczuk] has produced perhaps the most bulletproof solution, to create dual-port RAM with the help of a static RAM chip and a set of 74-series bus transceivers, and let a hardware VGA interface take care of the display. Yes, it’s not a microcontroller doing VGA, but standalone VGA for microcontrollers.

Dual-port memory is a special type of memory with two interfaces than can independently be used to access the contents. It’s not cheap when bought in integrated form, so seeing someone making a substitute with off-the-shelf parts is certainly worth a second look. The bus transceivers are in effect bus-width latches, and each one hangs on to the state while the RAM chip services each in turn. The video card part is relatively straightforward, a set of 74 chips which produce the timings and step through the addresses, and a shift register to push out simple black or white pixel data as a rudimentary video stream. We remember these types of circuits being used back in the days of home made video terminals, and here in 2024 they still work fine.

The display this thing produces isn’t the most impressive picture, but it is VGA, and it does work. We can see this circuit being of interest to plenty of other projects having less capable processing power, in fact we’d say the challenge should lie in how low you can go if all you need is the capacity to talk 74-series logic levels.

Interested in 74-series VGA cards? This isn’t the first we’ve seen.

Simon Says With An RP2040

The team of [Michael] and [Chimdi] from Cornell’s Designing with Microcontrollers (ECE 4760) Fall 2023 session designed a version of Simon Says on an RP2040 which they call Pico Says. It uses UDP packets over WiFi to communicate between the players, and supports VGA graphics for output. Each player’s hardware consists of a Pico W module plus a control panel containing the four LEDs and buttons ( red, green, yellow, and blue ) plus send and reset buttons.

For purposes of this lab, the modules were build on a solderless breadboard and used perfboard for the control panels. They weren’t entirely happy with their choice of UDP because they experienced frequent datagram dropouts in the noisy environment of the microcontroller lab. They also planned to implement sound effects, but ran out of time after spending too much time on the WiFi implementation, and had to drop that feature. In the end, however, they wrapped up their project and demonstrated a working game. We can only speculate whether this bonus lesson in resource management was intended by [Dr. Hunter Adams] or not.

Two ECE 4760 course references are highlighted in the write-up that helped them jump-start the project: the UDP and VGA examples for the Pico. These are good links to put in your RP2020 toolbox for future projects, in addition to the ECE 4760 course home page itself. We’ve covered several of these projects recently, as well as the curriculum switch from the Microchip PIC32MX-based Microstick II to the RP2040 last Spring.

Continue reading “Simon Says With An RP2040”

Gyro-Controlled Labyrinth Game Outputs To VGA

This gesture-controlled labyrinth game using two Raspberry Pi Pico units does a great job of demonstrating how it can sometimes take a lot of work to make something look simple.

To play, one tilts an MPU6050 inertial measurement unit (IMU) attached to one Pico to guide a square through a 2D maze, with the player working through multiple levels of difficulty. A second Pico takes care of displaying the game state on a VGA monitor, and together they work wirelessly to deliver a coherent experience with the right “feel”. This includes low latency, simulating friction appropriately, and more.

Taking a stream of raw sensor readings and turning them into control instructions over UDP in a way that feels intuitive while at the same time generating a VGA display signal has a lot of moving parts, software-wise. The project write-up has a considerable amount of detail on the architecture of the system, and the source code is available on GitHub for those who want a closer look.

We’ve seen gesture controls interfaced to physical marble mazes before, but two Raspberry Pi Picos doing it wirelessly with a VGA monitor for feedback is pretty neat. Watch it in action in the video, embedded just under the page break.

Continue reading “Gyro-Controlled Labyrinth Game Outputs To VGA”

Designing A Macintosh-to-VGA Adapter With An LM1881

Old-school Macintosh-to-VGA adapter. Just solve for X, set the right DIP switches and you’re golden.

If you’re the happy owner of a vintage Apple system like a 1989 Macintosh IIci you may know the pain of keeping working monitors around. Unless it’s a genuine Apple-approved CRT with the proprietary DA-15-based video connector, you are going to need at least an adapter studded with DIP switches to connect it to other monitors. Yet as [Steve] recently found out, the Macintosh’s rather selective use of video synchronization signals causes quite a headache when you try to hook up a range of VGA-equipped LCD monitors. A possible solution? Extracting the sync signal using a Texas Instruments LM1881 video sync separator chip.

Much of this trouble comes from the way that these old Apple systems output the analog video signal, which goes far beyond the physical differences of the DA-15 versus the standard DE-15 D-subminiature connectors. Whereas the VGA standard defines the RGB signals along with a VSYNC and HSYNC signal, the Apple version can generate HSYNC, VSYC, but also CSYNC (composite sync). Which sync signal is generated depends on what value the system reads on the three sense pins on the DA-15 connector, as a kind of crude monitor ID.

Theoretically this should be easy to adapt to, you might think, but the curveball Apple throws here is that for the monitor ID that outputs both VSYNC and HSYNC you are limited to a fixed resolution of 640 x 870, which is not the desired 640 x 480. The obvious solution is then to target the one monitor configuration with this output resolution, and extract the CSYNC (and sync-on-green) signal which it outputs, so that it can be fudged into a more VGA-like sync signal. Incidentally, it seems that [Steve]’s older Dell 2001FP LCD monitor does support sync-on-green and CSYNC, whereas newer LCD monitors no longer list this as a feature, which is why now more than a passive adapter is needed.

Although still a work-in-progress, so far [Steve] has managed to get an image on a number of these newer LCDs by using the LM1881 to extract CSYNC and obtain a VSYNC signal this way, while using the CSYNC as a sloppy HSYNC alternative. Other ICs also can generate an HSYNC signal from CSYNC, but those cost a bit more than the ~USD$3 LM1881.